
Digital Photo Professional Instruction Manual

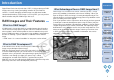


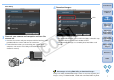

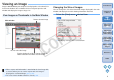
Table Of Contents
- Digital Photo Professional
- Introduction
- Basic Operation
- Advanced Operation
- Advanced Image Editing and Printing
- Adjusting While Comparing with the Original Image
- Adjusting by Comparing Multiple Images
- Displaying an Area Beyond the Set Range as a Warning Indicator (Highlight/Shadow Warning)
- Performing Advanced Editing
- Reducing Noise
- Correcting Lens Aberration
- Performing Automatic Dust Erasure Processing
- Manually Erasing Dust (Repair Function)
- Transferring a RAW Image to Photoshop
- Setting Work Color Space
- Printing with Shooting Information
- Printing a Thumbnail List (Contact Sheet Printing)
- Printing RAW Images on a High-End Canon Printer
- Specifying Preferences
- Useful Functions for Processing Large Numbers of RAW Images
- Editing JPEG and TIFF Images
- Reference
- Troubleshooting
- Deleting the Software (Uninstalling)
- List of Main Window Functions
- Image Frame Information in the Main Window and Edit Image Window
- List of Edit Window Functions
- List of Tool Palette Functions
- List of Quick Check Window Functions
- List of Edit Image Window Functions
- List of Convert/Save One Image Window Functions
- List of Trimming Window Functions
- List of Lens Aberration Correction Window Functions
- List of Copy Stamp Window Functions
- List of Convert/Save Multiple Images Window (Batch Processing) Functions
- List of Rename Window Functions
- Glossary
- Index

6
1
2
3
4
5
Introduction
Contents at
a Glance
Basic
Operation
Advanced
Operation
Advanced
Image Editing
and Printing
Editing JPEG
Images
Index
Processing
Large Numbers
of Images
Reference
Starting up DPP
Click the Dock icon.
¿ DPP starts up and the main window appears.
Click
Main window
Downloading an Image to Your Computer
Connect the camera and computer with the cable provided and
download the images saved on the memory card inside the camera.
For downloading images, start up the camera software “EOS Utility”
from DPP and use.
1
Select the save destination for the images.
O Select the save destination in the folder area on the left of the
main window.
O When creating a folder, refer to p.41.
2
Start up EOS Utility.
O Select the [Tools] menu [Start EOS Utility].
¿ EOS Utility starts up.