
User Manual

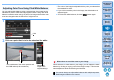
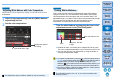
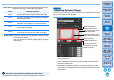
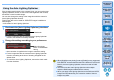

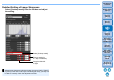
Table Of Contents
- Digital Photo Professional
- Introduction
- Downloading Images
- Viewing Images
- Organizing and Sorting Images
- Editing Images
- RAW Images
- Editing JPEG and TIFF Images
- Tool Palettes
- Editing with the Basic Adjustment Tool Palette
- Editing with the Tone Adjustment Tool Palette
- Editing with the Color Adjustment Tool Palette
- Editing with the Detailed Adjustment Tool Palette
- Editing with the Trimming/Angle Adjustment Tool Palette
- Editing with the Lens Correction Tool Palette
- Editing with the Partial Adjustment Tool Palette
- Editing with the Dust Delete/Copy Stamp Tool Palette
- Setting Work Color Space
- Using the Soft-Proof Colors Function
- Specifying the Size when Opening RAW Images
- Saving Editing Results
- Re-Editing an Image
- Utilizing Adjustment Contents (Recipe)
- Adjusting by Comparing Multiple Images
- Editing Efficiently
- Compositing Images
- Creating HDR (High Dynamic Range) Images
- Using the Dual Pixel RAW Optimizer
- Transferring a RAW Image to Photoshop
- Customizing the Main Window Toolbar
- Printing Images
- Processing Large Numbers of RAW Images
- Remote Shooting
- Playing Back Movies and Saving Still Photos
- Using HDR PQ Mode
- Specifying Preferences
- Reference

58
3
Sorting
Images
1
2
4
5
Introduction/
Contents
Downloading
Images
Viewing
Images
Printing
Images
Editing
Images
6
Processing
Large Numbers
of RAW Images
7
Remote
Shooting
9
HDR PQ
Mode
8
Playing Back
Movies and Saving
Still Photos
10
Specifying
Preferences
You can make the overall atmosphere of an image sharper or softer.
Adjustment can be made by selecting from two modes, [Sharpness] and
[Unsharp mask].
[Sharpness]: Controls the sharpness of an image by adjusting the
level of emphasis for the outline of the image. The
further to the right the [Sharpness] slider is moved (the
larger the setting value), the more the edges are
emphasized for a sharper image.
[Unsharp mask]: Adjusts the image’s sharpness more finely.
[Strength]: Shows the level of emphasis for the outline of the
image. The further to the right the slider is moved (the
larger the setting value), the more the image’s edges
are emphasized for a sharper image.
[Fineness]: Shows the fineness of the emphasized outline. The
further to the left the slider is moved (the smaller the
setting), the easier it becomes to emphasize fine
details.
[Threshold]: Sets “how much contrast difference there should be
compared to surroundings before emphasizing
edges”.
Adjusting Image Sharpness
[Unsharp mask] cannot be used with images other than RAW
images.
Select [Sharpness] from the list box and adjust the
setting.
Reverts the image to
the original settings
Drag the slider left or right
Enter a setting (in 0.1-
stop increments)
Select [Sharpness]
The adjustment range is 0 to 10.