
User's Manual


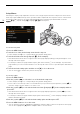

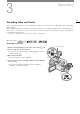

Table Of Contents
- Highlights of the XF405 / XF400
- Table of Contents
- Introduction
- Preparations
- Recording
- Recording Video and Photos
- Video Configuration: Resolution, Bit Rate and Frame Rate
- Dual Recording and Relay Recording
- Slow & Fast Motion Recording
- Adjusting the Focus
- Zooming
- Image Stabilization
- Automatic Gain Control (AGC) Limit
- Shooting Modes
- Adjusting the Exposure
- ND Filter
- White Balance
- Using Looks
- Setting the Time Code
- Setting the User Bit
- Recording Audio
- Using Headphones
- Color Bars/Audio Reference Signal
- Pre-Recording
- Infrared Recording
- Using the Optional RC-V100 Remote Controller
- Using the Optional GP-E2 GPS Receiver
- Customization
- Playback
- External Connections
- Network Functions
- Additional Information

3
39
Recording
Recording Video and Photos
This section explains the basics of recording clips* and photos. For details on recording audio, refer to Recording
Audio (A 82).
Before making important recordings for the first time, make test recordings using the video configuration(s) you
plan to use to check that the camcorder operates correctly. Should the camcorder fail to operate correctly, refer
to Troubleshooting (A 156).
* "Clip" refers to a single movie unit recorded with a single recording operation.
Preparing to Record
1 Attach a charged battery pack to the camcorder (A 19).
2Insert a card into an SD card slot.
• To use relay recording or dual recording (A 50), insert SD
cards into both slots.
3 Open the lens barrier.
• Set the lens barrier switch to OPEN.
4 If you need to use the viewfinder, pull it out and adjust it,
as necessary.
• You can use the dioptric adjustment lever and tilt the
viewfinder 45 degrees upward.
Operating modes:
햴
햵
Lens barrier switch