
User's Manual


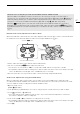

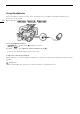
Table Of Contents
- Highlights of the XF405 / XF400
- Table of Contents
- Introduction
- Preparations
- Recording
- Recording Video and Photos
- Video Configuration: Resolution, Bit Rate and Frame Rate
- Dual Recording and Relay Recording
- Slow & Fast Motion Recording
- Adjusting the Focus
- Zooming
- Image Stabilization
- Automatic Gain Control (AGC) Limit
- Shooting Modes
- Adjusting the Exposure
- ND Filter
- White Balance
- Using Looks
- Setting the Time Code
- Setting the User Bit
- Recording Audio
- Using Headphones
- Color Bars/Audio Reference Signal
- Pre-Recording
- Infrared Recording
- Using the Optional RC-V100 Remote Controller
- Using the Optional GP-E2 GPS Receiver
- Customization
- Playback
- External Connections
- Network Functions
- Additional Information

87
Recording Audio
Manual Audio Level Adjustment for CH1 or CH2
When the handle unit is attached to the camcorder, adjust the audio level using the controls on the handle unit. If
the handle unit is not attached, adjust the audio levels using the FUNC menu (A 87).
1 Set the audio level switch of the desired channel to M (manual).
2 Turn the corresponding – dial to adjust the audio level.
• For reference, 0 corresponds to –G, 5 corresponds to 0 dB, and 10 corresponds to +18 dB.
• As a guideline, adjust the audio recording level so that the audio level meter on the screen will go to the right
of the –18 dB mark (one mark right of the –20 dB mark) only occasionally.
3 Close the protective cover to prevent the audio controls from being changed inadvertently.
Audio Level Adjustment Using the FUNC Menu
When recording clips with 4-channel audio, use the audio screen in the FUNC menu to adjust the audio
recording levels for CH3 and CH4. If the handle unit is not attached to the camcorder, you must use the audio
screen to adjust the audio recording levels for CH1 and CH2 as well.
1 Open the audio screen.
[FUNC] > [C Audio]
2 Touch [CH1/CH2] or [CH3/CH4] as necessary, to change the pair of audio channels you wish to adjust.
3 Touch [ Automatic] or [ö Manual].
• If you selected automatic adjustment, skip to step 5. If you selected manual adjustment, continue the
procedure to adjust the audio recording level.
4 Touch and hold [Ï] or [Ð] to adjust the recording level as necessary.
• As a guideline, adjust the audio recording level so that the audio level meter on the screen will go to the right
of the –18 dB mark (one mark right of the –20 dB mark) only occasionally.
5Touch [X].
Automatic Level Control (ALC) for audio from the INPUT terminals and MIC terminal
When the INPUT 1 and INPUT 2 switches are both set to the same type of audio source (line input or
microphone), you can link the audio level adjustment for both inputs with the [C Audio Setup] > [INPUT 1/2
ALC Link] setting. Similarly, you can link the audio level adjustment for the L and R channels of an external
microphone connected to the MIC terminal with the [C Audio Setup] > [MIC ALC Link] setting.
When the [ Linked] option is selected, if the audio inputs from the INPUT terminals are selected for
CH1/CH2, you can adjust both audio channels with the CH1 audio level switch and CH1 – dial (A 87).
If the INPUT terminals are selected for CH3/CH4, you can adjust both audio channels using the FUNC menu
(A 87).
CH1/CH2 audio level switches
CH1/CH2 – dials