
Owner's Manual

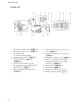
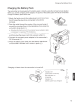

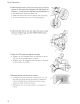
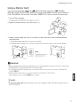
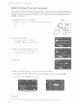
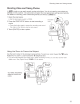
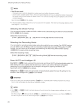
Table Of Contents
- Instruction Manual
- Table of Contents
- Supplied Accessories
- Parts & Controls
- Introduction
- Preparations
- Recording
- Recording Movies and Photos
- Selecting the Recording Mode (Video Quality)
- Dual Recording and Relay Recording
- Selecting the Frame Rate
- Slow & Fast Motion Recording
- CINEMA Mode and Cinema-Look Filters
- Focus Adjustment
- Zooming
- Advanced Image Stabilization
- Automatic Gain Control (AGC) Limit
- Automatic Exposure Recording Programs
- Exposure Adjustment
- White Balance
- Special Scene Recording Programs
- Looks and Other Image Effects
- Setting the Time Code
- Setting the User Bit
- Recording Audio
- Audio Settings and Recorded Audio Channels
- Connecting an External Microphone or External Audio Input Source to the Camcorder
- Using Line Input or an External Microphone Connected to an INPUT Terminal
- Recording Audio to Channel 2 (CH2)
- Audio Recording Level (INPUT Terminals)
- Adjusting the Microphone’s Sensitivity (INPUT terminals)
- Activating the Microphone’s Attenuator (INPUT terminals)
- Using the Built-in Microphone or an External Microphone Connected to the MIC Terminal
- Switching the Input (MIC Terminal)
- Audio Scenes
- Audio Recording Level (Built-in Microphone/MIC Terminal)
- Microphone Directionality (Built-in Microphone)
- Audio Equalizer (Built-in Microphone)
- Wind Screen (Built-in Microphone)
- Microphone Attenuator (Built-in Microphone)
- Low Cut Filter (MIC Terminal)
- Microphone Attenuator (MIC Terminal)
- Using Headphones
- Color Bars/Audio Reference Signal
- Video Snapshot
- Pre-Recording
- Onscreen Displays and Data Code
- Infrared Recording
- Using the GP-E2 GPS Receiver
- Customization
- Playback
- External Connections
- Photos
- Saving/Sharing Recordings
- Additional Information
- Troubleshooting
- Specs
- Index
- Quick Guide
- Table of Contents
- Supplied Accessories
- Parts & Controls
- Charging the Battery Pack
- Basic Preparations
- Using a Memory Card
- Setting the Date / Time and Language
- Shooting Video and Taking Photos
- Playing Back Movies and Viewing Photos
- Playback on a TV Screen
- Saving Your Recordings
- Onscreen Icons and Displays
- Specs
- Additional Information
- Warranty

Basic Preparations
16
2 Place the lens hood on the front of the lens so that the
groove on the lens hood is aligned with the bottom
of
the lens
(
G)
),
and then turn the lens hood clockwise
(@
).
•
Be careful not to deform the lens hood.
•
Make sure that the lens hood
is
aligned with the thread.
•
To
remove the lens hood, turn
it
counterclockwise.
3 Adjust the grip belt so you can reach the zoom rocker
with your index finger, and the
START/STOP
button
with your thumb.
4
Open the LCD panel and adjust the angle.
•
Rotate
it
up to
90
degrees down (for example, to record
with your hand extended above a crowd).
•
Rotate
it
up to
180
degrees toward the lens (for example,
to record video of
yoursel~.
5 Become familiar with the touch screen.
•
In
addition to touching buttons to select items, you can
also drag your finger across the screen for operations
such
as
scrolling menus. While touching the screen,
swipe your finger across the screen.
•
Alternatively, you can use the joystick to navigate the
menus.