
Owner's Manual

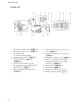
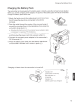

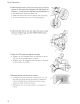
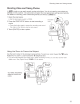
Table Of Contents
- Instruction Manual
- Table of Contents
- Supplied Accessories
- Parts & Controls
- Introduction
- Preparations
- Recording
- Recording Movies and Photos
- Selecting the Recording Mode (Video Quality)
- Dual Recording and Relay Recording
- Selecting the Frame Rate
- Slow & Fast Motion Recording
- CINEMA Mode and Cinema-Look Filters
- Focus Adjustment
- Zooming
- Advanced Image Stabilization
- Automatic Gain Control (AGC) Limit
- Automatic Exposure Recording Programs
- Exposure Adjustment
- White Balance
- Special Scene Recording Programs
- Looks and Other Image Effects
- Setting the Time Code
- Setting the User Bit
- Recording Audio
- Audio Settings and Recorded Audio Channels
- Connecting an External Microphone or External Audio Input Source to the Camcorder
- Using Line Input or an External Microphone Connected to an INPUT Terminal
- Recording Audio to Channel 2 (CH2)
- Audio Recording Level (INPUT Terminals)
- Adjusting the Microphone’s Sensitivity (INPUT terminals)
- Activating the Microphone’s Attenuator (INPUT terminals)
- Using the Built-in Microphone or an External Microphone Connected to the MIC Terminal
- Switching the Input (MIC Terminal)
- Audio Scenes
- Audio Recording Level (Built-in Microphone/MIC Terminal)
- Microphone Directionality (Built-in Microphone)
- Audio Equalizer (Built-in Microphone)
- Wind Screen (Built-in Microphone)
- Microphone Attenuator (Built-in Microphone)
- Low Cut Filter (MIC Terminal)
- Microphone Attenuator (MIC Terminal)
- Using Headphones
- Color Bars/Audio Reference Signal
- Video Snapshot
- Pre-Recording
- Onscreen Displays and Data Code
- Infrared Recording
- Using the GP-E2 GPS Receiver
- Customization
- Playback
- External Connections
- Photos
- Saving/Sharing Recordings
- Additional Information
- Troubleshooting
- Specs
- Index
- Quick Guide
- Table of Contents
- Supplied Accessories
- Parts & Controls
- Charging the Battery Pack
- Basic Preparations
- Using a Memory Card
- Setting the Date / Time and Language
- Shooting Video and Taking Photos
- Playing Back Movies and Viewing Photos
- Playback on a TV Screen
- Saving Your Recordings
- Onscreen Icons and Displays
- Specs
- Additional Information
- Warranty

Shooting Video and Taking Photos
Shooting
Video
and
Taking
Photos
In
IAUTOI
mode you can
easily
record movies and photos. You do not need to worry about any
settings or menu
options-
the camcorder
will select
the most appropriate settings
automatically.
For
details
on recording, refer
to
Recording Movies and Photos
(~PDF)
35).
1
Open
the
lens
barrier.
•
Set the
lens
barrier switch to OPEN.
2 Press the
START
/STOP
button to start recording a
movie.
• Press the button again to pause the recording and record
the video on the memory card as one scene.
3 Touch
[PHOTO]
to take a photo.
Using
the
Zoom
to
Frame
the
Subject
Lens
barrier
switch
[PHOTO]
START/
STOP
Use the zoom rocker or the onscreen zoom controls. To zoom out, zoom toward the
W
(wide
angle) end. To zoom
in,
zoom toward the
T
(telephoto) end.
•
The camcorder features
20x optical
zoom. When recording movies, you can
also
use the
400x
digital
zoom. See
[D![J!Ial
Zoom}
(~PDF)
119) for
details.
Touch
[FUNC.]
•)
[ZOOM]
to
display
the
onscreen
zoom
controls
19