
Owner's Manual
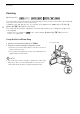

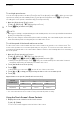


Table Of Contents
- Instruction Manual
- Table of Contents
- Supplied Accessories
- Parts & Controls
- Introduction
- Preparations
- Recording
- Recording Movies and Photos
- Selecting the Recording Mode (Video Quality)
- Dual Recording and Relay Recording
- Selecting the Frame Rate
- Slow & Fast Motion Recording
- CINEMA Mode and Cinema-Look Filters
- Focus Adjustment
- Zooming
- Advanced Image Stabilization
- Automatic Gain Control (AGC) Limit
- Automatic Exposure Recording Programs
- Exposure Adjustment
- White Balance
- Special Scene Recording Programs
- Looks and Other Image Effects
- Setting the Time Code
- Setting the User Bit
- Recording Audio
- Audio Settings and Recorded Audio Channels
- Connecting an External Microphone or External Audio Input Source to the Camcorder
- Using Line Input or an External Microphone Connected to an INPUT Terminal
- Recording Audio to Channel 2 (CH2)
- Audio Recording Level (INPUT Terminals)
- Adjusting the Microphone’s Sensitivity (INPUT terminals)
- Activating the Microphone’s Attenuator (INPUT terminals)
- Using the Built-in Microphone or an External Microphone Connected to the MIC Terminal
- Switching the Input (MIC Terminal)
- Audio Scenes
- Audio Recording Level (Built-in Microphone/MIC Terminal)
- Microphone Directionality (Built-in Microphone)
- Audio Equalizer (Built-in Microphone)
- Wind Screen (Built-in Microphone)
- Microphone Attenuator (Built-in Microphone)
- Low Cut Filter (MIC Terminal)
- Microphone Attenuator (MIC Terminal)
- Using Headphones
- Color Bars/Audio Reference Signal
- Video Snapshot
- Pre-Recording
- Onscreen Displays and Data Code
- Infrared Recording
- Using the GP-E2 GPS Receiver
- Customization
- Playback
- External Connections
- Photos
- Saving/Sharing Recordings
- Additional Information
- Troubleshooting
- Specs
- Index
- Quick Guide
- Table of Contents
- Supplied Accessories
- Parts & Controls
- Charging the Battery Pack
- Basic Preparations
- Using a Memory Card
- Setting the Date / Time and Language
- Shooting Video and Taking Photos
- Playing Back Movies and Viewing Photos
- Playback on a TV Screen
- Saving Your Recordings
- Onscreen Icons and Displays
- Specs
- Additional Information
- Warranty

Advanced Image Stabilization
56
Advanced Image Stabilization
The image stabilizer reduces camcorder blur (blur due to the camcorder moving) so you can get nice,
stable shots. Select the image stabilization mode according to the shooting conditions.
1 Open the [Image Stabilizer] screen.
[FUNC.] > [Image Stabilizer]
2 Touch the desired IS mode and then touch [X].
Options
(
Default value)
NOTES
• If the degree of camcorder shake is too high, the image stabilizer may not be able to fully
compensate.
• For surveying and following shots, when you pan the camcorder from side to side or tilt it up and
down, we recommend setting [Image Stabilizer] to [Ä Dynamic] or [Å Standard].
• The angle of view will change when [Image Stabilizer] is set to [Ä Dynamic].
Operating modes:
[Ä Dynamic]
Compensates for a higher degree of camcorder shake, such as when shooting
while walking, and is more effective as the zoom approaches full wide angle.
[Å Standard] Compensates for a lower degree of camcorder shake, such as when shooting while
remaining stationary, and is suitable for shooting natural-looking scenes.
[Ì Off] Use this setting when the camcorder is mounted on a tripod.
Powered IS
After setting an assignable button to [È Powered IS], you can use Powered IS to make the
image stabilization even more powerful. Powered IS is most effective when you are stationary and
zooming in on far subjects using high zoom ratios (the more you approach the telephoto end).
Holding the LCD panel with your left hand will add to the stability of the shot.
1 Set an assignable button to [È Powered IS] (A 91).
2 Press and hold the assignable button as long as you want to activate Powered IS.
• È appears in yellow while Powered IS is activated.
• You can change the operation of the assignable button set to [È Powered IS] (long press
or toggle on/off) with the [FUNC.] > [MENU] > q > [Powered IS Button] setting.
• Powered IS is available even when [Image Stabilizer] is set to [Ì Off].
Operating modes: