Getting Started Démarrage Inbetriebnahme Aan de Slag-gids Guida Rapida Para Começar Guía de inicio Ξεκινώντας Uppstartsguide Komme i gang Før du begynder Aloitusopas Read Safety and Important Information (addendum) first. Lire Sécurité et informations importantes (addendum) en premier. Lesen Sie Sicherheitsinformationen und wichtige Hinweise (Anhang) zuerst. Lees eerst Veiligheidsinformatie en belangrijke informatie (addendum).
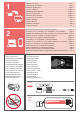
1 2 How to Hold Printer Manipulation de l'imprimante Halten des Druckers De printer vasthouden Come sospendere la stampante Como segurar a impressora Cómo sujetar la impresora Πώς να κρατάτε τον εκτυπωτή Hur du håller skrivaren Hvordan holde skriveren Sådan holder du printeren Tulostimen pitäminen Installing the Printer.................................................................................. page 1 Installation de l'imprimante.......................................................................
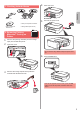
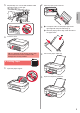
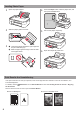
□ Power cord □ FINE cartridge 4 Close the cover. 5 Connect the power cord. ENGLISH 1. Checking Included Items □ Safety and Important Information □ Setup CD-ROM for Windows PC □ Getting Started (this manual) 2. Removing Packing Materials / Turning on Printer 1 2 Remove the packing materials (such as orange tape) from outside the printer. Open the cover. Do not connect any cables except the power cord yet. 6 3 Press the ON button.
3. Installing FINE Cartridge 1 Open the cover. 2 a T ake out the Color FINE cartridge from the package. b Remove the protective tape. 3 a Do not bump it against the surrounding parts. 4 b Do not touch. Be careful of ink on the protective tape. 2 Tilt the Color FINE cartridge a little and insert it into the FINE cartridge holder on the left. Push the FINE Cartridge in and up firmly until it snaps into place.
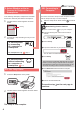
Repeat steps 2 to 4 and install the Black FINE cartridge as well, on the right. 2 Slide the paper guide to the left. 3 a L oad plain LTR or A4 size paper against the right edge with the print side facing up. b Slide the paper guide to align it with the side of the paper stack. ENGLISH 5 6 a Close the cover. b If E > 0 > 4 appears on the screen, return to step 3 and confirm that the Color and Black FINE cartridges are correctly installed. 4 Pull out the paper output tray.
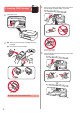
5. Select Whether or Not to Connect to Computer or Smartphone In the following description, smartphones and tablet devices are collectively described as smartphone. 1 Confirm that the screen appears as shown below. Windows 6-B. Connecting to Computer Mac OS You need a connection setup for each computer. Proceed with the setup from step 1 for each computer. 1 Start the setup file for either method . or method Downloading from the Internet Flashing a Open a web browser ( etc.) on your computer.
Using Setup CD-ROM (Windows Only) ENGLISH a Load the Setup CD-ROM in your computer. ■■ When using Windows 10 or Windows 8.1: b When the following message appears on the right side of your computer screen, click it. c If the following screen appears, click Run Msetup4.exe. When This Message Does Not Appear (or Has Disappeared) 1. Click File Explorer on the taskbar. or 2. Click This PC on the left side of the opened window. 3. Double-click the CD-ROM icon on the right side of the window.
iOS 6-C. Connecting to Smartphone Android You need a connection setup for each smartphone. Proceed with the setup from step 1 for each smartphone. Preparation • Turn on Wi-Fi on your smartphone. • If you have a wireless router, connect your smartphone to the wireless router you want to connect to the printer. * For operations, refer to manuals of your smartphone and the wireless router or contact those manufacturers. 1 Install the application software Canon PRINT Inkjet/SELPHY in your smartphone.
a Tap Settings on your smartphone's home screen, and tap Canon_ij_XXXX in the Wi-Fi settings. a Tap the installed application software. ENGLISH Procedures below vary depending on iOS or Android. Select your operating system and proceed to its procedure. b Follow the on-screen instructions to register the printer. If Canon_ij_XXXX does not appear on the list, see "Preparation for Printer" below to operate the printer, and then repeat step a. b Tap the installed application software.
Loading Photo Paper 1 Open the paper support. 4 Press the Paper button, select a paper size, and then press the OK button. 2 Slide the paper guide to the left. 5 Pull out the paper output tray. 3 a L oad photo paper against the right edge with the print side facing up. b Slide the paper guide to align it with the side of the paper stack. 6 Open the output tray extension.
1. Vérification des éléments fournis □ Cordon d'alimentation □ Cartouche FINE 4 Refermez le capot. 5 Branchez le cordon d'alimentation. □ Sécurité et informations importantes □ Démarrage (ce manuel) FRANÇAIS □ CD-ROM d'installation pour Windows PC 2. Retrait des matériaux d'emballage / Mise sous tension de l'imprimante 1 2 Retirez les matériaux d'emballage (telsque la bande orange) de l'imprimante. Ouvrez le capot.
3 3. Installation de la cartouche FINE 1 Ouvrez le capot. 2 a S ortez la cartouche FINE couleur de la boîte. b Retirez la bande protectrice. Inclinez légèrement la cartouche FINE et insérezla dans le porte-cartouche FINE sur la gauche. a Ne cognez pas la cartouche contre les bords. 4 b Ne pas toucher. Faites attention à l'encre se trouvant sur le ruban protecteur. 2 Poussez fermement la cartouche FINE vers le bas puis vers le haut jusqu'à entendre un déclic.
6 Répétez les étapes 2 à 4 et installez la cartouche FINE noire également, sur la droite. 2 Faites glisser le guide papier vers la gauche. 3 a C hargez du papier ordinaire au format LTR ou A4 le long du bord droit face à imprimer vers le haut. b Faites glisser le guide papier de manière à l'aligner avec le côté de la pile de papier. FRANÇAIS 5 a Refermez le capot.
5. Connexion ou non à un ordinateur ou à un smartphone Dans la description suivante, les smartphones et les tablettes sont regroupés sous le terme smartphone. 1 Confirmez que l'écran s'affiche comme ci-dessous. Clignotant 6-B. Connexion à un ordinateur 2 Pour utiliser l'imprimante en la connectant à un ordinateur ou à un smartphone Pour smartphones uniquement page 6 Pour utiliser l'imprimante sans la connecter à un ordinateur ou à un smartphone 6-A 6-A.
Utilisation du CD-ROM d'installation (Windows uniquement) a Chargez le CD-ROM d'installation dans votre ordinateur. b Lorsque le message suivant apparaît sur la droite de l'écran de l'ordinateur, cliquez dessus. Lorsque ce message n'apparaît pas (ou n'est plus affiché) 1. Cliquez sur Explorateur de fichiers dans la barre des tâches. c Si l'écran suivant s'affiche, cliquez sur Exécuter Msetup4.exe. d Si la boîte de dialogue Contrôle de compte d'utilisateur apparaît, cliquez sur Oui.
iOS 6-C. Connexion à un smartphone Android Vous devez configurer une connexion pour chaque smartphone. Poursuivez la configuration à partir de l'étape 1 pour chaque smartphone. Préparation • Activez Wi-Fi sur votre smartphone. • Si vous avez un routeur sans fil, connectez votre smartphone au routeur sans fil que vous voulez connecter à l'imprimante. * Pour le fonctionnement, reportez-vous aux manuels de votre smartphone et du routeur sans fil ou prenez contact avec les fabricants.
Les procédures ci-dessous varient selon que vous utilisez iOS ou Android. Sélectionnez votre système d'exploitation et poursuivez avec la procédure s'y rapportant. a Touchez Réglages sur l'écran d'accueil du smartphone, puis touchez Canon_ij_XXXX dans les réglages Wi-Fi. a Touchez le logiciel d'application installé. Si Canon_ij_XXXX n'apparaît pas dans la liste, reportez-vous à la section « Préparation de l'imprimante » ci-dessous pour faire fonctionner l'imprimante, puis répétez l'étape a.
Chargement de papier photo 1 Ouvrez le support papier. 2 Faites glisser le guide papier vers la gauche. 3 a C hargez du papier photo le long du bord droit face à imprimer vers le haut. b Faites glisser le guide papier de manière à l'aligner avec le côté de la pile de papier. 4 Appuyez sur le bouton Papier (Paper), sélectionnez le format de papier, puis appuyez sur le bouton OK. 5 Retirez le bac de sortie papier. 6 Ouvrez l'extension du bac de sortie papier.
1. Überprüfen des Lieferumfangs □ Netzkabel □ FINE-Patrone 4 Schließen Sie die Abdeckung. 5 Schließen Sie das Netzkabel an. □ Sicherheitsinformationen und wichtige Hinweise □ Installations-CD-ROM für Windows-PCs □ Inbetriebnahme (dieses Handbuch) 2. Entfernen des Verpackungsmaterials/ Anschalten des Druckers 2 Entfernen Sie das Verpackungsmaterial (z. B. orangefarbenes Klebeband) außen am Drucker. DEUTSCH 1 Öffnen Sie die Abdeckung. Schließen Sie außer dem Netzkabel noch keine Kabel an.
3 3. Installation der FINEPatrone 1 Öffnen Sie die Abdeckung. 2 a N ehmen Sie die farbige FINE-Patrone aus der Verpackung. b Entfernen Sie das Schutzband. Kippen Sie die farbige FINE-Patrone leicht und setzen Sie sie in die FINE-Patronen-Halterung auf der linken Seite ein. a Stoßen Sie mit der Patrone nicht gegen die umgebenden Teile. 4 b Nicht berühren. Achten Sie auf Tintenspuren auf dem Schutzband. 2 Drücken Sie die FINE-Patrone ein und fest nach oben, bis sie einrastet.
6 Wiederholen Sie die Schritte 2 bis 4 und setzen Sie auch die schwarze FINE-Patrone auf der rechten Seite ein. 2 Schieben Sie die Papierführung nach links. 3 a L egen Sie mehrere Blätter Normalpapier des Formats LTR oder A4 an der rechten Kante mit der bedruckbaren Seite nach oben ein. b Verschieben Sie die Papierführung, um sie an der Seite des Papierstapels auszurichten. a Schließen Sie die Abdeckung.
5. A uswählen, ob eine Verbindung zu einem Computer oder Smartphone hergestellt werden soll In der folgenden Beschreibung werden Smartphones und Tablet-Geräte gesamthaft als Smartphones bezeichnet. 1 Bestätigen Sie, dass der Bildschirm wie unten dargestellt angezeigt wird. Blinken Windows 6-B. H erstellen einer Verbindung mit einem Computer Für jeden Computer muss eine Verbindung eingerichtet werden. Fahren Sie mit der Einrichtung für jeden Computer ab Schritt 1 fort.
Verwenden der Installations-CD-ROM (nur Windows) a Legen Sie die Installations-CD-ROM in Ihren Computer ein. ■■ Bei Verwendung von Windows 10 oder Windows 8.1: b Wenn die folgende Nachricht rechts auf Ihrem Computerbildschirm angezeigt wird, klicken Sie darauf. Wenn diese Meldung nicht (oder nicht mehr) angezeigt wird 1. Klicken Sie auf der Taskleiste auf Datei-Explorer (File Explorer). 2. Klicken Sie links im geöffneten Fenster auf Dieser PC (This PC). 3.
6-C. Herstellen einer Verbindung mit einem Smartphone iOS Android Für jedes Smartphone muss eine Verbindung eingerichtet werden. Fahren Sie mit der Einrichtung für jedes Smartphone ab Schritt 1 fort. Vorbereitung • Aktivieren Sie auf Ihrem Smartphone Wi-Fi. • Wenn Sie einen Wireless Router besitzen, stellen Sie eine Verbindung zwischen Ihrem Smartphone und dem Wireless Router her, den Sie mit dem Drucker verbinden möchten.
Die unten aufgeführten Verfahren unterscheiden sich auf iOS und Android. Wählen Sie Ihr Betriebssystem aus und fahren Sie bei den entsprechenden Verfahren fort. a Tippen Sie auf dem Startbildschirm Ihres Smartphones auf Einstellungen (Settings) und anschließend in den Wi-Fi-Einstellungen auf Canon_ij_XXXX. a Tippen Sie auf die installierte Anwendungssoftware. b Befolgen Sie die Anweisungen auf dem Bildschirm, um den Drucker zu registrieren. b Tippen Sie auf die installierte Anwendungssoftware.
Einlegen von Fotopapier 1 Öffnen Sie die Papierstütze. 2 Schieben Sie die Papierführung nach links. 3 a L egen Sie Fotopapier an der rechten Kante mit der bedruckbaren Seite nach oben ein. b Verschieben Sie die Papierführung, um sie an der Seite des Papierstapels auszurichten. 4 Drücken Sie die Taste Papier (Paper), wählen Sie ein Papierformat und drücken Sie anschließend die Taste OK. 5 Ziehen Sie das Papierausgabefach heraus. 6 Öffnen Sie die Verlängerung des Ausgabefachs.
1. Meegeleverde artikelen controleren □ Netsnoer □ FINE-cartridge 4 Sluit de klep. 5 Sluit het netsnoer aan. □ Veiligheidsinformatie en belangrijke informatie □ Installatie-cd-rom voor Windows-pc □ Aan de Slag-gids (deze handleiding) 2. Verpakkingsmateriaal verwijderen/ de printer inschakelen 2 Verwijder het verpakkingsmateriaal (zoals oranje tape) van de buitenkant van de printer. Open de klep. Sluit nog geen kabels aan, behalve het netsnoer. 6 3 Druk op de knop AAN (ON).
3 3. De FINE-cartridge plaatsen 1 Open de klep. 2 a H aal de FINE-cartridge (kleur) uit de verpakking. b Verwijder de beschermende tape. Til de FINE-cartridge (kleur) een beetje omhoog en plaats deze in de FINE-cartridgehouder aan de linkerkant. a Stoot deze niet tegen de omringende onderdelen. 4 b Niet aanraken. Wees voorzichtig met de inkt op de beschermtape. 2 Duw de FINE-cartridge stevig omhoog en naar binnen totdat deze op zijn plaats klikt.
6 Herhaal 2 tot en met 4 en plaats ook de FINEcartridge (zwart) aan de rechterkant. 2 Schuif de papiergeleider naar links. 3 a P laats normaal papier van LTR- of A4-formaat tegen de rechterrand met de afdrukzijde omhoog. b Verschuif de papiergeleider en lijn deze uit met de zijkant van de papierstapel. a Sluit de klep. b Als E > 0 > 4 op het scherm verschijnt, gaat u terug naar stap 3 en bevestigt u dat de FINE-cartridges (kleur en zwart) correct zijn geplaatst.
6-B. Verbinden met een computer 5. Wel of niet verbinden met computer of smartphone selecteren In de volgende omschrijving worden smartphones en tablets gezamenlijk aangeduid met de term smartphone. 1 Bevestig dat het volgende scherm wordt weergegeven (zie hieronder). U moet een verbinding configureren voor elke computer. Ga verder met de installatie vanaf stap 1 voor elke computer. 1 Start het installatiebestand voor een van beide of voor de methode .
De installatie-cd-rom (alleen Windows) gebruiken a Plaats de installatie-cd-rom in de computer. ■■ Wanneer u Windows 10 of Windows 8.1 gebruikt: c Klik op Msetup4.exe uitvoeren (Run Msetup4.exe) als het volgende scherm wordt weergegeven. Wanneer dit bericht niet wordt weergegeven (of wanneer het is verdwenen) 1. Klik op Verkenner (File Explorer) op de taakbalk. of 2. Klik op Deze pc (This PC) aan de linkerkant van het geopende venster. 3.
iOS 6-C. Verbinden met een smartphone Android U moet een verbinding instellen voor elke smartphone. Ga verder met de installatie vanaf stap 1 voor elke smartphone. Voorbereiding • Schakel Wi-Fi in op uw smartphone. • Als u een draadloze router hebt, sluit u uw smartphone aan op de draadloze router die u met de printer wilt verbinden. * Raadpleeg voor de stappen de handleiding van uw smartphone en de draadloze router of neem contact op met de desbetreffende fabrikant.
De onderstaande procedures zijn van toepassing op iOS of Android. Selecteer uw besturingssysteem en ga verder naar de desbetreffende procedure. a Tik op Instellingen (Settings) op het beginscherm van uw smartphone en tik op Canon_ij_XXXX bij de instellingen voor Wi-Fi. a Tik op de geïnstalleerde toepassing. b Volg de instructies op het scherm om de printer te registreren. b Tik op de geïnstalleerde toepassing. c Volg de instructies op het scherm om de printer te registreren.
Fotopapier plaatsen 1 Open de papiersteun. 4 Druk op de knop Papier (Paper), selecteer een papierformaat en druk op de knop OK. 2 Schuif de papiergeleider naar links. 5 Trek de papieruitvoerlade uit. 3 a P laats fotopapier tegen de rechterrand met de afdrukzijde omhoog. b Verschuif de papiergeleider en lijn deze uit met de zijkant van de papierstapel. 6 Open het verlengstuk van de uitvoerlade.
1. Verifica degli elementi inclusi □ Cavo di alimentazione □ Cartuccia FINE 4 Chiudere il coperchio. 5 Collegare il cavo di alimentazione. □ Informazioni importanti e sulla sicurezza □ CD-ROM di installazione per Windows PC □ Guida Rapida (questo manuale) 2. Rimozione del materiale di imballaggio / Accensione della stampante 1 2 Rimuovere il materiale di imballaggio (ad es. il nastro arancione) dall'esterno della stampante. Aprire il coperchio.
3 3. Installazione della cartuccia FINE 1 Aprire il coperchio. 2 a E strarre la cartuccia FINE Colore dalla scatola. b Rimuovere il nastro di protezione. Inclinare leggermente la cartuccia FINE Colore e inserirla nel supporto cartuccia FINE sulla sinistra. a Non farlo urtare contro le parti circostanti. 4 b Non toccare. Prestare attenzione all'inchiostro sul nastro protettivo. 2 Inserire la cartuccia FINE e spingerla fermamente finché non scatta in posizione.
5 6 Ripetere i punti da 2 a 4 e installare la cartuccia FINE Nero sulla destra. 2 Far scorrere la guida della carta verso sinistra. 3 a C aricare carta normale in formato LTR o A4 contro il margine destro con il lato di stampa rivolto verso l'alto. b Far scorrere la guida della carta per allinearla con il lato della pila di carta. a Chiudere il coperchio. b Se E > 0 > 4 viene visualizzato sullo schermo, tornare al punto 3 e confermare che le cartucce FINE sono installate correttamente.
5. S elezionare se stabilire o meno una connessione a un computer o uno smartphone Nella seguente descrizione, i dispositivi smartphone e tablet sono indicati collettivamente come smartphone. 1 Confermare che la schermata viene visualizzata come illustrato di seguito. Lampeggiante 6-B. Connessione a computer Windows Mac OS È necessario impostare una connessione per ciascun computer. Procedere con l'impostazione dal passo 1 per ciascun computer.
Utilizzo del CD-ROM di installazione (solo Windows) a Caricare il CD-ROM di installazione nel computer. ■■ Quando si utilizza Windows 10 o Windows 8.1: b Quando il seguente messaggio viene visualizzato nella parte destra dello schermo del computer, fare clic sul messaggio. Quando non viene visualizzato questo messaggio (o il messaggio è scomparso) 1. Fare clic su File Explorer sulla barra delle applicazioni. o c Se viene visualizzata questa schermata, fare clic su Esegui Msetup4.exe (Run Msetup4.exe).
iOS 6-C. Connessione a smartphone Android È necessario impostare una connessione per ogni smartphone. Procedere con l'impostazione dal passo 1 per ciascuno smartphone. Preparazione • Attivare il Wi-Fi sullo smartphone. • Se si dispone di un router wireless, connettere lo smartphone al router wireless da collegare alla stampante. * Per informazioni sul funzionamento, fare riferimento ai manuali dello smartphone e del router wireless o contattare i rispettivi produttori.
Le procedure riportate di seguito variano a seconda se il sistema operativo è iOS o Android. Selezionare il sistema operativo in uso e continuare con la procedura appropriata. a Toccare Impostazioni (Settings) nella schermata iniziale dello smartphone, quindi toccare Canon_ij_XXXX nelle impostazioni Wi-Fi. a Toccare il software dell'applicazione installata. b Seguire le istruzioni a video per registrare la stampante.
Caricamento di carta fotografica 1 Aprire il supporto per la carta. 4 Premere il pulsante Carta (Paper), selezionare un formato carta, quindi premere il pulsante OK. 2 Far scorrere la guida della carta verso sinistra. 5 Estrarre il vassoio di uscita della carta. 3 a C aricare carta fotografica contro il margine destro con il lato di stampa rivolto verso l'alto. b Far scorrere la guida della carta per allinearla con il lato della pila di carta. 6 Aprire l'estensione del vassoio di uscita.
1. Verificando os itens incluídos □ Cabo de alimentação □ Cartucho FINE 4 Feche a tampa. 5 Conecte o cabo de alimentação. □ Informações Importantes e Sobre Segurança □ CD-ROM de instalação para Windows PC □ Para Começar (este manual) 2. Removendo os materiais de embalagem/ligando a impressora 1 2 Remova os materiais de embalagem (como a fita laranja) da parte externa da impressora. Abra a tampa. Não conecte os cabos ainda, exceto o cabo de alimentação.
3. Instalando o cartucho FINE 1 Abra a tampa. 2 a R etire o cartucho FINE colorido da embalagem. b Remova a fita de proteção. 3 Incline um pouco o cartucho FINE colorido e insira-o dentro do suporte do cartucho FINE à esquerda. a Não bata-a contra as peças em volta. 4 b Não toque. Cuidado com a tinta na fita de proteção. 2 Empurre o cartucho FINE para dentro e para cima firmemente até ele se encaixar.
5 6 Repita as etapas 2 a 4 e instale o cartucho FINE preto também, à direita. 2 Deslize a guia do papel para a esquerda. 3 a C oloque papel LTR comum ou tamanho A4 contra a borda direita com o lado a ser impresso voltado para cima. b Deslize a guia do papel para alinhá-la à pilha de papel. a Feche a tampa. b Se E > 0 > 4 aparecer na tela, volte para a etapa 3 e verifique se os cartuchos FINE colorido e preto estão instalados corretamente. 4 Puxe para fora a bandeja de saída do papel.
5. Selecione se deseja ou não conectar a um computador ou smartphone Na descrição abaixo, smartphone se refere coletivamente a smartphones e tablets. 1 Verifique se a tela aparece como mostrado abaixo. Piscando 6-B. Conectando a um computador Windows Mac OS Você precisará definir uma configuração de conexão para cada computador. Comece a configuração de cada computador pela etapa 1. 1 Inicie o arquivo de instalação para o método ou o método .
Usando o CD-ROM de instalação (somente Windows) a Insira o CD-ROM de instalação no computador. ■■ Ao usar Windows 10 ou Windows 8.1: b Clique na mensagem a seguir quando ela for exibida no lado direito da tela do computador. Quando esta mensagem não aparecer (ou tiver desaparecido) 1. Clique em Explorador de Arquivos (File Explorer) na barra de ferramentas. c Se a tela a seguir for exibida, clique em Executar Msetup4.exe (Run Msetup4.exe).
iOS 6-C. Conectando a um smartphone Android Você precisará configurar uma conexão para cada smartphone. Comece a configuração de cada smartphone pela etapa 1. Preparação • Ative o Wi-Fi em seu smartphone. • Se você tiver um roteador sem fio, conecte seu smartphone ao roteador sem fio que você deseja conectar à impressora. * Para obter informações sobre operações, consulte os manuais do seu smartphone e do seu roteador sem fio ou entre em contato com seus respectivos fabricantes.
Os procedimentos descritos abaixo podem variar para iOS e Android. Selecione seu sistema operacional e continue com o procedimento. a Toque em Configurações (Settings) na tela inicial do seu smartphone e depois em Canon_ij_XXXX nas configurações de Wi-Fi. a Toque no software aplicativo instalado. b Siga as instruções na tela para registrar a impressora. Se Canon_ij_XXXX não estiver na lista, consulte a seção "Preparação para a impressora" abaixo para operar a impressora e repita a etapa a.
Colocando papel fotográfico 1 Abra o suporte de papel. 2 Deslize a guia do papel para a esquerda. 3 a C oloque papel fotográfico contra a borda direita com o lado a ser impresso voltado para cima. b Deslize a guia do papel para alinhá-la à pilha de papel. 4 Pressione o botão Papel (Paper), selecione um tamanho de papel e, em seguida, pressione o botão OK. 5 Puxe para fora a bandeja de saída do papel. 6 Abra a extensão da bandeja de saída.
□ Cable de alimentación □ Cartucho FINE 4 Cierre la cubierta. 5 Conecte el cable de alimentación. ESPAÑOL 1. Comprobación de los elementos suministrados □ Información de seguridad e información importante □ CD-ROM de instalación para Windows PC □ Guía de inicio (este manual) 2. Retirada de los materiales de empaquetado / Encendido de la impresora 1 2 Retire los materiales de empaquetado (como la cinta naranja) del exterior de la impresora. Abra la cubierta.
3. Instalación del cartucho FINE 1 Abra la cubierta. 2 a S aque el cartucho FINE Color del paquete. b Retire la cinta protectora. 3 Incline ligeramente el cartucho FINE Color e insértelo en el soporte de cartucho FINE de la izquierda. a No golpear contra los objetos de alrededor. 4 b No tocar. Tenga cuidado con la tinta de la cinta protectora. 2 Presione el cartucho FINE hacia adentro y hacia arriba hasta que encaje en su posición.
Repita los pasos del 2 al 4 e instale también el cartucho FINE Negro en la parte derecha. 2 Deslice la guía del papel hacia la izquierda. 3 a C argue papel normal de tamaño LTR o A4 contra el borde derecho con el lado de impresión hacia arriba. b Deslice la guía del papel para alinearla con el lado de la pila de papel. ESPAÑOL 5 6 a Cierre la cubierta. b Si en la pantalla aparece E > 0 > 4, vuelva al paso 3 y confirme que los cartuchos FINE Color y Negro están correctamente instalados.
5. Seleccione si desea conectar el ordenador a un teléfono inteligente En la siguiente descripción, los teléfonos inteligentes y las tabletas se describen en conjunto como teléfonos inteligentes. 1 Confirme que en la pantalla se muestra lo siguiente. Parpadeando Continúe en el paso correspondiente al modo en que usa la impresora.
Uso del CD-ROM de instalación (solo para Windows) ESPAÑOL a Cargue el CD-ROM de instalación en su ordenador. ■■ Si utiliza Windows 10 o Windows 8.1: b Cuando se muestre el mensaje siguiente en el lado derecho de la pantalla del ordenador, haga clic en él. Si este mensaje no se muestra (o ya no aparece) 1. Haga clic en el Explorador de archivos (File Explorer) de la barra de tareas. o c Si aparece la siguiente pantalla, haga clic en Ejecutar Msetup4.exe (Run Msetup4.exe). 2.
iOS 6-C. Conexión con un teléfono inteligente Android Necesitará configurar una conexión para cada teléfono inteligente. Complete la configuración desde el paso 1 para cada teléfono inteligente. Preparativos • Active la Wi-Fi en su teléfono inteligente. • Si dispone de un router inalámbrico, conecte su teléfono inteligente al router inalámbrico para conectar con la impresora.
a Toque Ajustes (Settings) en la pantalla de inicio de su teléfono inteligente y después toque Canon_ij_XXXX en los ajustes de Wi-Fi. a Puntee el software de la aplicación instalado. ESPAÑOL Los procedimientos a continuación varían en función de iOS o Android. Seleccione su sistema operativo y continúe con el procedimiento correspondiente. b Siga las instrucciones en pantalla para registrar la impresora.
Carga de papel fotográfico 1 Abra el soporte del papel. 2 Deslice la guía del papel hacia la izquierda. 3 a Cargue papel fotográfico contra el borde derecho con el lado de impresión hacia arriba. b Deslice la guía del papel para alinearla con el lado de la pila de papel. 4 Pulse el botón Papel (Paper), seleccione un tamaño de papel y, a continuación, pulse el botón OK. 5 Extraiga la bandeja de salida del papel. 6 Abra la extensión de la bandeja de salida.
1. Έλεγχος των στοιχείων που περιλαμβάνονται □ Καλώδιο τροφοδοσίας □ Φυσίγγιο FINE 4 Κλείστε το κάλυμμα. 5 Συνδέστε το καλώδιο τροφοδοσίας. □ CD-ROM εγκατάστασης για Windows PC ΕΛΛΗΝΙΚΗ □ Πληροφορίες για την ασφάλεια και σημαντικές πληροφορίες □ Ξεκινώντας (αυτό το εγχειρίδιο) 2. Αφαίρεση υλικών συσκευασίας / Ενεργοποίηση εκτυπωτή 1 2 Αφαιρέστε τη συσκευασία (όπως η πορτοκαλί ταινία) από τον εκτυπωτή. Ανοίξτε το κάλυμμα.
3 3. Τοποθέτηση του φυσιγγίου FINE 1 Ανοίξτε το κάλυμμα. 2 a Β γάλτε το έγχρωμο φυσίγγιο FINE από τη συσκευασία. b Αφαιρέστε την προστατευτική ταινία. Γείρετε ελαφρώς το έγχρωμο φυσίγγιο FINE και τοποθετήστε το στη θήκη φυσιγγίου FINE στα αριστερά. a Μην το χτυπάτε στα περιβάλλοντα μέρη. 4 b Μην αγγίζετε. Προσέχετε τη μελάνη που παραμένει στην προστατευτική ταινία. 2 Σπρώξτε σταθερά προς τα μέσα και προς τα επάνω το φυσίγγιο FINE μέχρι να ασφαλίσει στη θέση του.
6 Επαναλάβετε τα βήματα 2 έως 4 και εγκαταστήστε και το μαύρο φυσίγγιο FINE στα δεξιά. 2 Σύρετε τον οδηγό χαρτιού προς τα αριστερά. 3 a Τ οποθετήστε απλό χαρτί μεγέθους LTR ή A4 έτσι ώστε να ακουμπά στη δεξιά πλευρά και με την πλευρά εκτύπωσης στραμμένη προς τα επάνω. b Σύρετε τον οδηγό χαρτιού για να τον ευθυγραμμίσετε με την πλαϊνή πλευρά της στοίβας των χαρτιών. Κλείστε το κάλυμμα.
5. Επιλέξτε εάν θέλετε να γίνει σύνδεση σε υπολογιστή ή smartphone Στην ακόλουθη περιγραφή, τα smartphones και οι συσκευές tablet περιγράφονται συλλογικά ως smartphone. 1 Επιβεβαιώστε ότι εμφανίζεται η παρακάτω οθόνη. Αναβοσβήνει 6-B. Σύνδεση σε υπολογιστή Windows Απαιτείται ρύθμιση σύνδεσης για κάθε υπολογιστή. Προχωρήστε στη ρύθμιση από το βήμα 1 για κάθε υπολογιστή. 1 Εκκινήστε το αρχείο εγκατάστασης για κάθε ή μέθοδο .
Χρήση CD-ROM εγκατάστασης (μόνο για Windows) a Τοποθετήστε το CD-ROM εγκατάστασης στον υπολογιστή σας. ■■ Κατά τη χρήση Windows 10 ή Windows 8.1: Όταν αυτό το μήνυμα δεν εμφανίζεται (ή έχει εξαφανιστεί) 1. Κάντε κλικ στην επιλογή Εξερεύνηση αρχείων (File Explorer), στη γραμμή εργασιών. ή c Αν εμφανιστεί η ακόλουθη οθόνη, κάντε κλικ στην επιλογή Εκτέλεση Msetup4.exe (Run Msetup4.exe). ΕΛΛΗΝΙΚΗ b Όταν το ακόλουθο μήνυμα εμφανίζεται στη δεξιά πλευρά της οθόνης του υπολογιστή, κάντε κλικ σε αυτό. 2.
iOS 6-C. Σύνδεση σε smartphone Android Απαιτείται ρύθμιση της σύνδεσης για κάθε smartphone. Προχωρήστε στη ρύθμιση από το βήμα 1 για κάθε smartphone. Προετοιμασία • Ενεργοποιήστε το Wi-Fi στο smartphone σας. • Αν έχετε ασύρματο δρομολογητή, συνδέστε το smartphone στον ασύρματο δρομολογητή που θέλετε να συνδέσετε στον εκτυπωτή. * Για τις διαδικασίες, ανατρέξτε στα εγχειρίδια του smartphone και του ασύρματου δρομολογητή ή επικοινωνήστε με τους κατασκευαστές τους.
Οι παρακάτω διαδικασίες ποικίλουν ανάλογα με το iOS ή το Android. Επιλέξτε το λειτουργικό σας σύστημα και προχωρήστε στην αντίστοιχη διαδικασία. a Πατήστε Ρυθμίσεις (Settings) στην αρχική οθόνη του smartphone και μετά πατήστε Canon_ij_XXXX στις ρυθμίσεις Wi-Fi. a Πατήστε το εγκατεστημένο λογισμικό εφαρμογής σας. Αν το Canon_ij_XXXX δεν εμφανιστεί στη λίστα, ανατρέξτε στην ενότητα "Προετοιμασία για τον εκτυπωτή" παρακάτω για να λειτουργήσει ο εκτυπωτής και, στη συνέχεια, επαναλάβετε το βήμα a.
Τοποθέτηση φωτογραφικού χαρτιού 1 Ανοίξτε την υποστήριξη χαρτιού. 2 Σύρετε τον οδηγό χαρτιού προς τα αριστερά. 3 a Τ οποθετήστε φωτογραφικό χαρτί έτσι ώστε να ακουμπά στη δεξιά πλευρά και με την πλευρά εκτύπωσης στραμμένη προς τα επάνω. b Σύρετε τον οδηγό χαρτιού για να τον ευθυγραμμίσετε με την πλαϊνή πλευρά της στοίβας των χαρτιών. 4 Πατήστε το κουμπί Χαρτί (Paper), επιλέξτε μέγεθος χαρτιού και, στη συνέχεια, πατήστε το κουμπί OK. 5 Τραβήξτε έξω τη θήκη εξόδου χαρτιού.
1. Kontrollera medföljande delar □ Strömkabel □ FINE-kassett 4 Stäng luckan. 5 Anslut strömkabeln. □ Information om säkerhet och annan viktig information □ Installations-CD för Windows PC □ Uppstartsguide (denna handbok) 2. Ta bort förpackningsmaterial/ slå på skrivaren 2 Ta bort förpackningsmaterialet (till exempel orange tejp) från skrivarens utsida. SVENSKA 1 Öppna luckan. Anslut inga andra kablar än strömkabeln ännu. 6 3 Tryck på knappen PÅ (ON).
3. Installera FINE-kassetten 1 Öppna luckan. 2 a T a ut FINE-kassetten i färg ur förpackningen. b Ta bort skyddstejpen. 3 Luta FINE-kassetten i färg något och för in den i hållaren för FINE-kassett till vänster. a Låt den inte stöta i omgivande delar. 4 b Vidrör inte denna. Det kan finnas bläck på skyddstejpen så var försiktig. 2 Tryck FINE-kassetten inåt och uppåt tills den klickar på plats.
5 2 Skjut pappersledaren åt vänster. 3 a L ägg i vanligt LTR- eller A4-papper mot höger kant med utskriftssidan vänd uppåt. b Skjut på pappersledaren för att justera den efter pappersbuntens sida. a Stäng luckan. b SVENSKA 6 Upprepa steg 2 till 4 för att installera även den svarta FINE-kassetten på höger sida. Om E > 0 > 4 syns på skärmen går du tillbaka till steg 3 och kontrollerar att FINE-kassetterna i färg och svart har installerats korrekt. 4 Dra ut utmatningsfacket.
5. Välj om du ska eller inte ska ansluta till en dator eller smarttelefon I följande beskrivning beskrivs smarttelefoner och surfplattor kollektivt som smarttelefon. 1 Kontrollera att skärmen visas som nedan. Windows 6-B. A nsluta till dator Mac OS Du behöver ställa in en anslutning för varje dator. Fortsätt med installationen från steg 1 för varje dator. 1 Starta inställningsfilen för antingen metod metod .
Använda installations-CD:n (endast Windows) a Sätt i installations-CD:n i datorn. ■■ Om du använder Windows 10 eller Windows 8.1: c Om följande skärm visas klickar du på Kör Msetup4.exe (Run Msetup4.exe). När detta meddelande inte visas (eller har stängts) 1. Klicka på Utforskaren (File Explorer) i aktivitetsfältet. eller 2. Klicka på Den här datorn (This PC) på den vänstra sidan av det öppnade fönstret. 3. Dubbelklicka på CD-ROM-ikonen på den högra sidan av fönstret.
iOS 6-C. Ansluta till smarttelefon Android Du behöver ställa in en anslutning för varje smarttelefon. Fortsätt med installationen från steg 1 för varje smarttelefon. Förberedelse • Slå på Wi-Fi på smarttelefonen. • Om du har en trådlös router ansluter du smarttelefonen till den trådlösa router du vill ansluta till skrivaren. * Information om användning hittar du i smarttelefonens och den trådlösa routerns handböcker, eller så kan du kontakta tillverkaren.
Förfarandena nedan varierar beroende på om du använder iOS eller Android. Välj operativsystem och fortsätt till förfarandet. a Tryck på Inställningar (Settings) på hemskärmen på din smarttelefon och tryck på Canon_ij_XXXX i Wi-Fi-inställningarna. a Tryck på den installerade applikationens programvara. b Följ instruktionerna på skärmen för att registrera skrivaren. b Tryck på den installerade applikationens programvara. Om ett meddelande med texten "Skrivaren är inte registrerad.
Fylla på fotopapper 1 Öppna pappersstödet. 4 Tryck på knappen Papper (Paper), välj en pappersstorlek och tryck sedan på knappen OK. 2 Skjut pappersledaren åt vänster. 5 Dra ut utmatningsfacket. 3 a L ägg i fotopapper mot höger kant med utskriftssidan vänd uppåt. b Skjut på pappersledaren för att justera den efter pappersbuntens sida. 6 Öppna utmatningsfackets förlängningsdel. a b Utskriftsresultatet är inte tillfredsställande Om utskriftsresultatet inte blir som förväntat, t.ex.
1. Kontroller medfølgende komponenter □ Strømledning □ FINE-kassett 4 Lukk dekselet. 5 Koble til strømledningen. □ Sikkerhetsinformasjon og viktig informasjon □ Installerings-CD-ROM for Windows PC □ Komme i gang (denne manualen) 2. Fjerne beskyttelsesmateriale / slå på skriveren 2 Fjern beskyttelsesmaterialet (f.eks. oransje tape) fra utsiden av skriveren. Åpne dekselet. Ikke koble til andre kabler enn strømledningen på dette tidspunktet. 6 3 Trykk på PÅ (ON)-knappen.
3. Installere FINE-kassett 1 Åpne dekselet. 2 a T a FINE-fargekassetten ut av innpakningen. b F jern beskyttelsestapen. 3 Tipp FINE-fargekassetten litt og sett den inn i FINE-kassettholderen på venstre side. a Ikke dunk den mot de omkringliggende delene. 4 b Ikke rør. Vær oppmerksom på at det kan være blekk på tapen. 2 Dytt FINE-kassetten inn og opp med fast trykk til den klikker på plass.
6 Gjenta trinn 2 til 4 og installer den svarte FINEkassetten også, på høyre side. 2 Dra papirføreren til venstre. 3 a L egg inn papir i LTR- eller A4-størrelse inntil den høyre kanten med utskriftssiden opp. b Skyv papirføreren slik at den ligger inntil siden på papirstabelen. a Lukk dekselet. b Hvis E > 0 > 4 vises på skjermen, går du tilbake til trinn 3 og bekrefter at farge og svart FINE-kassetter er riktig installert. 4 Trekk ut papirutmatingsbrettet. 5 Åpne mottakerbrettforlengelsen.
I beskrivelsen nedenfor brukes smarttelefon både om smarttelefoner og nettbrett. 1 Windows 6-B. Koble til datamaskin 5. Velg om du vil koble til datamaskin eller smarttelefon Bekreft at skjermbildet vises som nedenfor. Mac OS Du må konfigurere en tilkobling for hver datamaskin. Fortsett med installasjonen fra trinn 1 for hver datamaskin. 1 Start konfigurasjonen for enten metode metode .
Bruke installerings-CD-ROM (bare Windows) a Sett inn installerings-CD-ROM-en i datamaskinen. ■■ Når du bruker Windows 10 eller Windows 8.1: c Hvis følgende skjermbilde vises, klikker du på Kjør Msetup4.exe (Run Msetup4.exe). d Hvis dialogboksen Brukerkontokontroll (User Account Control) vises, klikker du på Ja (Yes). Når denne meldingen ikke vises (eller har blitt borte) 1. Klikk på Filutforsker (File Explorer) på oppgavelinjen. eller 2.
iOS 6-C. Koble til smarttelefon Android Du må konfigurere tilkobling for hver smarttelefon. Fortsett med installasjonen fra trinn 1 for hver smarttelefon. Forberedelse • Slå på Wi-Fi på smarttelefonen. • Hvis du har en trådløs ruter, kobler du smarttelefonen til den trådløse ruteren som du vil koble til skriveren. * Fremgangsmåten for dette finner du i manualene for smarttelefonen og den trådløse ruteren, eller du kan kontakte produsentene.
Fremgangsmåten nedenfor vil variere avhengig av om du bruker iOS eller Android. Velg operativsystem, og følg fremgangsmåten for det aktuelle systemet. a Trykk på Innstillinger (Settings) på smarttelefonens hjem-skjerm, og velg Canon_ij_XXXX i Wi-Fiinnstillingene. a Trykk på den installerte programvaren. b Følg instruksjonene på skjermen for å registrere skriveren. Hvis Canon_ij_XXXX ikke vises på listen, se "Forberedelse av skriveren" under for å betjene skriveren, og gjenta deretter trinn a.
Legge i fotopapir 1 Åpne papirstøtten. 4 Trykk på Papir (Paper)-knappen, velg en papirstørrelse, og trykk deretter på OK-knappen. 2 Dra papirføreren til venstre. 5 Trekk ut papirutmatingsbrettet. 3 a L egg i fotopapir inntil den høyre kanten med utskriftssiden opp. b Skyv papirføreren slik at den ligger inntil siden på papirstabelen. 6 Åpne mottakerbrettforlengelsen. a b Utskriftsresultatene er ikke tilfredsstillende Hvis utskriftsresultatene ikke ble slik du forventet, som at f.eks.
1. Kontrollér medfølgende elementer □ Netledning □ FINE-patron 4 Luk dækslet. 5 Tilslut netledningen. □ Sikkerhedsoplysninger og vigtige oplysninger □ Installations-cd-rom til Windows-pc □ Før du begynder (denne manual) 2. Fjernelse af emballagen/ Start af printeren 1 2 Fjern emballagen (f.eks. orange tape) fra ydersiden af printeren. Åbn dækslet. Tilslut ikke nogen kabler undtagen netledningen endnu. 3 Tryk på knappen TIL (ON).
3. Installation af FINE-patron 1 Åbn dækslet. 2 a T ag FINE-farvepatronen ud af emballagen. b Fjern beskyttelsestapen. 3 Vip FINE-farvepatronen en smule, og indsæt den i FINE-patronholderen til højre. a Slå den ikke mod de omgivende dele. 4 b Må ikke berøres. Vær påpasselig med, at der kan være blæk på den beskyttende tape. 2 Skub FINE-patronen helt ind og op, indtil den klikker på plads.
5 6 Gentag trinnene 2 til 4, og indsæt ligeledes den sorte FINE-patron til højre. 2 Skub papirstyret til venstre. 3 a I læg LTR- eller A4-papir i almindelige størrelse mod højre kant med udskriftssiden opad. b Skub papirstyret for at justere det med siden af det ilagte papir. a Luk dækslet. b Hvis E > 0 > 4 vises på skærmen, skal du vende tilbage til trin 3 og bekræfte, at FINE-farvepatronen og den sorte patron er installeret korrekt. 4 Træk udbakken til papir ud.
5. Vælg, om du vil tilslutte til en computer eller smartphone I følgende beskrivelse refereres der samlet til smartphones og tablet-enheder som smartphone. 1 Bekræft, at skærmen vises, som den ses herunder. Windows 6-B. Tilslutning til computer Mac OS Du skal have en forbindelse sat op for hver computer. Fortsæt setup fra trin 1 for hver computer. 1 Start konfigurationsfilen for metode metode . eller Hent fra internettet Blinker a Åbn en webbrowser ( osv.) på din computer.
Brug af installations-cd-rom (kun Windows) a Læg installations-cd-rom'en i din computer. ■■ Ved brug af Windows 10 eller Windows 8.1: b Når følgende meddelelse vises i højre side af din computerskærm, skal du klikke på den. Hvis denne meddelelse ikke vises (eller er forsvundet) 1. Klik på Stifinder (File Explorer) på proceslinjen. eller c Hvis følgende skærmbillede vises, skal du klikke på Kør Msetup4.exe (Run Msetup4.exe). 2. Klik på Denne pc (This PC) i venstre side af det åbne vindue. 3.
iOS 6-C. Tilslutning til smartphone Android Du skal have en forbindelse sat op for hver smartphone. Fortsæt setup fra trin 1 for hver smartphone. Forberedelse • Aktivér Wi-Fi på din smartphone. • Hvis du har en trådløs router, skal du tilslutte din smartphone til den trådløse router, der skal sluttes til printeren. * For funktioner henvises til brugervejledningen til din smartphone og den trådløse router. Ellers kan du kontakte de pågældende producenter.
Fremgangsmåderne herunder afhænger af iOS eller Android. Vælg dit operativsystem, og fortsæt til fremgangsmåden for det. a Tryk på Indstillinger (Settings) på startskærmen på din smartphone, og tryk på Canon_ij_XXXX under Wi-Fi indstillinger. a Tryk på den installerede applikationssoftware. b Følg instruktionerne på skærmen for at registrere printeren.
Ilægning af fotopapir 1 Åbn papirstøtten. 4 Tryk på knappen Papir (Paper), vælg en papirstørrelse, og tryk derefter på knappen OK. 2 Skub papirstyret til venstre. 5 Træk udbakken til papir ud. 3 a I læg fotopapir mod højre kant med udskriftssiden opad. b Skub papirstyret for at justere det med siden af det ilagte papir. 6 Åbn forlængeren til udbakken. a b Udskriftsresultater er ikke tilfredsstillende Hvis udskriftsresultaterne ikke er som forventet, hvis lige linjer f.eks.
1. Toimitettujen tuotteiden tarkistus □ Virtajohto □ FINE-kasetti 4 Sulje kansi. 5 Kytke virtajohto. □ Turvallisuus ja tärkeitä tietoja □ Asennus-CD Windows PC -tietokoneelle □ Aloitusopas (tämä käyttöopas) 2. Pakkausmateriaalien irrotus / virran kytkeminen tulostimeen 1 2 Poista pakkausmateriaalit (kuten oranssi teippi) tulostimen ulkopinnalta. Avaa kansi. Älä yhdistä mitään kaapelia vielä virtajohtoa lukuun ottamatta. 6 Poista oranssi teippi ja suojamateriaali ja hävitä ne molemmat.
3. FINE-kasetin asentaminen 1 Avaa kansi. 2 a O ta halutun värin FINE-kasetti pakkauksesta. b Poista suojateippi. 3 Kallista halutun värin FINE-kasettia hieman ja aseta se FINE-kasetin pidikkeeseen vasemmalla. a Älä kolhi sitä ympäröiviin osiin. 4 b Älä koske. Varo suojateipissä olevaa mustetta. 2 Paina FINE-kasettia sisään ja ylös kevyesti, kunnes se napsahtaa paikoilleen.
5 6 Toista vaiheet 2–4 ja asenna musta FINE-kasetti oikealle. 2 Liu'uta paperiohjain vasemmalle. 3 a A seta tavallinen LTR- tai A4-kokoinen paperi oikeaa reunaa vasten tulostuspuoli ylöspäin. b Liu'uta paperiohjainta niin, että se asettuu paperipinon reunaa vasten. a Sulje kansi. b Jos E > 0 > 4 näkyy näytössä, palaa kohtaan 3 ja vahvista, että FINE-kasetit (väri ja musta) on asennettu oikein. 4 Vedä paperin luovutustaso esiin. 5 Avaa luovutustason jatke. 4.
5. Valitse, yhdistetäänkö tietokoneeseen tai älypuhelimeen Seuraavassa kuvauksessa älypuhelimista ja tabletlaitteista käytetään yhdessä nimitystä älypuhelin. 1 Vahvista, että seuraava näyttö tulee näkyviin. 6-B. Y hdistäminen tietokoneeseen Windows Mac OS Yhteys pitää asettaa jokaiseen tietokoneeseen. Jatka asetusta kohdasta 1 jokaiselle tietokoneelle. 1 Käynnistä asetustiedosto joko tavalla .
Asennus-CD-levyn käyttö (vain Windows) a Aseta asennus-CD-levy tietokoneeseen. ■■ Kun käytössä on Windows 10 tai Windows 8.1: b Kun seuraava viesti tulee näkyviin tietokoneen näytön oikeaan reunaan, napsauta sitä. c Jos seuraava näyttö tulee näkyviin, valitse Suorita Msetup4.exe (Run Msetup4.exe). d Jos Käyttäjätilien valvonta (User Account Control) -valintaikkuna tulee näkyviin, valitse Kyllä (Yes). Jos tämä viesti ei tule näkyviin (tai on poistunut) 1.
iOS 6-C. Yhdistäminen älypuhelimeen Android Yhteys pitää asettaa jokaiseen älypuhelimeen. Jatka asetusta kohdasta 1 jokaiselle älypuhelimelle. Valmistelu • Ota Wi-Fi-yhteys käyttöön älypuhelimessa. • Jos käytät langatonta reititintä, yhdistä älypuhelin siihen langattomaan reitittimeen, johon haluat yhdistää tulostimen. * Katso lisätietoja älypuhelimen ja langattoman reitittimen käyttöohjeesta tai ota yhteys kyseisen laitteen valmistajaan. 1 Asenna Canon PRINT Inkjet/SELPHY -sovellus älypuhelimeen.
Seuraavat toiminnot vaihtelevat iOS- tai Android-järjestelmän mukaan. Valitse käyttöjärjestelmä ja jatka sen mukaan. a Napauta Asetukset (Settings) älypuhelimen aloitusnäytössä ja napauta Canon_ij_XXXX Wi-Fiasetuksissa. a Napauta asennettua sovellusta. b Jatka tulostimen rekisteröintiä noudattamalla näytössä näkyviä ohjeita. Jos Canon_ij_XXXX ei näy luettelossa, katso alta "Tulostimen valmistelu" tulostimen käyttämiseksi ja toista sitten vaihe a. b Napauta asennettua sovellusta.
Valokuvapaperin lisääminen 1 Avaa paperituki. 4 Paina Paperi (Paper)-painiketta, valitse paperikoko ja paina sitten OK-painiketta. 2 Liu'uta paperiohjain vasemmalle. 5 Vedä paperin luovutustaso esiin. 3 a A seta valokuvapaperi oikeaa reunaa vasten tulostuspuoli ylöspäin. b Liu'uta paperiohjainta niin, että se asettuu paperipinon reunaa vasten. 6 Avaa luovutustason jatke.
RMC (Regulatory Model Code): K10462 RMC (Regulatory Model Code): K10463
Access Online Manual Accès au Manuel en ligne Zugriff auf das Online-Handbuch Online handleiding openen Accedere al Manuale online Acesse o Manual On-line Acceso al Manual en línea Αποκτήστε πρόσβαση στο Εγχειρίδιο Online Läs Onlinehandbok Gå til Nettbasert manual Åbn Online vejledning Online-käyttöopas-oppaan käyttö From Web site Über eine Website Dal sito Web Desde el sitio web Från webbplatsen Fra websted À partir du site Web Van de website A partir do site Από τη διαδικτυακή τοποθεσία Fra nettsiden Ver