
Owner's Manual
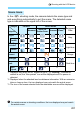

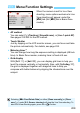
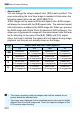
Table Of Contents
- Camera Instruction Manual
- Table of Contents
- Memory Card Compatibility
- Supplied Accessories
- Parts & Controls
- Introduction
- Getting Started and Basic Camera Operations
- Charging the Battery
- Installing and Removing the Battery and Card
- Using the LCD Monitor
- Turning on the Power
- Setting the Date, Time, and Zone
- Selecting the Interface Language
- Attaching and Detaching a Lens
- Basic Shooting Operations
- Setting the Screen Display Level
- Quick Control for Shooting Functions
- Menu Operations and Configurations
- Operating the Camera with Touch Screen
- Formatting the Card
- Switching the LCD Monitor Display
- Basic Shooting and Image Playback
- Fully Automatic Shooting (Scene Intelligent Auto)
- Full Auto Techniques (Scene Intelligent Auto)
- Shooting When You Cannot Use Flash
- Creative Auto Shooting
- Special Scene Mode
- Shooting Portraits
- Shooting Group Photos
- Shooting Landscapes
- Shooting Moving Subjects
- Photographing Children
- Shooting Close-ups
- Shooting Food
- Shooting Candlelight Portraits
- Shooting Night Portraits (With a Tripod)
- Shooting Night Scenes (Handheld)
- Shooting Backlit Scenes
- Shooting with Creative Filter Effects
- Quick Control
- Adjusting the Brightness
- Image Playback
- Setting the AF and Drive Modes
- Image Settings
- Setting the Image-Recording Quality
- Setting the ISO Speed for Still Photos
- Selecting a Picture Style
- Customizing a Picture Style
- Registering a Picture Style
- Matching the Light Source
- Adjusting the Color Tone for the Light Source
- Auto Correction of Brightness and Contrast
- Setting Noise Reduction
- Correction of Lens Aberrations due to Optical Characteristics
- Setting the Color Reproduction Range
- Advanced Operations for Photographic Effects
- Flash Photography
- Shooting with the LCD Monitor (Live View Shooting)
- Shooting Movies
- Handy Features
- Image Playback
- Searching for Images Quickly
- Magnifying Images
- Playing Back with the Touch Screen
- Rotating the Image
- Setting Ratings
- Filtering Images for Playback
- Quick Control for Playback
- Enjoying Movies
- Playing Back Movies
- Editing a Movie’s First and Last Scenes
- Slide Show (Auto Playback)
- Viewing Images on a TV Set
- Protecting Images
- Erasing Images
- Digital Print Order Format (DPOF)
- Specifying Images for a Photobook
- Shooting Information Display
- Post-Processing Images
- Customizing the Camera
- Reference
- Software Start Guide / Downloading Images to a Computer
- Troubleshooting
- Specs
- Index
- Camera Basic Instruction Manual
- Introduction
- Supplied Accessories
- Parts & Controls
- About Instruction Manuals
- Quick Start Guide
- Compatible Cards
- Conventions Used in this Manual
- Table of Contents
- Getting Started and Basic Camera Operations
- Basic Shooting and Image Playback
- Setting the AF and Drive Modes
- Image Settings
- Advanced Operations for Photographic Effects
- Shooting with the LCD Monitor (Live View Shooting)
- Shooting Movies
- Handy Features
- Image Playback
- Software Start Guide / Downloading Images to a Computer
- Index
- Wi-Fi (Wireless Communication) Function Basic Instruction Manual
- Lens Instructions
- EF Lens Instructions
- Warranty

3 Menu Function Settings
210
Aspect ratioN
You can change the image’s aspect ratio. [3:2] is set by default. The
area surrounding the Live View image is masked in black when the
following aspect ratios are set: [4:3] [16:9] [1:1].
JPEG images will be saved with the set aspect ratio. RAW images
will always be saved with the [3:2] aspect ratio. The selected aspect
ratio information is added to the RAW image file. When you process
the RAW image with Digital Photo Professional (EOS software), this
allows you to generate an image with the same aspect ratio that was
set for shooting. In the case of the [4:3], [16:9], and [1:1] aspect
ratios, the lines to indicate the aspect ratio will appear during image
playback, but they are not actually drawn on the image.
Image
Quality
Aspect Ratio and Pixel Count (Approx.)
3:2 4:3 16:9 1:1
3/1
6000x4000
(24 megapixels)
5328x4000*
(21.3 megapixels)
6000x3368*
(20.2 megapixels)
4000x4000
(16 megapixels)
4
3984x2656
(10.6 megapixels)
3552x2664
(9.5 megapixels)
3984x2240*
(8.9 megapixels)
2656x2656
(7.1 megapixels)
a
2976x1984
(5.9 megapixels)
2656x1992
(5.3 megapixels)
2976x1680*
(5 megapixels)
1984x1984
(3.9 megapixels)
b
2400x1600
(3.8 megapixels)
2112x1600*
(3.4 megapixels)
2400x1344*
(3.2 megapixels)
1600x1600
(2.6 megapixels)
The image-recording quality and aspect ratio with an asterisk do not
exactly match the indicated ratio.
The image area displayed for the asterisked aspect ratio may be slightly
different from the actual image area. Check the captured images on the
LCD monitor when shooting.