
Owner's Manual
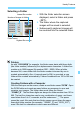
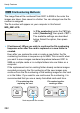


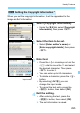
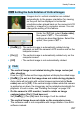
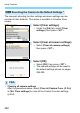
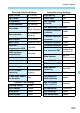
Table Of Contents
- Camera Instruction Manual
- Table of Contents
- Memory Card Compatibility
- Supplied Accessories
- Parts & Controls
- Introduction
- Getting Started and Basic Camera Operations
- Charging the Battery
- Installing and Removing the Battery and Card
- Using the LCD Monitor
- Turning on the Power
- Setting the Date, Time, and Zone
- Selecting the Interface Language
- Attaching and Detaching a Lens
- Basic Shooting Operations
- Setting the Screen Display Level
- Quick Control for Shooting Functions
- Menu Operations and Configurations
- Operating the Camera with Touch Screen
- Formatting the Card
- Switching the LCD Monitor Display
- Basic Shooting and Image Playback
- Fully Automatic Shooting (Scene Intelligent Auto)
- Full Auto Techniques (Scene Intelligent Auto)
- Shooting When You Cannot Use Flash
- Creative Auto Shooting
- Special Scene Mode
- Shooting Portraits
- Shooting Group Photos
- Shooting Landscapes
- Shooting Moving Subjects
- Photographing Children
- Shooting Close-ups
- Shooting Food
- Shooting Candlelight Portraits
- Shooting Night Portraits (With a Tripod)
- Shooting Night Scenes (Handheld)
- Shooting Backlit Scenes
- Shooting with Creative Filter Effects
- Quick Control
- Adjusting the Brightness
- Image Playback
- Setting the AF and Drive Modes
- Image Settings
- Setting the Image-Recording Quality
- Setting the ISO Speed for Still Photos
- Selecting a Picture Style
- Customizing a Picture Style
- Registering a Picture Style
- Matching the Light Source
- Adjusting the Color Tone for the Light Source
- Auto Correction of Brightness and Contrast
- Setting Noise Reduction
- Correction of Lens Aberrations due to Optical Characteristics
- Setting the Color Reproduction Range
- Advanced Operations for Photographic Effects
- Flash Photography
- Shooting with the LCD Monitor (Live View Shooting)
- Shooting Movies
- Handy Features
- Image Playback
- Searching for Images Quickly
- Magnifying Images
- Playing Back with the Touch Screen
- Rotating the Image
- Setting Ratings
- Filtering Images for Playback
- Quick Control for Playback
- Enjoying Movies
- Playing Back Movies
- Editing a Movie’s First and Last Scenes
- Slide Show (Auto Playback)
- Viewing Images on a TV Set
- Protecting Images
- Erasing Images
- Digital Print Order Format (DPOF)
- Specifying Images for a Photobook
- Shooting Information Display
- Post-Processing Images
- Customizing the Camera
- Reference
- Software Start Guide / Downloading Images to a Computer
- Troubleshooting
- Specs
- Index
- Camera Basic Instruction Manual
- Introduction
- Supplied Accessories
- Parts & Controls
- About Instruction Manuals
- Quick Start Guide
- Compatible Cards
- Conventions Used in this Manual
- Table of Contents
- Getting Started and Basic Camera Operations
- Basic Shooting and Image Playback
- Setting the AF and Drive Modes
- Image Settings
- Advanced Operations for Photographic Effects
- Shooting with the LCD Monitor (Live View Shooting)
- Shooting Movies
- Handy Features
- Image Playback
- Software Start Guide / Downloading Images to a Computer
- Index
- Wi-Fi (Wireless Communication) Function Basic Instruction Manual
- Lens Instructions
- EF Lens Instructions
- Warranty

Handy Features
292
The image files will be numbered from 0001 to 9999 in the order the
images are taken, then saved in a folder. You can change how the file
number is assigned.
The file number will appear on your computer in this format:
IMG_0001.JPG.
In [File numbering] under the [51] tab,
select [Numbering], then press <0>.
The available settings are described
below. Select the option, then press
<0>.
[Continuous]: When you wish to continue the file numbering
sequence even after the card is replaced or a new folder is
created.
Even after you replace the card or create a new folder, the file
numbering continues in sequence up to 9999. This is useful when
you want to save images numbered anywhere between 0001 to
9999 on multiple cards or in multiple folders into one folder on a
computer.
If the replacement card or existing folder already contains images
recorded previously, the file numbering of the new images may
continue from the file numbering of the existing images on the card
or in the folder. If you want to use continuous file numbering, it is
recommended that you use a newly-formatted card each time.
3 File Numbering Methods
File numbering after
replacing the card
Next sequential file number
File numbering after
creating a folder
Card-1Card-1 Card-2
0051 0052 0051 0052
100 101