
Owner's Manual
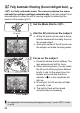
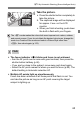
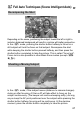
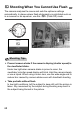
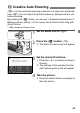
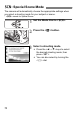

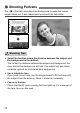
Table Of Contents
- Camera Instruction Manual
- Table of Contents
- Memory Card Compatibility
- Supplied Accessories
- Parts & Controls
- Introduction
- Getting Started and Basic Camera Operations
- Charging the Battery
- Installing and Removing the Battery and Card
- Using the LCD Monitor
- Turning on the Power
- Setting the Date, Time, and Zone
- Selecting the Interface Language
- Attaching and Detaching a Lens
- Basic Shooting Operations
- Setting the Screen Display Level
- Quick Control for Shooting Functions
- Menu Operations and Configurations
- Operating the Camera with Touch Screen
- Formatting the Card
- Switching the LCD Monitor Display
- Basic Shooting and Image Playback
- Fully Automatic Shooting (Scene Intelligent Auto)
- Full Auto Techniques (Scene Intelligent Auto)
- Shooting When You Cannot Use Flash
- Creative Auto Shooting
- Special Scene Mode
- Shooting Portraits
- Shooting Group Photos
- Shooting Landscapes
- Shooting Moving Subjects
- Photographing Children
- Shooting Close-ups
- Shooting Food
- Shooting Candlelight Portraits
- Shooting Night Portraits (With a Tripod)
- Shooting Night Scenes (Handheld)
- Shooting Backlit Scenes
- Shooting with Creative Filter Effects
- Quick Control
- Adjusting the Brightness
- Image Playback
- Setting the AF and Drive Modes
- Image Settings
- Setting the Image-Recording Quality
- Setting the ISO Speed for Still Photos
- Selecting a Picture Style
- Customizing a Picture Style
- Registering a Picture Style
- Matching the Light Source
- Adjusting the Color Tone for the Light Source
- Auto Correction of Brightness and Contrast
- Setting Noise Reduction
- Correction of Lens Aberrations due to Optical Characteristics
- Setting the Color Reproduction Range
- Advanced Operations for Photographic Effects
- Flash Photography
- Shooting with the LCD Monitor (Live View Shooting)
- Shooting Movies
- Handy Features
- Image Playback
- Searching for Images Quickly
- Magnifying Images
- Playing Back with the Touch Screen
- Rotating the Image
- Setting Ratings
- Filtering Images for Playback
- Quick Control for Playback
- Enjoying Movies
- Playing Back Movies
- Editing a Movie’s First and Last Scenes
- Slide Show (Auto Playback)
- Viewing Images on a TV Set
- Protecting Images
- Erasing Images
- Digital Print Order Format (DPOF)
- Specifying Images for a Photobook
- Shooting Information Display
- Post-Processing Images
- Customizing the Camera
- Reference
- Software Start Guide / Downloading Images to a Computer
- Troubleshooting
- Specs
- Index
- Camera Basic Instruction Manual
- Introduction
- Supplied Accessories
- Parts & Controls
- About Instruction Manuals
- Quick Start Guide
- Compatible Cards
- Conventions Used in this Manual
- Table of Contents
- Getting Started and Basic Camera Operations
- Basic Shooting and Image Playback
- Setting the AF and Drive Modes
- Image Settings
- Advanced Operations for Photographic Effects
- Shooting with the LCD Monitor (Live View Shooting)
- Shooting Movies
- Handy Features
- Image Playback
- Software Start Guide / Downloading Images to a Computer
- Index
- Wi-Fi (Wireless Communication) Function Basic Instruction Manual
- Lens Instructions
- EF Lens Instructions
- Warranty

67
Depending on the scene, positioning the subject toward the left or right to
include a balanced background will result in a picture with better perspective.
In the <A> mode, pressing the shutter button halfway to focus on a
still subject will lock the focus on that subject. Recompose the shot
while keeping the shutter button pressed halfway, and then press the
shutter button completely to take the picture. This is called “focus lock”.
Focus lock is also possible in other Basic Zone modes (except <8:
5C>).
In the <A> mode, if the subject moves (distance to camera changes)
during or after focusing, AI Servo AF will take effect to focus on the
subject continuously. (The beeper will continue beeping softly.) As long
as you keep the AF point positioned over the subject while pressing the
shutter button halfway, focusing will be continuous. At the decisive
moment, press the shutter button completely to take the picture.
A
Full Auto Techniques (Scene Intelligent Auto)
Recomposing the Shot
Shooting a Moving Subject