
Owner's Manual

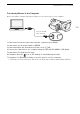
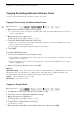
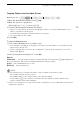

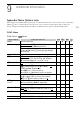
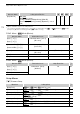
Table Of Contents
- Instruction Manual
- Table of Contents
- Supplied Accessories
- Parts & Controls
- Introduction
- Preparations
- Recording
- Recording Movies and Photos
- Selecting the Recording Mode (Video Quality)
- Dual Recording and Relay Recording
- Selecting the Frame Rate
- Slow & Fast Motion Recording
- CINEMA Mode and Cinema-Look Filters
- Focus Adjustment
- Zooming
- Advanced Image Stabilization
- Automatic Gain Control (AGC) Limit
- Automatic Exposure Recording Programs
- Exposure Adjustment
- White Balance
- Special Scene Recording Programs
- Looks and Other Image Effects
- Setting the Time Code
- Setting the User Bit
- Using the Mini Advanced Shoe
- Recording Audio
- Using an External Microphone
- Switching the Input (MIC Terminal)
- Audio Scenes
- Audio Recording Level (Built-in Microphone/MIC Terminal)
- Microphone Directionality (Built-in Microphone)
- Audio Equalizer (Built-in Microphone)
- Wind Screen (Built-in Microphone)
- Microphone Attenuator
- Low Cut Filter (MIC Terminal)
- Audio Mix
- Using Headphones
- Color Bars/Audio Reference Signal
- Video Snapshot
- Pre-Recording
- Onscreen Displays and Data Code
- Using the GP-E2 GPS Receiver
- Customization
- Playback
- External Connections
- Photos
- Saving/Sharing Recordings
- Additional Information
- Troubleshooting
- Specs
- Index
- Quick Guide
- Table of Contents
- Supplied Accessories
- Parts & Controls
- Charging the Battery Pack
- Basic Preparations
- Using a Memory Card
- Setting the Time/Date and Language
- Shooting Video and Taking Photos
- Playing Back Movies and Viewing Photos
- Playback on a TV Screen
- Saving Your Recordings
- Onscreen Icons and Displays
- Specs
- Additional Information
- Warranty

Deleting Photos
101
Deleting Photos
You can delete those photos that you are not interested in keeping.
Deleting a Single Photo
1 In single photo view, select the photo you want to delete.
2 Touch the screen to display the playback controls.
3 Open the [Delete] screen.
[FUNC.] > [Delete]
4 Touch [ Proceed] and then touch [Yes].
• The photo is deleted.
5 Drag your finger left/right to select another photo to delete or touch [X].
Deleting Photos from the Index Screen
1 Open the photo index screen.
2 Open the [Delete] screen.
[FUNC.] > [Delete]
3 Touch the desired option and then touch [Yes].
• When you select [Select], perform the following procedure to select the individual photos you
want to delete before touching [Yes].
• Touch [Stop] to interrupt the operation while it is in progress. Some photos will be deleted
nevertheless.
4Touch [OK].
To select individual photos
1 Touch on the individual photos you want to delete.
• A checkmark ! will appear on the photos you touch. The total number of selected photos will
appear next to the " icon.
• Touch a selected photo to remove the checkmark. To remove all checkmarks at once, touch
[Remove All] > [Yes].
2 After selecting all the desired photos, touch [OK].
Options
IMPORTANT
• Be careful when deleting photos. Deleted photos cannot be recovered.
• Photos that were protected with other devices cannot be deleted with this camcorder.
Operating modes:
[
folder name
] Delete all the photos taken on a particular date. The folder name (A 89) will appear in
the onscreen button, with the last four digits indicating the month and day.
[Select] Select individual photos to delete.
[All Photos] Delete all the photos.