
Owner's Manual

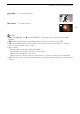


Table Of Contents
- Instruction Manual
- Table of Contents
- Supplied Accessories
- Parts & Controls
- Introduction
- Preparations
- Recording
- Recording Movies and Photos
- Selecting the Recording Mode (Video Quality)
- Dual Recording and Relay Recording
- Selecting the Frame Rate
- Slow & Fast Motion Recording
- CINEMA Mode and Cinema-Look Filters
- Focus Adjustment
- Zooming
- Advanced Image Stabilization
- Automatic Gain Control (AGC) Limit
- Automatic Exposure Recording Programs
- Exposure Adjustment
- White Balance
- Special Scene Recording Programs
- Looks and Other Image Effects
- Setting the Time Code
- Setting the User Bit
- Using the Mini Advanced Shoe
- Recording Audio
- Using an External Microphone
- Switching the Input (MIC Terminal)
- Audio Scenes
- Audio Recording Level (Built-in Microphone/MIC Terminal)
- Microphone Directionality (Built-in Microphone)
- Audio Equalizer (Built-in Microphone)
- Wind Screen (Built-in Microphone)
- Microphone Attenuator
- Low Cut Filter (MIC Terminal)
- Audio Mix
- Using Headphones
- Color Bars/Audio Reference Signal
- Video Snapshot
- Pre-Recording
- Onscreen Displays and Data Code
- Using the GP-E2 GPS Receiver
- Customization
- Playback
- External Connections
- Photos
- Saving/Sharing Recordings
- Additional Information
- Troubleshooting
- Specs
- Index
- Quick Guide
- Table of Contents
- Supplied Accessories
- Parts & Controls
- Charging the Battery Pack
- Basic Preparations
- Using a Memory Card
- Setting the Time/Date and Language
- Shooting Video and Taking Photos
- Playing Back Movies and Viewing Photos
- Playback on a TV Screen
- Saving Your Recordings
- Onscreen Icons and Displays
- Specs
- Additional Information
- Warranty

Recording Audio
70
Recording Audio
The camcorder features many audio-related functions you can use when recording. You can record
audio using the built-in stereo microphone, an optional external microphone (mini advanced shoe) or a
commercially available microphone (MIC terminal). Using an external microphone is useful when
recording in very quiet surroundings, where the built-in microphone may pick up the sound of the
camcorder's internal machinery, or when recording outside, where the built-in microphone may pick
up excessive noise from wind.
When you are recording AVCHD movies and the recording mode is set to 28 Mbps LPCM or 24 Mbps
LPCM, you can enjoy 2-channel, 16-bit linear PCM audio recording with a sampling frequency of 48
kHz. LPCM audio playback is also available for scenes recorded with those recording modes.
Using an External Microphone
Using the SM-V1 Surround Microphone or DM-100 Directional Stereo
Microphone
Using the SM-V1 you can add a sense of depth and presence to your recordings with 5.1ch surround
sound. Using the DM-100 you can accurately record audio coming directly from the direction you are
recording. In either case, to reduce the amount of noise due to wind, we recommend that you use the
wind screen supplied with the microphone.
When you use the optional SM-V1 Surround Microphone with this camcorder for the first time, you will
need to update the camcorder's firmware using the memory card supplied with the SM-V1. Please
note an important change to the firmware update procedure in the instruction manual of the SM-V1. It
states that you must set the camcorder to photo playback mode and open the [Firmware] setting in
the setup menus. In this camcorder, however, you must set the camcorder to mode and open
[FUNC.] > [MENU] > q > [Firmware].
Attach the optional SM-V1 Surround Microphone or DM-100 Directional Stereo Microphone
to the mini advanced shoe.
Refer to
Using the Mini Advanced Shoe
(A 69).
º will appear on the screen. For details about using the
optional external microphone, refer to the instruction manual of
the accessory used.
Operating modes: