
Owner's Manual


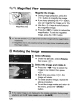
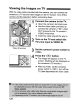
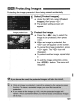

Table Of Contents
- Pocket Guide
- Owners Manual
- Image Quality
- Restore Default Settings (Menu Item)
- Date & Time Set
- Conventions Used in This Manual
- Table of Contents
- Supplied Accessories
- Parts & Controls
- Quick Start
- Getting Started
- Basic Shooting & Playback
- Advanced Shooting Techniques
- Program AE
- ISO Speed
- Using the Flash
- Changing Auto Focus Mode
- Selecting the Auto Focus Point
- Continuous Shooting
- Image Quality
- Selecting a Picture Style
- Action Shots
- Depth of Field
- Manual Exposure
- Automatic Depth of Field
- Metering Mode
- Exposure Compensation
- Auto Exposure Bracketing
- Customizing the Picture Style
- Defining a New Picture Style
- Setting the Color Space
- AE Lock
- FE Lock
- White Balance
- White Balance Correction
- Preventing Camera Shake
- Live View Shooting
- Handy Features
- Silencing the Beeper
- Card Reminder
- Image Review Time
- Auto Power-Off Time
- LCD Monitor Brightness
- File Numbering Method
- Auto Rotate
- Checking Camera Function Settings
- Restore Default Settings
- Preventing the LCD from Turning Off Automatically
- Changing the Shooting Settings Screen Color
- Flash Control
- Automatic Sensor Cleaning
- Appending Dust Delete Data
- Manual Sensor Cleaning
- Image Playback
- Printing Images
- Transferring Images to a Computer
- Customizing the Camera
- Automatic Sensor Cleaning
- Appending Dust Delete Data
- Manual Sensor Cleaning
- Reference
- Troubleshooting
- Error Codes
- System Accessory Map
- Specs
- Index
- Software Note - Install Software Before Connecting to a Computer
- Software Guide
- Scans of Supplied CD-ROMS
- Do More with Macro
- Great Photography IS Easy
- Warranty

.Viewing the Images on TV . _
With the video cable provided with
the
camera, you can connect the
. -
camera to a
TV
set and view images on the
TV
screen. Turn off the
camera
and the television before connecting them
..
Connect the camera
to
the
TV~
.
•
Open
the camera's terminal cover.·
.•.
Use the video cable (provided) to
connect the camera's
<
VbDu
E
??>
video
QUTterminal
to the
TV
monitor's
VIDEO IN terminal. .
• Insertthe cable plug all the way in.
2
Tu
..
n on the TV and
switch
the
TV's line
input
to
VIDEO IN.
Video IN terminal
3
4
Set
the
camera's
power
switch
to
.
<-ON>.
Press the <[E]> button.
~
The image
will
appear
on
the
TV
scree-no
(Nothing will
be
displayed on
the camera's LCD monitor.) .
•
After
you finish, set the
camera's·
.power switch to
<OFF>,
turn off the
TV,
then
disconnect the video cable.
128 \