
Owner's Manual
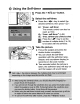
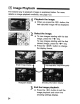
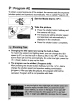
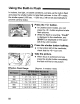
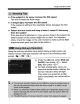
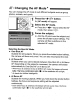
Table Of Contents
- Pocket Guide
- Owners Manual
- Image Quality
- Restore Default Settings (Menu Item)
- Date & Time Set
- Conventions Used in This Manual
- Table of Contents
- Supplied Accessories
- Parts & Controls
- Quick Start
- Getting Started
- Basic Shooting & Playback
- Advanced Shooting Techniques
- Program AE
- ISO Speed
- Using the Flash
- Changing Auto Focus Mode
- Selecting the Auto Focus Point
- Continuous Shooting
- Image Quality
- Selecting a Picture Style
- Action Shots
- Depth of Field
- Manual Exposure
- Automatic Depth of Field
- Metering Mode
- Exposure Compensation
- Auto Exposure Bracketing
- Customizing the Picture Style
- Defining a New Picture Style
- Setting the Color Space
- AE Lock
- FE Lock
- White Balance
- White Balance Correction
- Preventing Camera Shake
- Live View Shooting
- Handy Features
- Silencing the Beeper
- Card Reminder
- Image Review Time
- Auto Power-Off Time
- LCD Monitor Brightness
- File Numbering Method
- Auto Rotate
- Checking Camera Function Settings
- Restore Default Settings
- Preventing the LCD from Turning Off Automatically
- Changing the Shooting Settings Screen Color
- Flash Control
- Automatic Sensor Cleaning
- Appending Dust Delete Data
- Manual Sensor Cleaning
- Image Playback
- Printing Images
- Transferring Images to a Computer
- Customizing the Camera
- Automatic Sensor Cleaning
- Appending Dust Delete Data
- Manual Sensor Cleaning
- Reference
- Troubleshooting
- Error Codes
- System Accessory Map
- Specs
- Index
- Software Note - Install Software Before Connecting to a Computer
- Software Guide
- Scans of Supplied CD-ROMS
- Do More with Macro
- Great Photography IS Easy
- Warranty

;i
.~
Using
the
Self-timer
I:
.
/
I
Press
the
<~
~~i>
button.
1
2
Select
the
self-timer
.
• Press the <
~~>
key to
selecfthe
desired self-timer, then press
<@l
>.
~i:
·10-sec.self-timer
'
The remote control can also be
used. (p.164)
,.
~2:
2-sec.
self-timer*
(p.94)
\'!.)c:
10-sec.
self-timer
pliJs
continuous
shots
Press the
<::lA.T
> key to set the·
number of multiple shots
(2
to 10)
.
to
be
taken with the self-timer.
3
TakFe
thethPictub~e.
t d
th
• . ocus e su
~ec
an press e
shutter button completely.
~
You
can
che.ck
the
self-timer
operation with the self-timer lamp,·
beeper,
and
countdown display (in
seconds) on the LCD monitor.
... Two seconds before the picture is
taken, the self-timer lamp will stay on·
and the beeper will sound faster;
53