
Owner's Manual

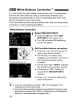
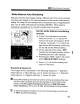
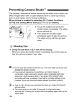

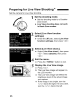
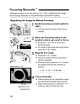

Table Of Contents
- Pocket Guide
- Owners Manual
- Image Quality
- Restore Default Settings (Menu Item)
- Date & Time Set
- Conventions Used in This Manual
- Table of Contents
- Supplied Accessories
- Parts & Controls
- Quick Start
- Getting Started
- Basic Shooting & Playback
- Advanced Shooting Techniques
- Program AE
- ISO Speed
- Using the Flash
- Changing Auto Focus Mode
- Selecting the Auto Focus Point
- Continuous Shooting
- Image Quality
- Selecting a Picture Style
- Action Shots
- Depth of Field
- Manual Exposure
- Automatic Depth of Field
- Metering Mode
- Exposure Compensation
- Auto Exposure Bracketing
- Customizing the Picture Style
- Registering the Picture Style
- Setting the Color Space
- AE Lock
- FE Lock
- White Balance
- White Balance Correction
- Preventing Camera Shake
- Live View Shooting
- Handy Features
- Silencing the Beeper
- Card Reminder
- Image Review Time
- Auto Power-Off Time
- LCD Monitor Brightness
- File Numbering Method
- Auto Rotate
- Checking Camera Function Settings
- Restore Default Settings
- Setting the LCD On / Off
- Changing the Shooting Settings Screen Color
- Flash Control
- Automatic Sensor Cleaning
- Appending Dust Delete Data
- Manual Sensor Cleaning
- Image Playback
- Printing Images
- Transferring Images to a Computer
- Customizing the Camera
- Automatic Sensor Cleaning
- Appending Dust Delete Data
- Manual Sensor Cleaning
- Reference
- Troubleshooting
- Error Codes
- System Accessory Map
- Specs
- Index
- Software Note - Install Software Before Connecting to a Computer
- Software Guide
- Scans of Supplied CD-ROMS
- Great Photography IS Easy
- Do More with Macro
- Warranty

Preparing for Live View Shooting *
o.
During Live View shqoting,db not pointthe
~mera
tow~rdthesun.The
sun's heat can
damag~the
camera's internal components.
• Live Viewshooting WilldisableaJewCustornFunctignsettings.{p.193)
• Under low light or bright light conditions,theUveView image might not
reflect the brightness
of
the captured image.
• If·the light source within
theirnagechqnges,th~screenmight
f1icker
..
·lf
this happens, stop
theUve
View shooting, then resume Live View
shooting under the actual light source
to
be
used.
• Dqring
Liv~
View.imqgedisplay,>if,yoq
pointt~~carnerajn.adjfferent
direction, it mightthroVII offthe correct brightness momentarily
and
the
image might not look right-Wait until the image brightness stabilizes
before
...
shooting.
•
Ifthereisa
verybrighflightsourceirl
the picture,
sUCh
as the sun, the
bright area mightbe blackenedon the LCD monitor. However, the actual
captured image
""HI
corr~~tly~h0'J\'
th~
bright
~reCl'
• If
yousetthett~
'LCDbrightnEilssj,tobrightsettingsinlow light,
chrominancenoise may appear
in
fhe Live View image. However, the
chrominancenoise willD?tpe
re~?rded
t?
the~apt~red
image.
• When
youmagnify
the
image, the image sharpness
may
look more
pronounced than it really is.
• Under the
[r~
Custom
FunctionsJC.Fn)] menu,sefting
[AutoLighting
~~~~~~:~~··~··~:~~'~~i~~\7~:·~~e~~~::.SPI'ay.'·a·".darkl·y-exposed.'(·Set·.'With
I
r=¥l.
L..jj •
If
the camera is
not
operated fora,prolongedperiod, thepQwer
wiHtLirn
off automatically as sefwith
[r~rAoto
power
off]. (p.109) If
[r~·
Auto
power()ff]issettp[()ff],tneJ
•.
iv;.vieV\i shooting will stop automatically
after30m!n.(camerapower remains on).
• The image's field
of
view is about 100%.
• With the video cable (provided}connecting'the camera to
can
view
images on the
TV.
(p.128)
97