
Owner's Manual
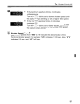
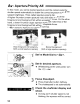
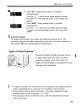

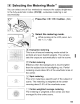
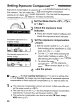

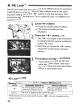
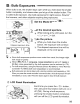
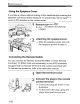
Table Of Contents
- Pocket Guide
- Owners Manual
- Conventions Used in This Manual
- Table of Contents
- Quick Start
- Supplied Accessories
- Parts & Controls
- Getting Started
- Attaching the Strap
- Charging the Battery
- Installing / Removing the Battery
- Power On
- Installing & Removing a CF Card
- Mounting & Detaching a Lens
- Lens Image Stabilizer
- Basic Operation
- Using the Quick Control Screen
- Menu Operations
- Setting the Language
- Date & Time Set
- Formatting a CF Card
- Auto Power-Off
- Restore Default Settings
- Basic Shooting
- Image Settings
- Setting the Auto Focus & Drive Modes
- Advanced Operations
- Live View Shooting & Movies
- Image Playback
- Sensor Cleaning
- Printing Images & Transferring Images to a Computer
- Customizing the Camera
- Checking Camera Settings
- Checking Battery Information
- Optional Accessories
- Replacing Date / Time Battery
- Function Availability Table
- Menu Settings
- Troubleshooting
- Error Codes
- System Map
- Specs
- Index
- Software Information
- Note - Playback Movies from the Computer on the Camera
- Accessory Brochure
- Warranty

B:
Bulb Exposures
Using the Eyepiece Cover
If you take a picture without looking at the viewfinder, light entering the
eyepiece can throw off the exposure.
To
prevent this, use the eyepiece
cover (p.23) attached to the camera strap.
Remove the eyecup.
• Push the bottom of the eyecup
upward.
Attaching the eyepiece cover.
• Slide the eyepiece cover down into
the eyepiece groove to attach
it.
Connecting the Remote Switch
You
can connect the Remote Switch RS-80N3 or Timer Remote
Controller TC-80N3 (both sold separately) or any EOS accessory
equipped with
an
N3-type terminal to the camera and shoot with
it.
To
operate the accessory, refer to its instruction manual.
Connect the plug to the remote
control terminal.
• Connect the plug as shown
in
the
illustration.
•
To
disconnect the plug, grasp the
plug's silver part and pull out.
1 Open the terminal cover.
2
100