
Owner's Manual
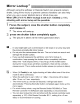
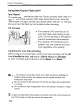

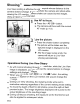
Table Of Contents
- Pocket Guide
- Owners Manual
- Conventions Used in This Manual
- Table of Contents
- Quick Start
- Supplied Accessories
- Parts & Controls
- Getting Started
- Attaching the Strap
- Charging the Battery
- Installing / Removing the Battery
- Power On
- Installing & Removing a CF Card
- Mounting & Detaching a Lens
- Lens Image Stabilizer
- Basic Operation
- Using the Quick Control Screen
- Menu Operations
- Setting the Language
- Date & Time Set
- Formatting a CF Card
- Auto Power-Off
- Restore Default Settings
- Basic Shooting
- Image Settings
- Setting the Auto Focus & Drive Modes
- Advanced Operations
- Live View Shooting & Movies
- Image Playback
- Sensor Cleaning
- Printing Images & Transferring Images to a Computer
- Customizing the Camera
- Checking Camera Settings
- Checking Battery Information
- Optional Accessories
- Replacing Date / Time Battery
- Function Availability Table
- Menu Settings
- Troubleshooting
- Error Codes
- System Map
- Specs
- Index
- Software Information
- Note - Playback Movies from the Computer on the Camera
- Accessory Brochure
- Warranty

Mirror
Lockup"*
Although using the self-timer or Remote Switch can prevent camera
shake, using mirror lockup to prevent camera vibrations can also help
when you use a super telephoto lens or shoot close ups.
When
[.Q.
C.Fn
III -6:
Mirror
lockup]
is
set
to
[1:
Enable]
(p.180),
shooting
with
mirror
lockup
will
be
possible.
1
Focus
the
subject,
press
the
shutter
button
completely
and
release
it.
• The mirror will swing up.
2
Press
the
shutter
button
completely
again
.
... The picture is taken and the mirror goes back down.
•
In
very bright light such as at the beach or ski slope on a sunny day, take
the picture promptly after mirror lockup.
• Do not point the camera toward the sun. The sun's heat can scorch and
damage the shutter curtains.
•
If
you use bulb exposures, the self-timer, and mirror lockup
in
combination, keep pressing the shutter button completely (self-timer
delay time
+ bulb exposure time). If you let go of the shutter button
during the 10-sec./2-sec. self-timer countdown, there will be a shutter-
release sound. This is not the actual shutter release (no picture
is
taken).
[]:I
When [1: Enable]
is
set, single shooting will take effect even if the drive
mode is set to continuous.
• When the self-timer is set to
<ij\5»
or
<ij\5>2>,
the picture will be taken
after 10 sec. or 2 sec. respectively.
• The mirror locks up, and after 30 seconds, it will go back down
automatically. Pressing the shutter button completely again locks up the
mirror again.
• For mirror lockup shots, using the Remote Switch RS-80N3 or Timer
Remote Controller TC-80N3 (both sold separately)
is
recommended.
•
You
can also lockup the mirror and shoot with the remote controller (sold
separately, p.102). With Remote Controller
RC-1
, setting it to a 2-sec.
delay is recommended for shooting.
101
I