
Owner's Manual
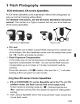

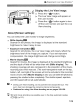
Table Of Contents
- Pocket Guide
- Owners Manual
- Conventions Used in This Manual
- Table of Contents
- Quick Start
- Supplied Accessories
- Parts & Controls
- Getting Started
- Attaching the Strap
- Charging the Battery
- Installing / Removing the Battery
- Power On
- Installing & Removing a CF Card
- Mounting & Detaching a Lens
- Lens Image Stabilizer
- Basic Operation
- Using the Quick Control Screen
- Menu Operations
- Setting the Language
- Date & Time Set
- Formatting a CF Card
- Auto Power-Off
- Restore Default Settings
- Basic Shooting
- Image Settings
- Setting the Auto Focus & Drive Modes
- Advanced Operations
- Live View Shooting & Movies
- Image Playback
- Sensor Cleaning
- Printing Images & Transferring Images to a Computer
- Customizing the Camera
- Checking Camera Settings
- Checking Battery Information
- Optional Accessories
- Replacing Date / Time Battery
- Function Availability Table
- Menu Settings
- Troubleshooting
- Error Codes
- System Map
- Specs
- Index
- Software Information
- Note - Playback Movies from the Computer on the Camera
- Accessory Brochure
- Warranty

Shooting*
Live View shooting
is
effective for still subjects whose distance to the
camera does not change. If you handhold the camera and shoot while
viewing the LCD monitor, camera shake can cause blurred images.
Using a tripod is recommended.
1 Use AF
to
focus
.
• Press the <
AF-ON
> button.
~
The camera will focus with the current
AF mode (p.113).
Take
the
picture.
• Press the shutter button completely.
~
The picture will be taken and the
captured image
is
displayed on the
LCD monitor.
~
After the image review ends, the
camera will return to Live View
shooting automatically.
Operations
During
Live
View
Display
• As with normal shooting through the viewfinder, while the Live View
image is displayed, you can still use the camera buttons to change
settings and playback images.
• When you press the <
AF·
DRIVE>
or <
ISO·~
> button, the setting
screen will appear on the LCD monitor and you can change the
settings.
• During Live View shooting, the metering mode will
be
set to
evaluative metering regardless
of
the current metering mode setting.
•
To
check the depth
of
field for still photos, press the depth-of-field
preview button. The image brightness displayed will
be
close to the
actual brightness
of
the resulting image.
• During continuous shooting, the exposure set for the first shot will
also be applied to subsequent shots.
110