
Owner's Manual

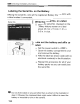
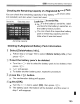
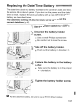
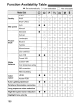
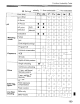
Table Of Contents
- Pocket Guide
- Owners Manual
- Conventions Used in This Manual
- Table of Contents
- Quick Start
- Supplied Accessories
- Parts & Controls
- Getting Started
- Attaching the Strap
- Charging the Battery
- Installing / Removing the Battery
- Power On
- Installing & Removing a CF Card
- Mounting & Detaching a Lens
- Lens Image Stabilizer
- Basic Operation
- Using the Quick Control Screen
- Menu Operations
- Setting the Language
- Date & Time Set
- Formatting a CF Card
- Auto Power-Off
- Restore Default Settings
- Basic Shooting
- Image Settings
- Setting the Auto Focus & Drive Modes
- Advanced Operations
- Live View Shooting & Movies
- Image Playback
- Sensor Cleaning
- Printing Images & Transferring Images to a Computer
- Customizing the Camera
- Checking Camera Settings
- Checking Battery Information
- Optional Accessories
- Replacing Date / Time Battery
- Function Availability Table
- Menu Settings
- Troubleshooting
- Error Codes
- System Map
- Specs
- Index
- Software Information
- Note - Playback Movies from the Computer on the Camera
- Accessory Brochure
- Warranty

Replacing
the
Date/Time
Battery
The date/time (back-up) battery maintains the camera's date and time.
Its service life
is
about 5 years. If you turn on the power and the date/
time
is
reset, replace the back-up battery with a new CR1616 lithium
battery as described below.
The
date/time
setting
will
also
be
reset,
so
be
sure
to
set
the
correct
date/time
(p.42).
3 Take
off
the
battery
holder.
• Push out the battery
in
direction
~.
1
Set
the
power
switch
to
<OFF>.
--.--.--~-~-
2
Unscrew
the
battery
holder
screw.
• Use a small Philips screwdriver.
• Be careful not to lose the screw.
Replace
the
battery
in
the
battery
holder.
• Make sure the battery
is
in
the proper
+ - orientation.
S Tighten the battery
holder
screw.
o
For
the date/time battery,
be
sure to use a CR1616 lithium battery.
I
197