
Owner's Manual
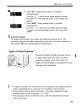

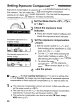

Table Of Contents
- Pocket Guide
- Owners Manual
- Conventions Used in This Manual
- Table of Contents
- Quick Start
- Supplied Accessories
- Parts & Controls
- Getting Started
- Attaching the Strap
- Charging the Battery
- Installing / Removing the Battery
- Power On
- Installing & Removing a CF Card
- Mounting & Detaching a Lens
- Lens Image Stabilizer
- Basic Operation
- Using the Quick Control Screen
- Menu Operations
- Setting the Language
- Date & Time Set
- Formatting a CF Card
- Auto Power-Off
- Restore Default Settings
- Basic Shooting
- Image Settings
- Setting the Auto Focus & Drive Modes
- Advanced Operations
- Live View Shooting & Movies
- Image Playback
- Sensor Cleaning
- Printing Images & Transferring Images to a Computer
- Customizing the Camera
- Checking Camera Settings
- Checking Battery Information
- Optional Accessories
- Replacing Date / Time Battery
- Function Availability Table
- Menu Settings
- Troubleshooting
- Error Codes
- System Map
- Specs
- Index
- Software Information
- Note - Playback Movies from the Computer on the Camera
- Accessory Brochure
- Warranty

Setting
Exposure
Compensation
'*
Exposure compensation is used to alter the standard exposure set by
the camera.
You
can make the image look brighter (increased
exposure) or darker (decreased exposure).
You
can set the exposure
compensation up to ±2 stops
in
1/3-stop increments.
Set
the
Mode Dial
to
<P>, <Tv>,
or
<Av>.
Check
the
exposure
level
indicator.
• Press the shutter button halfway and
check the exposure level indicator.
3 Set
the
exposure
compensation
amount.
• Set the power switch to
<,J
>, and
while looking at the viewfinder or LCD
panel, turn the
< 0 > dial.
•
Turn
the
< 0 > dial while pressing the
shutter button halfway or within
(04
)
after pressing
the
shutter button
halfway.
•
To
cancel the exposure
compensation, set the exposure
compensation amount back to
<i
>.
1
2
o
Decreased exposure for a
darker image
Increased exposure for a
brighter image
4 Take
the
picture.
--
If [,g, C.Fn
II
-4:
Auto
Lighting
Optimizer] (p.177) is set to a setting other
than [3:
Disable], the image may look bright even
if
a decreased exposure
compensation or flash exposure compensation (p.103, 105) has been set.
[i] • The exposure compensation amount will remain
in
effect even after you
set the power switch to
<OFF>.
•
Take
care not to turn the <0 > dial
and
change the exposure compensation
inadvertently.
To
prevent this, set the power switch to <
ON
>.
• The exposure compensation can also be set with
[0:
Expo.
comp.!
AEB] menu (p.97).
96