
Owner's Manual


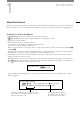

Table Of Contents
- Instruction Manual
- Highlights of the XF705
- Table of Contents
- Introduction
- Preparations
- Recording
- Recording Video
- Video Configuration: Video Format, System Frequency, Frame Rate, Resolution and Bit Rate
- Changing Main Functions with the FUNC Button
- Shutter Speed
- Gain
- ND Filter
- Aperture
- Gamma Curve and Main Color Settings
- White Balance
- Zooming
- Using Optional Conversion Lenses
- Adjusting the Focus
- Image Stabilization
- Onscreen Markers and Zebra Patterns
- Setting the Time Code
- Setting the User Bit
- Synchronizing with an External Device
- Recording Audio
- Audio Settings and Recorded Audio Channels
- Connecting an External Microphone or External Audio Input Source to the Camcorder
- Setting the Audio Input Type for the INPUT 1/INPUT 2 Terminals
- Selecting the Audio Input Source for Audio Channels
- Adjusting the Audio Recording Level
- Advanced Audio Input Settings
- Monitoring the Audio with Headphones
- Colors Bars/Audio Reference Signal
- Waveform Monitor
- Adding Marks to Clips while Recording
- Using Metadata
- Recording GPS Information (Geotagging)
- Reviewing a Recording
- Special Recording Modes
- Infrared Recording
- Customization
- Playback
- External Connections
- Network Functions
- Photos
- Additional Information

1
9
Introduction
About this Manual
Thank you for purchasing the Canon XF705. Please read this manual carefully before you use the camcorder and
retain it for future reference. Should the camcorder fail to operate correctly, refer to Troubleshoot ing (A 204).
Conventions Used in this Manual
• IMPORTANT: Precautions related to the camcorder’s operation.
• NOTES: Additional topics that complement the basic operating procedures.
• A: Reference page number.
• The following terms are used in this manual.
"Screen" refers to the LCD screen and the viewfinder screen.
"Card" refers to an SD, SDHC or SDXC card.
When not specified, "access indicator" refers to either or both of the SD card access indicators (SD CARD2/
SD CARD3).
"Clip" refers to a single movie unit recorded with a single recording operation (for example, from the point when
the REC button is pressed to start recording until it is pressed again to stop).
• Photographs in the manual are simulated pictures taken with a still camera. Some screenshots have been
altered to make them easier to read.
• Operating mode icons: These icons indicate the camcorder's two operating modes (A 22). A shaded icon
(like ) indicates that the function described can be used in the operating mode shown; a non-shaded icon
(like ) indicates that the function cannot be used.
• The following style is used to represent menu selections. For a detailed explanation on how to use the menus,
refer to Using the Menus (A 25). For a summary of all available menu options and settings, refer to Menu
Options (A 183).
Operating modes:
Brackets [ ] indicate text as it appears on the
camcorder's screen (menu options, onscreen
buttons, messages, etc.).
This arrow indicates a deeper
level in the menu hierarchy or
the next step in a procedure.
1 Select [Rec Format].
> [
Æ
! Recording/Media Setup] > [Rec Format]
2 Select [XF-HEVC] or [XF-AVC] and then press SET.