
Getting Started


5
ENGLISH
1
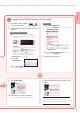
Insert the Setup CD-ROM
into your computer.
2
Follow the instructions for your version of
Windows.
Windows 10/Windows 8.1
aClick on the following message when it
appears on the right-hand side of your
computer screen.
Note
If the message does not appear (or is no longer
visible), click the
File Explorer icon in the
taskbar. On the left-hand side of the window, click
This PC. Double click the CD icon that is
displayed on the right-hand side. When the
content of the CD is displayed, double click
Msetup4.exe. Proceed to c.
bClick Run
Msetup4.exe.
cIf the User Account Control dialog box
appears, click Yes .
Windows 7
aClick Run Msetup4.exe.
•
When the AutoPlay screen appears, click
Run Msetup4.exe.
Note
If the AutoPlay screen does not appear, in the
Start menu, click Computer. On the right-hand
side of the window, double click the
CD icon.
When the content of the CD is displayed, double
click Msetup4.exe.
bIf the User Account Control dialog box
appears, click Continue.
3
Proceed to step 9 below.
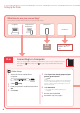
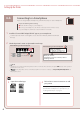
Using the Setup CD-ROM (Windows Only) Provided
9
Click Start Setup.
10
Follow the on-screen instructions.
•
These operations may take some time.
11
When the following screen appears, click
Exit.
Your printer is now connected to your computer.
To connect a smartphone as well, see "6-b.
Connecting to a Smartphone" on page 6.