
User Manual


Preparing the Camcorder
19
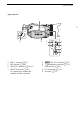
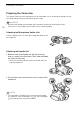
Using the Lens Hood
While recording, the supplied lens hood with lens barrier is
effective for reducing stray light that can be the cause of lens
flare and ghost images. Additionally, closing the lens barrier
can help prevent fingerprints and dirt accumulation on the
lens.
1 Remove the lens cap.
2 Align the mark on the lens hood with the lens hood
mount index mark on the bottom of the camcorder
(
햲), and then turn the lens hood clockwise until it
stops with a click
(햳).
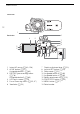
• Be careful not to deform the lens hood.
• Make sure that the lens hood is aligned with the thread.
• To remove the lens hood, turn it counterclockwise.
NOTES
About the lens cap:
• Use the supplied lens cap when carrying the camcorder or storing it after use.
• Note that the lens cap and the lens hood with lens barrier cannot be used simultaneously.
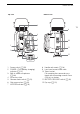
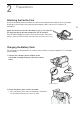
Adjusting the LCD Screen
Open the LCD panel 90 degrees.
• You can rotate the panel downward or toward the lens.
• Rotating the LCD toward the lens can be useful to allow the subject to monitor the LCD screen while
you use the viewfinder.
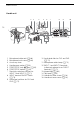
NOTES
• You can adjust the brightness of the LCD screen with the > [£ Display Setup] > [LCD
Brightness] or [LCD Backlight] setting. Also, you can hold the DISP button pressed down for more
than 2 seconds to change the [LCD Backlight] setting between bright and normal or from dim to
normal.
Subject can monitor the LCD screen