
Owner's Manual


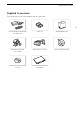

Table Of Contents
- Instruction Manual
- Highlights of the Camcorder
- Table of contents
- 1. Introduction
- 2. Preparations
- 3. Recording
- Recording Clips and Photos
- Video Configuration: Resolution, Bit Rate and Frame Rate
- Slow & Fast Motion Recording
- Shooting Modes
- Exposure Adjustment
- Automatic Gain Control (AGC) Limit
- White Balance
- Using Looks
- Zooming
- Focus Adjustment
- Image Stabilization
- Setting the Time Code
- Setting the User Bit
- Recording Audio
- Selecting the Audio Recording Format
- Audio Settings and Recorded Audio Channels
- Connecting an External Microphone or External Audio Input Source to the Camcorder
- Using Line Input or an External Microphone Connected to an INPUT Terminal
- Audio Recording Level (INPUT Terminals)
- Adjusting the Microphone’s Sensitivity (INPUT terminals)
- Microphone Attenuator (INPUT terminals)
- Using the Built-in Microphone or an External Microphone Connected to the MIC Terminal
- Audio Recording Level (Built-in Microphone/MIC Terminal)
- Microphone Sensitivity (Built-in Microphone)
- Microphone Attenuator (Built-in Microphone or MIC Terminal)
- Low-Cut Filter (Built-in Microphone or MIC Terminal)
- Using Headphones
- Color Bars/Audio Reference Signal
- Pre-Recording
- Onscreen Displays
- Infrared Recording
- Using the Optional RC-V100 Remote Controller
- Using the GP-E2 GPS Receiver
- 4. Customization
- 5. Playback
- 6. External Connections
- 7. Saving Clips
- 8. Additional Information
- Quick Guide
- Important Usage Instructions
- Precautions About the Battery Pack
- Supplied Accessories
- Table of Contents
- Names of Parts
- Charging the Battery Pack
- Basic Preparations
- Setting the Date, Time and Language
- Using SD Cards
- Recording Clips and Photos
- Playing Back and Saving Clips and Photos
- Connecting to an External Monitor
- Onscreen Icons and Displays
- Safety Instructions and Handling Precautions
- Others
- Abridged Specifications
- Additional Information
- Warranty

About this Manual
7
Introduction
About this Manual
Thank you for purchasing the Canon XA45 / XA40. Please read this manual carefully before you use
the camcorder and retain it for future reference. Should your camcorder fail to operate correctly, refer
to
Troubleshooting
(A 116).
Conventions Used in this Manual
• IMPORTANT: Precautions related to the camcorder’s operation.
• NOTES: Additional topics that complement the basic operating procedures.
• A: Reference page number within this manual.
• s: Used as an abbreviation for the model indicated in the icon. The icon refers to text and
illustrations that apply only to the indicated model.
• The following terms are used in this manual:
“SD card” refers to an SD, SDHC or SDXC memory card.
“Screen” refers to the LCD screen and the viewfinder screen.
“Clip” refers to one movie unit from the point you press the START/STOP button to start recording
until you press again to pause the recording.
• The photos included in this manual are simulated pictures taken with a still camera. Unless indicated
otherwise, illustrations and menu icons refer to the s.
• Some screenshots in this manual have been simplified to show only relevant icons.
IMPORTANT
• Observe the following precautions while the ACCESS indicator is on or flashing. Failing to do so
may result in permanent data loss or damage to the memory.
- Do not disconnect the power source or turn off the camcorder.
- Do not open the SD card compartment cover.
- Do not change the camcorder’s camera mode.
- Do not set the camcorder to MEDIA mode.
- When a USB cable is connected to the camcorder, do not disconnect the USB cable.
1
Introduction