
Owner's Manual


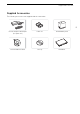

Table Of Contents
- Instruction Manual
- Reset All
- Highlights of the Camcorder
- Table of contents
- 1. Introduction
- 2. Preparations
- 3. Recording
- Recording Clips and Photos
- Video Configuration: Resolution, Bit Rate and Frame Rate
- Slow & Fast Motion Recording
- Shooting Modes
- Exposure Adjustment
- Automatic Gain Control (AGC) Limit
- White Balance
- Using Looks
- Zooming
- Focus Adjustment
- Image Stabilization
- Setting the Time Code
- Setting the User Bit
- Using the Mini Advanced Shoe
- Recording Audio
- Using an External Microphone
- Audio Scenes
- Audio Recording Level (Built-in Microphone/MIC Terminal)
- Microphone Attenuator (Built-in Microphone or External Microphone)
- Low-Cut Filter (MIC Terminal)
- Wind Screen (Built-in Microphone)
- Microphone Directionality (Built-in Microphone)
- Audio Equalizer (Built-in Microphone)
- Audio Limiter
- Audio Compressor
- Using Headphones
- Color Bars/Audio Reference Signal
- Pre-Recording
- Onscreen Displays
- Using the Optional RC-V100 Remote Controller
- Using the GP-E2 GPS Receiver
- 4. Customization
- 5. Playback
- 6. External Connections
- 7. Saving Clips
- 8. Additional Information
- Quick Guide
- Important Usage Instructions
- Supplied Accessories
- Table of Contents
- Names of Parts
- Charging the Battery Pack
- Basic Preparations
- Setting the Date, Time and Language
- Using SD Cards
- Recording Clips and Photos
- Playing Back and Saving Clips and Photos
- Connecting to an External Monitor
- Onscreen Icons and Displays
- Safety Instructions and Handling Precautions
- Others
- Abridged Specifications
- Additional Information
- Optional Accessories
- Specifications

About this Manual
8
Brackets [ ] are used to
refer to onscreen buttons
and menu options you will
select and to other
onscreen messages and
displays.
These icons indicate the camcorder’s operating mode and whether a function is available in that
mode.
: Indicates whether the
camcorder is in shooting (CAMERA) or
playback (MEDIA) mode. In this example, the
function is available only in mode. For
details, refer to
Turning the Camcorder On
and Off
(A 21).
: Indicates the camera mode. For
details, refer to
Setting the Camera Mode
(A 22).
The > arrow is used to abbreviate menu
selections. For details on how to use the
menus, refer to
Using the Menus
(A 25).
For a summary of available menu options
and settings, refer to the appendix
Menu
Options
(A 96).