
Owner's Manual

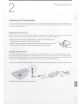
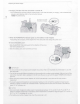
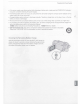
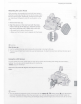
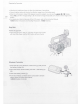
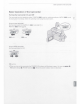
Table Of Contents
- Instruction Manual
- Highlights of the Camcorder
- Table of Contents
- Introduction
- Preparations
- Recording
- Recording Video and Photos
- Video Configuration: Video Format, Resolution, Bit Rate and Frame Rate
- Slow & Fast Motion Recording
- Adjusting the Focus
- Zooming
- Image Stabilization
- Automatic Gain Control (AGC) Limit
- Shooting Modes
- Adjusting the Exposure
- ND Filter
- White Balance
- Using Looks
- Setting the Time Code
- Setting the User Bit
- Recording Audio
- Selecting the Audio Format of MP4 Clips
- Audio Settings and Recorded Audio Channels
- Connecting an External Microphone or External Audio Input Source to the Camcorder
- Recording Audio from the INPUT Terminals to CH1/CH2
- Recording Audio from the Built-In Microphone or MIC Terminal to CH1/CH2
- Adjusting the Audio Recording Level
- Advanced Audio Input Settings
- Using Headphones
- Color Bars/Audio Reference Signal
- Pre-Recording
- Infrared Recording
- Using the Optional RC-V100 Remote Controller
- Using the Optional GP-E2 GPS Receiver
- Customization
- Playback
- External Connections
- Saving Clips
- Additional Information
- Quick Guide
- Warranty

18
Preparing the Camcorder
Preparing the Camcorder
0 IMPO_RTANT
• Be careful not
to
drop the camcorder when attaching, removing or adjusting the various accessories. Using a
table or other stable surface is recommended.
Attaching the Handle Unit
The camcorder is functional even if you remove the handle unit. However,
to
use the INPUT terminals, infrared
light and tally lamp, the handle unit must be correctly attached
to
the camcorder.
1
Attach
the
microphone
holder
unit
to
the
handle
unit.
• Use a commercially available Phillips head ("crosshead")
screwdriver and the
two
supplied screws.
2 Align
the
handle
unit
with
the
handle
attachment
unit
and
then
slide
the
handle
unit
forward
all
the
way.
3 Firmly tighten
the
front and rear screws.
•
To
tighten the rear screws you can use a coin or similar object.