
Owner's Manual
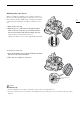
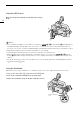
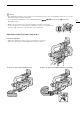
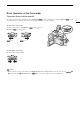

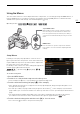
Table Of Contents
- Instruction Manual
- Highlights of the Camcorder
- Table of Contents
- Introduction
- Preparations
- Recording
- Recording Video and Photos
- Video Configuration: Video Format, Resolution, Bit Rate and Frame Rate
- Slow & Fast Motion Recording
- Adjusting the Focus
- Zooming
- Image Stabilization
- Automatic Gain Control (AGC) Limit
- Shooting Modes
- Adjusting the Exposure
- ND Filter
- White Balance
- Using Looks
- Setting the Time Code
- Setting the User Bit
- Recording Audio
- Selecting the Audio Format of MP4 Clips
- Audio Settings and Recorded Audio Channels
- Connecting an External Microphone or External Audio Input Source to the Camcorder
- Recording Audio from the INPUT Terminals to CH1/CH2
- Recording Audio from the Built-In Microphone or MIC Terminal to CH1/CH2
- Adjusting the Audio Recording Level
- Advanced Audio Input Settings
- Using Headphones
- Color Bars/Audio Reference Signal
- Pre-Recording
- Infrared Recording
- Using the Optional RC-V100 Remote Controller
- Using the Optional GP-E2 GPS Receiver
- Customization
- Playback
- External Connections
- Saving Clips
- Additional Information
- Quick Guide
- Warranty

21
Preparing the Camcorder
Attaching the Lens Hood
While recording, the supplied lens hood with lens barrier is
effective for reducing stray light that can be the cause of lens
flare and ghost images. Additionally, closing the lens barrier
can help prevent fingerprints and dirt accumulation on the
lens.
1 Remove the lens cap.
2 Align the groove on the lens hood with the index
mark on the top of the lens (
햲), and then turn the
lens hood clockwise until it stops with a click
(햳).
• Be careful not to deform the lens hood.
• Make sure that the lens hood is aligned with the thread.
To remove the lens hood
1Press and hold the lens hood release button and turn
the lens hood counterclockwise.
2 Place the lens cap back on the lens.
NOTES
About the lens cap:
• Use the supplied lens cap when carrying the camcorder or storing it after use.
• The lens cap and lens hood cannot be used simultaneously. To attach the lens hood, remove the lens cap in
advance.
햲
햳
Lens hood release
button