
Owner's Manual


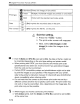


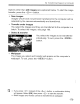
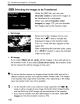
Table Of Contents
- Instruction Manual
- Conventions Used in This Manual
- Table of Contents
- Quick Start Guide
- Supplied Accessories
- Parts & Controls
- Getting Started
- Basic Shooting & Image Playback
- Advanced Shooting Operations
- Program AE
- Changing the ISO Speed
- Using the Flash
- Changing the AF Mode
- Selecting the AF Point
- Continuous Shooting
- Self-Timer
- Setting Image Quality
- Selecting a Picture Style
- Action Shots
- Changing Depth of Field
- Manual Exposure
- Automatic Depth of Field
- Changing the Metering Mode
- Setting Exposure Compensation
- Auto Exposure Bracketing
- Customizing a Picture Style
- Registering a Picture Style
- Setting the Color Space
- AE Lock
- FE Lock
- Setting the White Balance
- White Balance Correction
- Lens Peripheral Illumination Correction
- Using the Quick Control Screen
- Preventing Camera Shake
- Live View Shooting
- Shooting Movies
- Handy Features
- Silencing the Beeper
- Card Reminder
- Setting Image Preview Time
- Setting Auto Power-Off Time
- Adjusting LCD Monitor Brightness
- File Numbering Methods
- Auto Rotate of Vertical Images
- Checking Camera Settings
- Restore Default Settings
- About Copyright Information
- Preventing the LCD Monitor from Turning Off Automatically
- Changing the Shooting Settings Screen Color
- Setting the Flash
- Automatic Sensor Cleaning
- Appending Dust Delete Data
- Manual Sensor Cleaning
- Image Playback
- Printing Images & Transferring Images to a Computer
- Customizing the Camera
- Reference
- Troubleshooting
- Error Codes
- System Accessory Map
- Specs
- Index
- Pocket Guide
- Parts & Controls
- Quick Start Guide
- Image Playback
- Menu Operations / Menu Settings
- Quick Control Screen
- Image Recording Quality
- Picture Style
- Shooting Operations
- Basic Zone Modes
- Creative Zone Modes
- Using the Flash
- Program AE
- Shutter-Priority AE
- Aperture-Priority AE
- AF Mode
- AF Point
- ISO Speed
- Drive Mode
- Live View Shooting
- Shooting Movies
- Custom Functions
- Software Information
- Warranty

rE
...
Transferring Images to a Computer
11'
f.
UI
By connecting the camera to a computer, you can transfer images from
the camera's card by operating the camera. This is called direct image
transfer.
o
Before
connecting
the
camera
to
a
computer,
be
sure
to
install
the
provided
software
(EOS DIGITAL
Solution
Disk
on
CD-
ROM)
in
the
computer.
For instructions to install the provided software, see the separate
sheet,
CD-ROM
Guide.
Preparation
for
Image
Transfer
Set
the
camera's
power
switch
to
<OFF>.
Set
the
shooting
mode
to
any
mode
except
<."
>.
~
,
I,.
!
t
~j
...........•.•.......................•...••.••.•...
~
....
:
.•.••...•....•.......
~.~
........•........•.....••..•...............•.............•..........
"
........•.....
:
......•...
.
·.·.·.Iii..
I.\(,~
•
.•.•..
:,
~
c~,~~,_.
..'
3
Connect
the
camera
to
the
computer.
4ft
Use the interface cable provided with
the camera.
~
When connecting the cable plug to
the camera's
<A/V
OUT
/DIGITAL>
terminal, the cable plug's <
~
> icon
must face the front side
of
the
camera.
1t Connect the plug on the other end
of
the cable to the computer's USB port.
177
I