
Owner's Manual
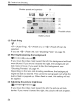
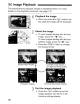
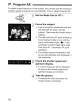
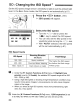
Table Of Contents
- Instruction Manual
- Conventions Used in This Manual
- Table of Contents
- Quick Start Guide
- Supplied Accessories
- Parts & Controls
- Getting Started
- Basic Shooting & Image Playback
- Advanced Shooting Operations
- Program AE
- Changing the ISO Speed
- Using the Flash
- Changing the AF Mode
- Selecting the AF Point
- Continuous Shooting
- Self-Timer
- Setting Image Quality
- Selecting a Picture Style
- Action Shots
- Changing Depth of Field
- Manual Exposure
- Automatic Depth of Field
- Changing the Metering Mode
- Setting Exposure Compensation
- Auto Exposure Bracketing
- Customizing a Picture Style
- Registering a Picture Style
- Setting the Color Space
- AE Lock
- FE Lock
- Setting the White Balance
- White Balance Correction
- Lens Peripheral Illumination Correction
- Using the Quick Control Screen
- Preventing Camera Shake
- Live View Shooting
- Shooting Movies
- Handy Features
- Silencing the Beeper
- Card Reminder
- Setting Image Preview Time
- Setting Auto Power-Off Time
- Adjusting LCD Monitor Brightness
- File Numbering Methods
- Auto Rotate of Vertical Images
- Checking Camera Settings
- Restore Default Settings
- About Copyright Information
- Preventing the LCD Monitor from Turning Off Automatically
- Changing the Shooting Settings Screen Color
- Setting the Flash
- Automatic Sensor Cleaning
- Appending Dust Delete Data
- Manual Sensor Cleaning
- Image Playback
- Printing Images & Transferring Images to a Computer
- Customizing the Camera
- Reference
- Troubleshooting
- Error Codes
- System Accessory Map
- Specs
- Index
- Pocket Guide
- Parts & Controls
- Quick Start Guide
- Image Playback
- Menu Operations / Menu Settings
- Quick Control Screen
- Image Recording Quality
- Picture Style
- Shooting Operations
- Basic Zone Modes
- Creative Zone Modes
- Using the Flash
- Program AE
- Shutter-Priority AE
- Aperture-Priority AE
- AF Mode
- AF Point
- ISO Speed
- Drive Mode
- Live View Shooting
- Shooting Movies
- Custom Functions
- Software Information
- Warranty

P:
Program AE
IB.HI
,ill
'lgJ.:illmllIUM;\
il
J I I
••
IIii
11:
Ii..
!
Ii
BIIII!UJII
;]1:'
'u
iB
:_
~(Jij~
Shooting
Tips
~)
Changing
the
ISO
speed
and
using
the
built-in
flash.
To
match the subject and ambient lighting level, you can change the
ISO speed (p.60) or use the built-in flash (p.62). In the
< P > mode,
the built-in flash will not fire automatically. So under low light, press
the
<
~
> (Flash) button to pop up the built-in flash.
ffj
The
program
can
be
shifted.
(Program
shift)
After pressing the shutter button halfway, turn the <
B3
> dial to
change the shutter speed and aperture setting combination
(program). After you take the picture, the program shift will be
canceled. Program shift is not possible with flash.
I
In
very low light
or
very bright light, the shutter speed and
aperture display will blink when you press the shutter
button halfway, as shown
in
the figure.
In
low light (30"
3.5), either increase the ISO speed (p.60)
or
use flash
(p.62).
In
bright light (4000 22), decrease the ISO speed.
~-1I-'
-,
,-
cP
=_"
__
=
cP-"_'
-'.
-'
~
EII
Differences
Between
<P>
and
<0>
(Full
Auto)
With
<0>,
many functions such the AF mode, drive mode, and metering
mode are set automatically to prevent spoiled shots. The functions you can
set are limited, With
<P>,
only the shutter speed and aperture are set
automatically.
You
can freely set the AF mode, drive mode, and other
functions (p.198).
59