
Owner's Manual
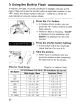
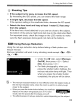
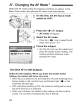

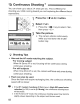

Table Of Contents
- Instruction Manual
- Conventions Used in This Manual
- Table of Contents
- Quick Start Guide
- Supplied Accessories
- Parts & Controls
- Getting Started
- Basic Shooting & Image Playback
- Advanced Shooting Operations
- Program AE
- Changing the ISO Speed
- Using the Flash
- Changing the AF Mode
- Selecting the AF Point
- Continuous Shooting
- Self-Timer
- Setting Image Quality
- Selecting a Picture Style
- Action Shots
- Changing Depth of Field
- Manual Exposure
- Automatic Depth of Field
- Changing the Metering Mode
- Setting Exposure Compensation
- Auto Exposure Bracketing
- Customizing a Picture Style
- Registering a Picture Style
- Setting the Color Space
- AE Lock
- FE Lock
- Setting the White Balance
- White Balance Correction
- Lens Peripheral Illumination Correction
- Using the Quick Control Screen
- Preventing Camera Shake
- Live View Shooting
- Shooting Movies
- Handy Features
- Silencing the Beeper
- Card Reminder
- Setting Image Preview Time
- Setting Auto Power-Off Time
- Adjusting LCD Monitor Brightness
- File Numbering Methods
- Auto Rotate of Vertical Images
- Checking Camera Settings
- Restore Default Settings
- About Copyright Information
- Preventing the LCD Monitor from Turning Off Automatically
- Changing the Shooting Settings Screen Color
- Setting the Flash
- Automatic Sensor Cleaning
- Appending Dust Delete Data
- Manual Sensor Cleaning
- Image Playback
- Printing Images & Transferring Images to a Computer
- Customizing the Camera
- Reference
- Troubleshooting
- Error Codes
- System Accessory Map
- Specs
- Index
- Pocket Guide
- Parts & Controls
- Quick Start Guide
- Image Playback
- Menu Operations / Menu Settings
- Quick Control Screen
- Image Recording Quality
- Picture Style
- Shooting Operations
- Basic Zone Modes
- Creative Zone Modes
- Using the Flash
- Program AE
- Shutter-Priority AE
- Aperture-Priority AE
- AF Mode
- AF Point
- ISO Speed
- Drive Mode
- Live View Shooting
- Shooting Movies
- Custom Functions
- Software Information
- Warranty

ISO:
Changing the ISO Speed *
About "AUTO" for Automatic ISO Speed
If the ISO speed is set to "AUTO", the
actual ISO speed to be set will be
displayed when you press the shutter
button halfway. As indicated below, the
ISO speed will be set automatically to
suit the shooting mode.
Shooting
Mode·
DIa.l
,'f!,/~/~/rn/~1
P
lTv
I AvI
A-DEP
M
With flash
•
"1
• .... _.
~ttirlg
...
. • .
Jt:I_
Automatically set within ISO 100 - 1600
Fixed at ISO 100
Fixed at ISO 400
Fixed at ISO 400*
I
* If fill flash results
in
overexposure, ISO 100 or a higher ISO will be set.
* If an external Speedlite
is
used for bounce flash, ISO 400 - 1600 will be set
automatica
Ily.
EiI
When "AUTO" is set, the ISO speed will be displayed
in
whole-stop
increments
of
100,200,400,800,
or 1600. However, the actual ISO speed
may be set more precisely. Therefore,
in
the image's shooting information,
you may find an ISO speed like 125 or 640 displayed as the ISO speed.
61