
Owner's Manual

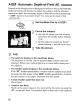

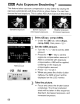
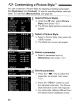
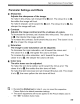
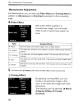
Table Of Contents
- Instruction Manual
- Conventions Used in This Manual
- Table of Contents
- Quick Start Guide
- Supplied Accessories
- Parts & Controls
- Getting Started
- Basic Shooting & Image Playback
- Advanced Shooting Operations
- Program AE
- Changing the ISO Speed
- Using the Flash
- Changing the AF Mode
- Selecting the AF Point
- Continuous Shooting
- Self-Timer
- Setting Image Quality
- Selecting a Picture Style
- Action Shots
- Changing Depth of Field
- Manual Exposure
- Automatic Depth of Field
- Changing the Metering Mode
- Setting Exposure Compensation
- Auto Exposure Bracketing
- Customizing a Picture Style
- Registering a Picture Style
- Setting the Color Space
- AE Lock
- FE Lock
- Setting the White Balance
- White Balance Correction
- Lens Peripheral Illumination Correction
- Using the Quick Control Screen
- Preventing Camera Shake
- Live View Shooting
- Shooting Movies
- Handy Features
- Silencing the Beeper
- Card Reminder
- Setting Image Preview Time
- Setting Auto Power-Off Time
- Adjusting LCD Monitor Brightness
- File Numbering Methods
- Auto Rotate of Vertical Images
- Checking Camera Settings
- Restore Default Settings
- About Copyright Information
- Preventing the LCD Monitor from Turning Off Automatically
- Changing the Shooting Settings Screen Color
- Setting the Flash
- Automatic Sensor Cleaning
- Appending Dust Delete Data
- Manual Sensor Cleaning
- Image Playback
- Printing Images & Transferring Images to a Computer
- Customizing the Camera
- Reference
- Troubleshooting
- Error Codes
- System Accessory Map
- Specs
- Index
- Pocket Guide
- Parts & Controls
- Quick Start Guide
- Image Playback
- Menu Operations / Menu Settings
- Quick Control Screen
- Image Recording Quality
- Picture Style
- Shooting Operations
- Basic Zone Modes
- Creative Zone Modes
- Using the Flash
- Program AE
- Shutter-Priority AE
- Aperture-Priority AE
- AF Mode
- AF Point
- ISO Speed
- Drive Mode
- Live View Shooting
- Shooting Movies
- Custom Functions
- Software Information
- Warranty

o:~
Customizing a Picture Style
<:r
Monochrome
Adjustment
For Monochrome, you can also set
[Filter
effect]
and [Toning effect]
in
addition to
[Sharpness]
and
[Contrast]
explained on the preceding
page.
~
Filter
Effect
Detail
set.
~Monochrome
tN:None
Ye:Yellow
~Filter
effect
Or:Orange
R:Red
G:Green
Default
set.
tmmJ
~
With a filter effect applied to a
monochrome image, you can make
white clouds or green trees stand out
more.
Filter
Sample
Effects
N:None
Normal black-and-white image with no filter effects.
Ye:
Yellow
The blue sky will look more natural, and the white clouds will look
crisper.
Or: Orange
The blue sky will look slightly darker. The sunset will look more
brilliant.
R:Red
The blue sky will look quite dark. Fall leaves will look crisper and
brighter.
G:
Green
Skin tones and lips will look fine. Tree leaves will look crisper and
brighter.
CiI
Increasing the
[Contrast]
will make the filter effect more pronounced.
Q)Toning
Effect
Detail
set.
~Monochrome
tN:None
S:Sepia
B:Blue
0Toning
effect
P:Purple
G:Green
Default
set.
rm.mJ
~
90
By applying a toning effect, you can
create a monochrome image
in
that
color.
It
can make the image look more
impressive.
The following can be selected: [N:None]
[S:Sepia]
[B:Blue]
[P:Purple]
[G:Green].