
Owner's Manual
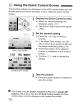

Table Of Contents
- Instruction Manual
- Conventions Used in This Manual
- Table of Contents
- Quick Start Guide
- Supplied Accessories
- Parts & Controls
- Getting Started
- Basic Shooting & Image Playback
- Advanced Shooting Operations
- Program AE
- Changing the ISO Speed
- Using the Flash
- Changing the AF Mode
- Selecting the AF Point
- Continuous Shooting
- Self-Timer
- Setting Image Quality
- Selecting a Picture Style
- Action Shots
- Changing Depth of Field
- Manual Exposure
- Automatic Depth of Field
- Changing the Metering Mode
- Setting Exposure Compensation
- Auto Exposure Bracketing
- Customizing a Picture Style
- Registering a Picture Style
- Setting the Color Space
- AE Lock
- FE Lock
- Setting the White Balance
- White Balance Correction
- Lens Peripheral Illumination Correction
- Using the Quick Control Screen
- Preventing Camera Shake
- Live View Shooting
- Shooting Movies
- Handy Features
- Silencing the Beeper
- Card Reminder
- Setting Image Preview Time
- Setting Auto Power-Off Time
- Adjusting LCD Monitor Brightness
- File Numbering Methods
- Auto Rotate of Vertical Images
- Checking Camera Settings
- Restore Default Settings
- About Copyright Information
- Preventing the LCD Monitor from Turning Off Automatically
- Changing the Shooting Settings Screen Color
- Setting the Flash
- Automatic Sensor Cleaning
- Appending Dust Delete Data
- Manual Sensor Cleaning
- Image Playback
- Printing Images & Transferring Images to a Computer
- Customizing the Camera
- Reference
- Troubleshooting
- Error Codes
- System Accessory Map
- Specs
- Index
- Pocket Guide
- Parts & Controls
- Quick Start Guide
- Image Playback
- Menu Operations / Menu Settings
- Quick Control Screen
- Image Recording Quality
- Picture Style
- Shooting Operations
- Basic Zone Modes
- Creative Zone Modes
- Using the Flash
- Program AE
- Shutter-Priority AE
- Aperture-Priority AE
- AF Mode
- AF Point
- ISO Speed
- Drive Mode
- Live View Shooting
- Shooting Movies
- Custom Functions
- Software Information
- Warranty Information for Supplied Lens
- Warranty

Preventing Camera Shake*
The camera's mechanical shake caused by the reflex mirror action can
affect images taken with a super telephoto lens
or
close-up (macro)
lens.
In
such cases, mirror lockup
is
effective.
Mirror
lockup
is
enabled
by
selecting
the
[~:
Custom
Functions
(C.Fn))
menu's
[Mirror
lockup]
and
setting
it
to
[1: Enable] (p.187).
1
Focus
the
subject,
press
the
shutter
button
completely
and
release it.
~
The mirror will swing up.
.2
Press
the
shutter
button
completely
again.
~
The picture
is
taken and the mirror goes back down.
~~~
Shooting
Tips
~
Using
the
self-timer
<~h>
with
mirror
lockup.
When you press the shutter button completely, the mirror locks up,
then the picture
is
taken 2 sec. later.
@}
Remote
control
shooting.
Since you do not touch the camera when the picture is taken, remote
control shooting together with mirror lockup can further prevent
camera shake. With Remote Controller RC-5, pressing the transmit
button locks up the mirror before the shot
is
taken 2 sec. later. With
Remote Controller RC-1, set it to 2-sec. delay, then shoot.
Q
;j
Do not point the camera toward the sun. The sun's heat can scorch and
damage the shutter curtains.
;@
If
you
use
bulb
exposures,
the
self-timer,
and
mirror
lockup
in
combination,
keep
pressing
the
shutter
button
completely
(self-timer
delay
time
+
bulb
exposure
time).
If
you
let
go
of
the
shutter
button
during
the
self-timer
countdown,
there
will
be
a
shutter-
release
sound.
However,
this
is
not
the
actual
shutter
release
(no
picture
is
taken).
[i]
$ Even if <
QJj
> (Continuous shooting) has been set, single shooting will
still take effect.
• The mirror locks
up,
and after 30 seconds, it will go back down automatically.
Pressing the shutter button completely again locks
up
the mirror again.
104