
Owner's Manual
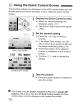
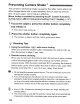
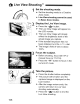

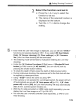
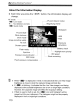
Table Of Contents
- Instruction Manual
- Conventions Used in This Manual
- Table of Contents
- Quick Start Guide
- Supplied Accessories
- Parts & Controls
- Getting Started
- Basic Shooting & Image Playback
- Advanced Shooting Operations
- Program AE
- Changing the ISO Speed
- Using the Flash
- Changing the AF Mode
- Selecting the AF Point
- Continuous Shooting
- Self-Timer
- Setting Image Quality
- Selecting a Picture Style
- Action Shots
- Changing Depth of Field
- Manual Exposure
- Automatic Depth of Field
- Changing the Metering Mode
- Setting Exposure Compensation
- Auto Exposure Bracketing
- Customizing a Picture Style
- Registering a Picture Style
- Setting the Color Space
- AE Lock
- FE Lock
- Setting the White Balance
- White Balance Correction
- Lens Peripheral Illumination Correction
- Using the Quick Control Screen
- Preventing Camera Shake
- Live View Shooting
- Shooting Movies
- Handy Features
- Silencing the Beeper
- Card Reminder
- Setting Image Preview Time
- Setting Auto Power-Off Time
- Adjusting LCD Monitor Brightness
- File Numbering Methods
- Auto Rotate of Vertical Images
- Checking Camera Settings
- Restore Default Settings
- About Copyright Information
- Preventing the LCD Monitor from Turning Off Automatically
- Changing the Shooting Settings Screen Color
- Setting the Flash
- Automatic Sensor Cleaning
- Appending Dust Delete Data
- Manual Sensor Cleaning
- Image Playback
- Printing Images & Transferring Images to a Computer
- Customizing the Camera
- Reference
- Troubleshooting
- Error Codes
- System Accessory Map
- Specs
- Index
- Pocket Guide
- Parts & Controls
- Quick Start Guide
- Image Playback
- Menu Operations / Menu Settings
- Quick Control Screen
- Image Recording Quality
- Picture Style
- Shooting Operations
- Basic Zone Modes
- Creative Zone Modes
- Using the Flash
- Program AE
- Shutter-Priority AE
- Aperture-Priority AE
- AF Mode
- AF Point
- ISO Speed
- Drive Mode
- Live View Shooting
- Shooting Movies
- Custom Functions
- Software Information
- Warranty Information for Supplied Lens
- Warranty

o Live View Shooting *
1 Set the shooting mode.
• Set the shooting mode to a Creative
Zone mode.
• Live View shooting cannot be used
in
Basic Zone modes.
Display the Live View image.
• Press the
<0>
button.
~
The Live View image will appear on
the LCD monitor.
a The Live View image will closely
reflect the brightness level
of
the
actual image you capture.
~
If the standard exposure has not
been obtained, turn the
<
~
> dial.
• The image's field
of
view
is
about
100
0
/0.
3 Focus the subject.
• Before shooting, focus with AF or
manual focus (p.111-118).
~
Press the < *> button to focus
in
the
current AF mode.
Take the picture.
• Press the shutter button completely.
~
The picture will be taken and the
captured image
is
displayed on the
LCD monitor.
~
After the image review ends, the
camera will return to Live View
shooting automatically.
~
Press the < 0 > button to end the
Live View shooting.
106