
Owner's Manual

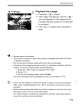
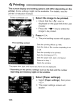
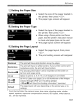
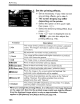

Table Of Contents
- Instruction Manual
- Conventions Used in This Manual
- Table of Contents
- Quick Start Guide
- Supplied Accessories
- Parts & Controls
- Getting Started
- Basic Shooting & Image Playback
- Advanced Shooting Operations
- Program AE
- Changing the ISO Speed
- Using the Flash
- Changing the AF Mode
- Selecting the AF Point
- Continuous Shooting
- Self-Timer
- Setting Image Quality
- Selecting a Picture Style
- Action Shots
- Changing Depth of Field
- Manual Exposure
- Automatic Depth of Field
- Changing the Metering Mode
- Setting Exposure Compensation
- Auto Exposure Bracketing
- Customizing a Picture Style
- Registering a Picture Style
- Setting the Color Space
- AE Lock
- FE Lock
- Setting the White Balance
- White Balance Correction
- Lens Peripheral Illumination Correction
- Using the Quick Control Screen
- Preventing Camera Shake
- Live View Shooting
- Shooting Movies
- Handy Features
- Silencing the Beeper
- Card Reminder
- Setting Image Preview Time
- Setting Auto Power-Off Time
- Adjusting LCD Monitor Brightness
- File Numbering Methods
- Auto Rotate of Vertical Images
- Checking Camera Settings
- Restore Default Settings
- About Copyright Information
- Preventing the LCD Monitor from Turning Off Automatically
- Changing the Shooting Settings Screen Color
- Setting the Flash
- Automatic Sensor Cleaning
- Appending Dust Delete Data
- Manual Sensor Cleaning
- Image Playback
- Printing Images & Transferring Images to a Computer
- Customizing the Camera
- Reference
- Troubleshooting
- Error Codes
- System Accessory Map
- Specs
- Index
- Pocket Guide
- Parts & Controls
- Quick Start Guide
- Image Playback
- Menu Operations / Menu Settings
- Quick Control Screen
- Image Recording Quality
- Picture Style
- Shooting Operations
- Basic Zone Modes
- Creative Zone Modes
- Using the Flash
- Program AE
- Shutter-Priority AE
- Aperture-Priority AE
- AF Mode
- AF Point
- ISO Speed
- Drive Mode
- Live View Shooting
- Shooting Movies
- Custom Functions
- Software Information
- Warranty Information for Supplied Lens
- Warranty

11
.
r:·.
t(Printing
5
Set
the
date
and
file
number
imprinting.
e Set as necessary.
@ Select
<~>,
then press
<@>.
@ Set as desired, then press
<@>.
Set
the
number
of
copies.
11·
Set as necessary.
• Select
<~>,
then press
<@>
.
• Set the number
of
copies, then press
<@>.
Start
printing.
,~
Select
[Print],
then press
<@>
.
...
The <
~1tV'
> button's blue lamp will
blink and the printing will start.
[]]@
With Easy printing, you can print another image with the same settings.
Just select the image and press the
<~Ai">
button lit
in
blue. With Easy
printing, the number
of
copies will always be
1.
(You cannot set the
number
of
copies.) Also, any trimming (p.171) will not be applied.
@ The [Default] setting for printing effects and other options are the
printer's own default settings as set by the printer's manufacturer. See
the printer's instruction manual to find out what the
[Default] settings are. I
**
Depending on the image's file size and image-recording quality, it may
take some time for the printing to start after you select [Print].
@ If image tilt correction (p.171) has been applied, it will take longer to print
the image.
$b
To
stop the printing, press
<§>
while [Stop] is displayed, then select [OK].
**
If you execute [Clear all
camera
settings]
(p.136), all the settings will
revert to the default.
169