
Owner's Manual
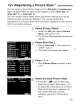
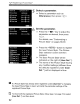
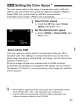
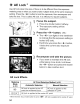

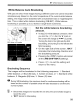
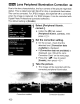
Table Of Contents
- Instruction Manual
- Conventions Used in This Manual
- Table of Contents
- Quick Start Guide
- Supplied Accessories
- Parts & Controls
- Getting Started
- Basic Shooting & Image Playback
- Advanced Shooting Operations
- Program AE
- Changing the ISO Speed
- Using the Flash
- Changing the AF Mode
- Selecting the AF Point
- Continuous Shooting
- Self-Timer
- Setting Image Quality
- Selecting a Picture Style
- Action Shots
- Changing Depth of Field
- Manual Exposure
- Automatic Depth of Field
- Changing the Metering Mode
- Setting Exposure Compensation
- Auto Exposure Bracketing
- Customizing a Picture Style
- Registering a Picture Style
- Setting the Color Space
- AE Lock
- FE Lock
- Setting the White Balance
- White Balance Correction
- Lens Peripheral Illumination Correction
- Using the Quick Control Screen
- Preventing Camera Shake
- Live View Shooting
- Shooting Movies
- Handy Features
- Silencing the Beeper
- Card Reminder
- Setting Image Preview Time
- Setting Auto Power-Off Time
- Adjusting LCD Monitor Brightness
- File Numbering Methods
- Auto Rotate of Vertical Images
- Checking Camera Settings
- Restore Default Settings
- About Copyright Information
- Preventing the LCD Monitor from Turning Off Automatically
- Changing the Shooting Settings Screen Color
- Setting the Flash
- Automatic Sensor Cleaning
- Appending Dust Delete Data
- Manual Sensor Cleaning
- Image Playback
- Printing Images & Transferring Images to a Computer
- Customizing the Camera
- Reference
- Troubleshooting
- Error Codes
- System Accessory Map
- Specs
- Index
- Pocket Guide
- Parts & Controls
- Quick Start Guide
- Image Playback
- Menu Operations / Menu Settings
- Quick Control Screen
- Image Recording Quality
- Picture Style
- Shooting Operations
- Basic Zone Modes
- Creative Zone Modes
- Using the Flash
- Program AE
- Shutter-Priority AE
- Aperture-Priority AE
- AF Mode
- AF Point
- ISO Speed
- Drive Mode
- Live View Shooting
- Shooting Movies
- Custom Functions
- Software Information
- Warranty Information for Supplied Lens
- Warranty

~~
White Balance Correction *
You
can correct the white balance that has been set. This adjustment
will have the same effect as using a commercially-available color
temperature conversion filter or color compensating filter. Each color
can be corrected to one
of
nine levels.
This is for advanced users who are familiar with using color temperature
conversion or color compensating filters.
White
Balance
Correction
Select
[WB
SHIFT/BKT].
~
Under the [01:] tab, select [WB
SHIFT/BKT], then press
<@>.
..
The WB correction/WB bracketing
screen will appear.
<'SHIFT
"'SKT
Sample setting: A2,
G1
B
G
WB
~-'
~
+I-
SHH
\
1 •
'A
t
"
At-it
Gtl
1
BU
•..
",.
,
...
.-
..
·........
"~
..
".".w
.....
,,
0
M ±
61tJ
Clear
all
maOK
Set
the
white
balance
correction.
ft
Press the <
..
:~
> key to move the
"."
mark to the desired position.
~
B is for blue, A is amber, M is
magenta, and
G
is
green. The color
in
the respective direction will be
corrected.
~
On the upper right, "SHIFT" indicates
the direction and correction amount.
~
Pressing the
<DlSP.>
button will
cancel all the [WB SHIFT/BKT]
settings.
$#
Press < @ > to exit the setting and
return to the menu.
Eil
(¢
During the white balance correction, <
~~>
will be displayed
in
the
viewfinder and on the LCD monitor.
~
One level
of
the blue/amber correction is equivalent to 5 mireds
of
a color
temperature conversion filter. (Mired: Measuring unit indicating the
density of a color temperature conversion filter.)
98