
Owner's Manual
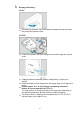
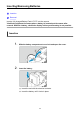

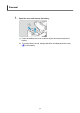
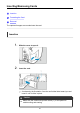

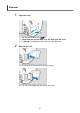

Table Of Contents
- Advanced User Guide
- Contents
- Introduction
- Preparation and Basic Operations
- Charging the Battery
- Inserting/Removing Batteries
- Inserting/Removing Cards
- Using the Screen
- Turning on the Power
- Attaching/Detaching Lenses
- Basic Operations
- Setting the Screen Display Level
- Menu Operations and Settings
- Quick Control
- Touch-Screen Operation
- Viewing the Screen as You Shoot (Live View Shooting)
- Shooting Selfies (Self Portrait)
- Basic Zone
- Creative Zone
- AF, Drive, and Exposure Settings
- Flash Photography
- Shooting and Recording
- Still Photo Shooting
- Tab Menus: Still Photo Shooting (Viewfinder Shooting)
- Tab Menus: Still Photo Shooting (Live View Shooting)
- Image Quality
- Still Image Aspect Ratio
- Image Review Time
- Shutter Release Without Card
- Lens Aberration Correction
- Exposure Compensation/AEB Setting
- ISO Speed Settings (Still Photos)
- Auto Lighting Optimizer
- Highlight Tone Priority
- Metering Timer (Live View Shooting)
- White Balance Settings
- White Balance Correction
- Color Space
- Picture Style Selection
- Picture Style Customization
- Picture Style Registration
- Noise Reduction Features
- Appending Dust Delete Data
- Anti-Flicker Shooting
- Continuous AF (Live View Shooting)
- Lens Electronic MF
- AF-Assist Beam Firing
- General Still Photo Shooting Precautions
- Movie Recording
- Still Photo Shooting
- Playback
- Tab Menus: Playback
- Image Playback
- Index Display (Multiple-Image Display)
- Magnified Image Display
- Movie Playback
- Editing a Movie's First and Last Scenes
- Frame Extraction from 4K Movies or 4K Time-Lapse Movies
- Playback on a TV Set
- Protecting Images
- Rotating Still Photos
- Changing Movie Orientation Information
- Erasing Images
- Print Ordering (DPOF)
- Photobook Set-up
- Creative Filters
- RAW Image Processing
- Creative Assist
- Quick Control RAW Processing
- Red-Eye Correction
- Creating Albums
- Cropping
- Resizing
- Rating Images
- Slide Show
- Setting Image Search Conditions
- Browsing Images with the Main Dial
- Histogram
- AF Point Display
- Resuming from Previous Playback
- HDMI HDR Output
- Wireless Features
- Tab Menus: Wireless Settings
- Wi-Fi/Bluetooth Connection
- Connecting to a Smartphone
- Connecting to a Computer via Wi-Fi
- Connecting to a Printer via Wi-Fi
- Sending Images to a Web Service
- Wi-Fi Connection via Access Points
- Connecting to a Wireless Remote Control
- Reconnecting via Wi-Fi
- Registering Multiple Connection Settings
- Wi-Fi Settings
- Bluetooth Settings
- Nickname
- GPS Device Settings
- Changing or Deleting Connection Settings
- Airplane Mode
- Clearing Wireless Communication Settings to Default
- View Info Screen
- Virtual Keyboard Operations
- Responding to Error Messages
- Wireless Communication Function Precautions
- Security
- Checking Network Settings
- Wireless Communication Status
- Set-up
- Tab Menus: Set-up
- Selecting a Folder
- File Numbering
- Auto Rotate
- Adding Orientation Information to Movies
- Formatting
- Auto Power Off
- Display Brightness
- Screen Off/On
- Date/Time/Zone
- Language
- Video System
- Touch Control
- Beeps
- Battery Information
- Sensor Cleaning
- Viewfinder Display
- INFO Button Display Options
- Grid Display When Shooting
- Shutter Button Function for Movies
- Switching AF Point Selection and AE Lock Buttons
- HDMI Resolution
- Multi-Function Lock
- Custom Functions (C.Fn)
- Clearing Settings
- Copyright Information
- Other Information
- My Menu
- Reference
- Trademarks and Licensing
- Getting Started
- Warranty
- Product Registration

Note
The number of available shots varies depending on the remaining capacity of the
card, the settings of image quality, ISO speed, etc.
Setting [ : Release shutter without card] to [Disable] will prevent you from
forgetting to insert a card ( ).
Caution
When the access lamp is lit or blinking, it indicates that images are being
written to, read from, or erased from the card, or data is being transferred. Do
not open the card slot cover during this time. To avoid corrupting image data
or damaging cards or the camera, never do any of the following while the
access lamp is lit or blinking.
• Removing the card.
• Removing the battery.
• Shaking or striking the camera.
• Unplugging or plugging in a power cord
(when using optional Household Power Outlet Accessory).
If the card already contains recorded images, the image number may not start from
0001 ( ).
If a card-related error message is displayed on the screen, remove and reinsert the
card. If the error persists, use a different card.
If you can transfer images on the card to a computer, transfer all the images and
then format the card with the camera ( ). The card may then return to normal.
Do not touch the card's contacts with your fingers or metal objects. Do not expose
the contacts to dust or water. If smudges adhere to the contacts, contact failure
may result.
Multimedia cards (MMC) cannot be used. (Card error will be displayed.)
49