111111 CTZ-B150 l -l (2) (1) 2-1 1-2 2-2 --~',~ 3-1 4-1 .
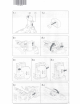
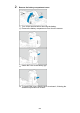
Battery Grip BG-R10 (I Instructions BG-R10 is a battery grip for EOS cameras. Make sure you read this guide before using the product. Store this guide safely so that you can use it in the future. For detailed instructions and precautions, refer to the Advanced Guide (online manual) for the camera in use. ■ Attaching to the Camera 1. Detach contact covers (1) and (2) (Fig. 1-1). 2. Attach contact cover (1) to (2) to store it (Fig. 1-2). 3. Remove the battery pack from the camera (Fig.2-1). 4.
Safety Instructions Be sure to read these instructions in order to operate the product safely. Follow these instructions to prevent injury or harm to the operator of the product or others. ~ WARNING: • • • • • • Denotes the risk of serious injury or death. Keep batteries out of the reach of children. Use only power sources specified in this instruction manual for use with the product. Do not disassemble or modify the product. Do not expose the product to strong shocks or vibration.
~~~~~~~~~~~~~-~~~~o ~ ~ 1£ ~ ~ B1i~il ~ 3 ±th S{] tfJ;! !]lj o ~~4?JJ~ ~~14-~~ ia .::c. 7.k iiWJ /\ 1fl-~ (Pb) (Hg) (Cd) ( Cr(VI)) (PBB) (PBDE) 0 0 0 0 0 0 ~r-=~~±.rr~L~ 7, ,;tx: R 7J X ~}i~~14- X 0 0 0 0 ~iJJJ.ft'.~1M ~~Ili;t ~~=;tM *~~~t@SJ/T 11364 0: ~~~~~~~~~$#*~~~~~~~*;~~ GB/T 26572 iJJJ.ft'.S{]~~m.J~)R~f 7' o X: ~~~~~~~~~~~$#~¥-~~#~~~*;~lli GB/T 26572 jJJJ.ft:S{]B~;~)J(o FOR P.R.C. ONLY *~~~fflrZ'£$ ~A~:!tl~@li~~S1 ~ ~ ~~F~, 0 E) :t-,j$~~~®.
Using a Battery Grip Attaching Batteries Using a Household Power Outlet Button and Dial Operations Using a USB Power Adapter to Charge/Power the Camera Equipped with buttons and dials for vertical shooting, Battery Grip BG-R10 is an optional camera accessory that can power the camera with two batteries. 1. Remove the contact covers. Remove contact covers (1) and (2) on the battery grip. Attach the battery grip contact cover (1) to (2) to store them.
2. Remove the battery compartment cover. Turn off the camera before removing the battery. Remove the battery compartment cover from the camera. Attach the cover to the battery grip. To remove the cover, slide the lever to release it, following the attachment procedure in reverse.
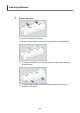
3. Attach and lock the battery grip. Insert the battery grip in the camera and turn the release dial to lock it in place. 4. Remove the battery magazine.
Caution When reattaching the battery compartment cover to the camera, attach it opened to at least 90°. Do not touch the camera or battery grip contacts.
Attaching Batteries 1. Attach the batteries. Insert the batteries as shown. When only one battery is used, it can be inserted in either position. To secure the batteries, push in the direction of the arrows until they click into place. To remove the batteries, press the battery magazine lever in the direction of the arrow.
2. Attach the battery magazine. Insert the battery magazine all the way in to secure it. Caution When attaching batteries, make sure the electrical contacts are clean. Wipe off any dirt on the contacts with a soft cloth. Attach batteries after attaching the battery grip to the camera. If the battery grip is attached to the camera with batteries already attached, it may prevent correct display of battery check results. Before removing the battery grip, turn the camera off and remove the batteries.
Using a Household Power Outlet 1. Attach the DC coupler. Attach DC Coupler DR-E6 (sold separately) the same way as the batteries. Pass the DC coupler cord through the battery magazine cord groove. Insert the battery magazine all the way in to secure it. 2. Attach the battery magazine. Guide the end of the cord out of the cord hole.
3. Connect the DC coupler to the AC adapter. Fully insert the DC coupler plug into the socket of AC Adapter AC-E6N (sold separately). 4. Connect the power cord. Connect the power cord to the AC adapter and insert the power plug into a power outlet. Caution While the camera is on, do not connect or disconnect the power cord or socket, and do not remove the battery magazine. Avoid getting the DC coupler cord caught between the battery grip and battery magazine.
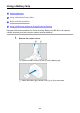
Button and Dial Operations To use the buttons and dials, turn the vertical-grip on/off switch (4) to ON. The buttons and dials are used the same way as corresponding buttons and dials on the camera.
Using a USB Power Adapter to Charge/Power the Camera Using USB Power Adapter PD-E1, you can charge Battery Pack LP-E6NH or LP-E6N without removing it from the battery grip. The camera can also be powered. Caution LP-E6NH and LP-E6N can be charged together. Otherwise, you can charge a single LP-E6NH or LP-E6N battery at a time. LP-E6 cannot be charged this way. No battery will be charged if LP-E6NH or LP-E6N is attached at the same time as LP-E6.
2. Charge the battery. Connect the power cord to the USB power adapter and plug the other end into a power outlet. Charging begins, and the charge lamp lights up. [ ] is displayed on the LCD panel. When charging is finished, the charge lamp turns off. Supplying power To power the camera without charging batteries, set the camera power switch to < [ ] is displayed on the LCD panel and screen while the camera is powered. To change from powering the camera to charging, set the camera power switch to < >.
Caution To protect the battery pack and keep it in optimal condition, do not charge it continuously for more than 24 hours. If the charging lamp fails to light up or a problem occurs during charging (shown by the charge lamp blinking), unplug the power cord, reinsert the battery, and wait a few minutes before plugging it in again. If the problem persists, take the camera to the nearest Canon Service Center.
Canon European Warranty System (EWS) Model name & serial number/Model & serienummer/ Modellbezeichnung und Seriennummer/Modelo y numero de serie/ Designation du modele et numero de sene/Ovoµa MovrtJ..
UNITED STATES OF AMERICA AND CANADA LIMITED WARRANTY/ GARANTIE LIMITEE CANON U.S.A., INC. CANON CANADA INC. NAME NOM ADDRESS ADRESSE CITY VILLE PROVINCE POSTAL CODE CODE POSTAL THESE ARE NOT REGISTRATION CARDS - Retain for your Records CES CARTES NE SONT PAS GELLES POUR L'ENREGISTREMENT. - Les conserver comme reference.
LIST A/ LISTE A EF Lens and Accessories / Objectifs et accessoires EF Digital Video Camcorder and Accessories I Camescope numerique et accessoires EOS Digital Camera and Accessories I Appareil photo numerique et accessoires EOS PowerShot Digital Camera and Accessories I Appareil photo numerique et accessoires PowerShot Compact Photo Printer and Accessories / lmprimante photo compacte et accessoires Professional Digital Video and Accessories / Camera video numerique professionnelle et accessoires Multi Pu
I I 111111111111111 I CT2-B164 Canon CT2-B164-A PRINTED IN TAIWAN IMPRIME A TAIWAN L1M1Teo wARRANTv ~~ PRODUCT NAME MODEL MODELE BATTERY GRIP BG-R10 F~ffi% AUSTRALIA AND NEW ZEALAND WARRANTY CARD KEEP THIS CARD SAFE ALONG WITH YOUR PROOF OF PURCHASE For Canon consumer imaging Products distributed by Canon Australia Pty Ltd or Canon New Zealand Limited only. Warranty does not cover Canon products purchased in other countries unless otherwise stated .
PRODUCT - Purchased new and unused, or Canon-refurbished (not second hand)) All consumer camera, lens, video and projector accessories I WARRANTY PERIOD ! (from date of purchase) 12 month 2. Canon's warranty does not cover: a. replacing consumables including lamps, film, SD cards, ink, toner and paper; b. any software included with the Products; or c. any malfunction or specific requirement of any other item of hardware or software you link to the Product. 3.