
Owner's Manual
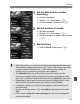
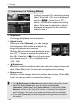
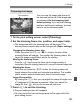
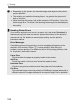
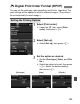
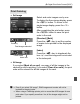
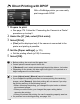
Table Of Contents
- Quick Start Guide
- Instruction Manual
- Conventions Used in This Manual
- Table of Contents
- Quick Start Guide
- Supplied Accessories
- Parts & Controls
- Getting Started
- Attaching the Strap
- Charging the Battery
- Installing / Removing the Battery
- Power On
- Date & Time Set
- Setting the Language
- Installing & Removing Memory Card
- Attaching & Detaching a Lens
- Lens Image Stabilizer
- Basic Operation
- Using the Quick Control Screen
- Menu Operations
- Formatting a Memory Card
- Switching the LCD Monitor Display
- Basic Shooting & Image Playback
- Advanced Shooting Operations
- Program AE
- Changing the ISO Speed
- Using the Flash
- Changing the AF Mode
- Selecting the AF Point
- Continuous Shooting
- Self-Timer
- Setting Image Quality
- Selecting a Picture Style
- Action Shots
- Changing Depth of Field
- Manual Exposure
- Automatic Depth of Field
- Changing the Metering Mode
- Setting Exposure Compensation
- Auto Exposure Bracketing
- Customizing a Picture Style
- Registering a Picture Style
- Setting the Color Space
- AE Lock
- FE Lock
- Setting the White Balance
- White Balance Correction
- Auto Lighting Optimizer
- Lens Peripheral Illumination Correction
- Preventing Camera Shake
- Live View Shooting
- Shooting Movies
- Handy Features
- Silencing the Beeper
- Card Reminder
- Setting Image Preview Time
- Setting Auto Power-Off Time
- Adjusting LCD Monitor Brightness
- File Numbering Methods
- Auto Rotate of Vertical Images
- Checking Camera Settings
- Restore Default Settings
- Preventing the LCD Monitor from Turning Off Automatically
- Changing the Shooting Settings Screen Color
- Setting the Flash
- Automatic Sensor Cleaning
- Appending Dust Delete Data
- Manual Sensor Cleaning
- Image Playback
- Printing Images
- Customizing the Camera
- Reference
- Troubleshooting
- Error Codes
- System Accessory Map
- Specs
- Index
- Quick Reference Guide
- Macro Photography Made Easy
- Using Image Stabilizer Lenses for Better Results
- Scan of Supplied CD-ROMs
- Software Installation Warning
- Warranty

wPrinting
184
Depending on the printer, the trimmed image area might not be printed
as you specified.
The smaller you make the trimming frame, he grainier the picture will
look on the print.
While trimming the image, look at the camera’s LCD monitor. If you look
at the image on a TV screen, the trimming frame might not be displayed
accurately.
Handling Printer Errors
If you resolve a printer error (no ink, no paper, etc.) and select [
Continue
] to
resume prin ing but it does not resume, operate the buttons on the printer to
resume prin ing. For details on resuming the printing, see the printer’s
instruction manual.
Error Messages
If a problem occurs during printing, an error message will appear on the
camera’s LCD monitor. Press <
0> to stop printing. After fixing the
problem, resume printing. For details on how to fix a printing problem, refer
to he printer’s instruction manual.
Paper Error
Check whether the paper is properly loaded in the printer.
Ink Error
Check the printer’s ink level, and check the waste ink tank.
Hardware Error
Check for any printer problems other than paper and ink problems.
File Error
The selected image cannot be printed via PictBridge. Images taken with a
different camera or images edited with a computer might not be printable.