
Owner's Manual
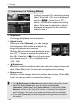
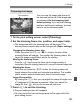
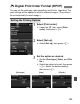
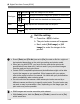
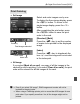
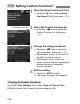
Table Of Contents
- Quick Start Guide
- Instruction Manual
- Conventions Used in This Manual
- Table of Contents
- Quick Start Guide
- Supplied Accessories
- Parts & Controls
- Getting Started
- Attaching the Strap
- Charging the Battery
- Installing / Removing the Battery
- Power On
- Date & Time Set
- Setting the Language
- Installing & Removing Memory Card
- Attaching & Detaching a Lens
- Lens Image Stabilizer
- Basic Operation
- Using the Quick Control Screen
- Menu Operations
- Formatting a Memory Card
- Switching the LCD Monitor Display
- Basic Shooting & Image Playback
- Advanced Shooting Operations
- Program AE
- Changing the ISO Speed
- Using the Flash
- Changing the AF Mode
- Selecting the AF Point
- Continuous Shooting
- Self-Timer
- Setting Image Quality
- Selecting a Picture Style
- Action Shots
- Changing Depth of Field
- Manual Exposure
- Automatic Depth of Field
- Changing the Metering Mode
- Setting Exposure Compensation
- Auto Exposure Bracketing
- Customizing a Picture Style
- Registering a Picture Style
- Setting the Color Space
- AE Lock
- FE Lock
- Setting the White Balance
- White Balance Correction
- Auto Lighting Optimizer
- Lens Peripheral Illumination Correction
- Preventing Camera Shake
- Live View Shooting
- Shooting Movies
- Handy Features
- Silencing the Beeper
- Card Reminder
- Setting Image Preview Time
- Setting Auto Power-Off Time
- Adjusting LCD Monitor Brightness
- File Numbering Methods
- Auto Rotate of Vertical Images
- Checking Camera Settings
- Restore Default Settings
- Preventing the LCD Monitor from Turning Off Automatically
- Changing the Shooting Settings Screen Color
- Setting the Flash
- Automatic Sensor Cleaning
- Appending Dust Delete Data
- Manual Sensor Cleaning
- Image Playback
- Printing Images
- Customizing the Camera
- Reference
- Troubleshooting
- Error Codes
- System Accessory Map
- Specs
- Index
- Quick Reference Guide
- Macro Photography Made Easy
- Using Image Stabilizer Lenses for Better Results
- Scan of Supplied CD-ROMs
- Software Installation Warning
- Warranty

W Digital Print Order Format (DPOF)
186
4
Exit the setting.
Press the <7> button.
X The print order screen will reappear.
Next, select [Sel.Image] or [All
image] to order the images to be
printed.
Print type
K
Standard Prints one image on one sheet.
L
Index Multiple thumbnail images are printed on one sheet.
K
L
Both Prints both the standard and index prints.
Date
On
[On] imprints the recorded date on the print.
Off
File number
On
[On] imprints the file No. on the print.
Off
Even if [Date] and [File No.] are set to [On], the date or file No. might not
be imprinted depending on the print type setting and printer model.
When prin ing with DPOF, you must use the card whose print order
specifications have been set. It will not work if you just extract images
from the card and try to print them.
Certain DPOF-compatible printers and photofinishers might not be able
to print the images as you specified. If this happens with your printer,
refer to the printer’s instruc ion manual. Or check with your photofinisher
about compatibility when ordering prints.
Do not insert into the camera a card whose print order was set by a
different camera and then try to specify a print order. The print order may
not work or may be overwritten. Also, depending on the image type, the
print order may not be possible.
RAW images and movies cannot be print ordered.
With [Index] prints, both the [Date] and [File No.] cannot be set to [On]
at the same time.