
Owner's Manual

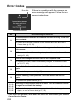
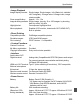
Table Of Contents
- Quick Start Guide
- Instruction Manual
- Conventions Used in This Manual
- Table of Contents
- Quick Start Guide
- Supplied Accessories
- Parts & Controls
- Getting Started
- Attaching the Strap
- Charging the Battery
- Installing / Removing the Battery
- Power On
- Date & Time Set
- Setting the Language
- Installing & Removing Memory Card
- Attaching & Detaching a Lens
- Lens Image Stabilizer
- Basic Operation
- Using the Quick Control Screen
- Menu Operations
- Formatting a Memory Card
- Switching the LCD Monitor Display
- Basic Shooting & Image Playback
- Advanced Shooting Operations
- Program AE
- Changing the ISO Speed
- Using the Flash
- Changing the AF Mode
- Selecting the AF Point
- Continuous Shooting
- Self-Timer
- Setting Image Quality
- Selecting a Picture Style
- Action Shots
- Changing Depth of Field
- Manual Exposure
- Automatic Depth of Field
- Changing the Metering Mode
- Setting Exposure Compensation
- Auto Exposure Bracketing
- Customizing a Picture Style
- Registering a Picture Style
- Setting the Color Space
- AE Lock
- FE Lock
- Setting the White Balance
- White Balance Correction
- Auto Lighting Optimizer
- Lens Peripheral Illumination Correction
- Preventing Camera Shake
- Live View Shooting
- Shooting Movies
- Handy Features
- Silencing the Beeper
- Card Reminder
- Setting Image Preview Time
- Setting Auto Power-Off Time
- Adjusting LCD Monitor Brightness
- File Numbering Methods
- Auto Rotate of Vertical Images
- Checking Camera Settings
- Restore Default Settings
- Preventing the LCD Monitor from Turning Off Automatically
- Changing the Shooting Settings Screen Color
- Setting the Flash
- Automatic Sensor Cleaning
- Appending Dust Delete Data
- Manual Sensor Cleaning
- Image Playback
- Printing Images
- Customizing the Camera
- Reference
- Troubleshooting
- Error Codes
- System Accessory Map
- Specs
- Index
- Quick Reference Guide
- Macro Photography Made Easy
- Using Image Stabilizer Lenses for Better Results
- Scan of Supplied CD-ROMs
- Software Installation Warning
- Warranty

224
If there is a problem with the camera, an
error message will appear. Follow the on-
screen instructions.
* If the error still persists, write down the error No. and contact your nearest
Canon Service Center.
Error Codes
No. Error Message & Solution
01
Communications between the camera and lens is faulty. Clean the
lens contacts.
Î Clean the electrical contacts on the camera and lens and use a
Canon lens (p.13, 16).
02
Card cannot be accessed. Reinsert/change card or format card
with camera.
Î Remove and insert the card again, replace the card, or format the
card (p.31, 42).
04
Cannot save images because card is full. Replace card.
Î Replace the card, erase unnecessary images, or format the card
(p.31, 171, 42).
05
The built-in flash could not be raised. Turn the camera off and on
again.
Î Operate the power switch (p.27).
06
Sensor cleaning is not possible. Turn the camera off and on
again.
Î Operate the power switch (p.27).
10, 20,
30, 40,
50, 60,
70, 80
Shooting is not possible due to an error. Turn the camera off and
on again or re-install the battery.
Î Operate the power switch, remove and install the battery pack
again, or use a Canon lens (p.27, 26)
Error No.
Countermeasures