
Owner's Manual


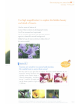

Table Of Contents
- Quick Start Guide
- Instruction Manual
- Conventions Used in This Manual
- Table of Contents
- Quick Start Guide
- Supplied Accessories
- Parts & Controls
- Getting Started
- Attaching the Strap
- Charging the Battery
- Installing / Removing the Battery
- Power On
- Date & Time Set
- Setting the Language
- Installing & Removing Memory Card
- Attaching & Detaching a Lens
- Lens Image Stabilizer
- Basic Operation
- Using the Quick Control Screen
- Menu Operations
- Formatting a Memory Card
- Switching the LCD Monitor Display
- Basic Shooting & Image Playback
- Advanced Shooting Operations
- Program AE
- Changing the ISO Speed
- Using the Flash
- Changing the AF Mode
- Selecting the AF Point
- Continuous Shooting
- Self-Timer
- Setting Image Quality
- Selecting a Picture Style
- Action Shots
- Changing Depth of Field
- Manual Exposure
- Automatic Depth of Field
- Changing the Metering Mode
- Setting Exposure Compensation
- Auto Exposure Bracketing
- Customizing a Picture Style
- Registering a Picture Style
- Setting the Color Space
- AE Lock
- FE Lock
- Setting the White Balance
- White Balance Correction
- Auto Lighting Optimizer
- Lens Peripheral Illumination Correction
- Preventing Camera Shake
- Live View Shooting
- Shooting Movies
- Handy Features
- Silencing the Beeper
- Card Reminder
- Setting Image Preview Time
- Setting Auto Power-Off Time
- Adjusting LCD Monitor Brightness
- File Numbering Methods
- Auto Rotate of Vertical Images
- Checking Camera Settings
- Restore Default Settings
- Preventing the LCD Monitor from Turning Off Automatically
- Changing the Shooting Settings Screen Color
- Setting the Flash
- Automatic Sensor Cleaning
- Appending Dust Delete Data
- Manual Sensor Cleaning
- Image Playback
- Printing Images
- Customizing the Camera
- Reference
- Troubleshooting
- Error Codes
- System Accessory Map
- Specs
- Index
- Quick Reference Guide
- Macro Photography Made Easy
- Using Image Stabilizer Lenses for Better Results
- Scan of Supplied CD-ROMs
- Software Installation Warning
- Warranty

Start
enloying
your
macro
lens.
Tuesday
Our
hero
Let the ubjecl tand
out
clearly
again t a blurred background.
Macro
lenses are ideal for taking portrait photos.
Since the subject stands out crisply against a
hazy
background,
you can capture the
whole
scene
in
an attractive image.
To
create a beautifully blurred background,
just choose the
Av
1
mode setting
while keeping the aperture fully open (for example,
f/2.8
or an even
lower
f/number,
depending on your lens).
t~oto
tt'
Make full use
of
light for attractive background effects
Try
photographing a
subject
against background illumination -
such
as
gleams
of light
falling
through
leaves
-
to
capture
images
against a wonderfully
luminous
backdrop.
Don't forget
to
set
the
aperture
2
as
fully
open
as
possible.
By
making
the
most
of backlighting
(shooting
the
subject
against light),
you
can
take
an
impressive
portrait -
using
the
hair
to
create
a
shining
"halo"
effect.
'L"
I
08
I