
Owner's Manual
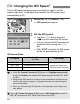
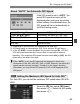
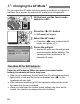
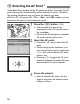
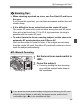
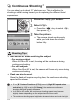
Table Of Contents
- Quick Start Guide
- Instruction Manual
- Conventions Used in This Manual
- Table of Contents
- Quick Start Guide
- Supplied Accessories
- Parts & Controls
- Getting Started
- Attaching the Strap
- Charging the Battery
- Installing / Removing the Battery
- Power On
- Date & Time Set
- Setting the Language
- Installing & Removing Memory Card
- Attaching & Detaching a Lens
- Lens Image Stabilizer
- Basic Operation
- Using the Quick Control Screen
- Menu Operations
- Formatting a Memory Card
- Switching the LCD Monitor Display
- Basic Shooting & Image Playback
- Advanced Shooting Operations
- Program AE
- Changing the ISO Speed
- Using the Flash
- Changing the AF Mode
- Selecting the AF Point
- Continuous Shooting
- Self-Timer
- Setting Image Quality
- Selecting a Picture Style
- Action Shots
- Changing Depth of Field
- Manual Exposure
- Automatic Depth of Field
- Changing the Metering Mode
- Setting Exposure Compensation
- Auto Exposure Bracketing
- Customizing a Picture Style
- Registering a Picture Style
- Setting the Color Space
- AE Lock
- FE Lock
- Setting the White Balance
- White Balance Correction
- Auto Lighting Optimizer
- Lens Peripheral Illumination Correction
- Preventing Camera Shake
- Live View Shooting
- Shooting Movies
- Handy Features
- Silencing the Beeper
- Card Reminder
- Setting Image Preview Time
- Setting Auto Power-Off Time
- Adjusting LCD Monitor Brightness
- File Numbering Methods
- Auto Rotate of Vertical Images
- Checking Camera Settings
- Restore Default Settings
- Preventing the LCD Monitor from Turning Off Automatically
- Changing the Shooting Settings Screen Color
- Setting the Flash
- Automatic Sensor Cleaning
- Appending Dust Delete Data
- Manual Sensor Cleaning
- Image Playback
- Printing Images
- Customizing the Camera
- Reference
- Troubleshooting
- Error Codes
- System Accessory Map
- Specs
- Index
- Quick Reference Guide
- Macro Photography Made Easy
- Using Image Stabilizer Lenses for Better Results
- Scan of Supplied CD-ROMs
- Software Installation Warning
- Warranty

65
D Using the Built-in Flash
If the subject is far away, increase the ISO speed.
By increasing the ISO speed, you can extend the flash range.
In bright light, decrease the ISO speed.
If the exposure setting in the viewfinder blinks, decrease the ISO speed.
Detach the lens hood and keep at least 1 meter/3.3 feet away
from the subject.
If the lens has a hood attached or you are too close to the subject,
the bottom of the picture might look dark due to the obstructed flash.
For important shots, check the image on the LCD monitor to make
sure the flash exposure looks good (not dark at the bottom).
Using the red-eye reduction lamp before taking a flash picture can
reduce red eye.
Red-eye reduction will work in any shooting mode except <7> <3>
<5> <k>.
Under the [1] tab, select [Red-eye
reduc.], then press <0>. Select
[Enable], then press <0>.
For flash photography, when you
press the shutter button halfway, the
red-eye reduction lamp will light. Then
when you press the shutter button
completely, the picture will be taken.
Shooting Tips
3 Using Red-eye Reduction
The red-eye reduction feature is most effective when the subject looks at
the red-eye reduction lamp, when the room is well lit, or when you go
closer to the subject.
When you press the shutter button halfway, the
viewfinder display on the bottom will gradually turn
off. For best results, take the picture after this display
turns off.
The effectiveness of red-eye reduction varies depending on the subject.