
Owner's Manual
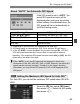
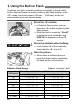
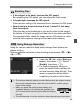
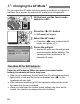
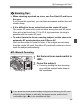
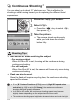
Table Of Contents
- Quick Start Guide
- Instruction Manual
- Conventions Used in This Manual
- Table of Contents
- Quick Start Guide
- Supplied Accessories
- Parts & Controls
- Getting Started
- Attaching the Strap
- Charging the Battery
- Installing / Removing the Battery
- Power On
- Date & Time Set
- Setting the Language
- Installing & Removing Memory Card
- Attaching & Detaching a Lens
- Lens Image Stabilizer
- Basic Operation
- Using the Quick Control Screen
- Menu Operations
- Formatting a Memory Card
- Switching the LCD Monitor Display
- Basic Shooting & Image Playback
- Advanced Shooting Operations
- Program AE
- Changing the ISO Speed
- Using the Flash
- Changing the AF Mode
- Selecting the AF Point
- Continuous Shooting
- Self-Timer
- Setting Image Quality
- Selecting a Picture Style
- Action Shots
- Changing Depth of Field
- Manual Exposure
- Automatic Depth of Field
- Changing the Metering Mode
- Setting Exposure Compensation
- Auto Exposure Bracketing
- Customizing a Picture Style
- Registering a Picture Style
- Setting the Color Space
- AE Lock
- FE Lock
- Setting the White Balance
- White Balance Correction
- Auto Lighting Optimizer
- Lens Peripheral Illumination Correction
- Preventing Camera Shake
- Live View Shooting
- Shooting Movies
- Handy Features
- Silencing the Beeper
- Card Reminder
- Setting Image Preview Time
- Setting Auto Power-Off Time
- Adjusting LCD Monitor Brightness
- File Numbering Methods
- Auto Rotate of Vertical Images
- Checking Camera Settings
- Restore Default Settings
- Preventing the LCD Monitor from Turning Off Automatically
- Changing the Shooting Settings Screen Color
- Setting the Flash
- Automatic Sensor Cleaning
- Appending Dust Delete Data
- Manual Sensor Cleaning
- Image Playback
- Printing Images
- Customizing the Camera
- Reference
- Troubleshooting
- Error Codes
- System Accessory Map
- Specs
- Index
- Quick Reference Guide
- Macro Photography Made Easy
- Using Image Stabilizer Lenses for Better Results
- Scan of Supplied CD-ROMs
- Software Installation Warning
- Warranty

70
You can shoot up to about 3.7 shots per sec. This is effective for
shooting a child running toward you or capturing the different facial
expressions.
1
Press the <YiQ> button.
2
Select <i>.
Press the <U> key to select <i>,
then press <0>.
3
Take the picture.
The camera shoots continuously
while you hold down the shutter
button fully.
Also set the AF mode matching the subject.
• For moving subject
When AI Servo AF is set, focusing will be continuous during
continuous shooting.
• For still subjects
When One-Shot AF is set, the camera will focus only once during
continuous shooting.
Flash can also be used.
Since the flash will require recycling time, the continuous shooting
speed will be slower.
i Continuous ShootingN
Shooting Tips
If he [7 Custom Functions (C.Fn)] menu’s [High ISO speed noise
reduction] (p.193) is set to [2: Strong], the maximum continuous
shooting burst will greatly decrease.
In AI Servo AF mode, the continuous shooting speed may become
slightly slower depending on the subject and the lens used.
The continuous shooting speed might also decrease indoors and under low light.