
All in One Printer User Manual
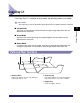


Table Of Contents
- Manuals for the Machine
- How This Manual Is Organized
- Contents
- Preface
- How To Use This Manual
- Operations and Terms Used in This Manual
- Legal Notices
- Before You Start Using This Machine
- Basic Operations
- What This Machine Can Do
- Overview of the imageRUNNER 5075/5065/5055/ 5050
- Using the Touch Panel Display
- Entering Characters from the Touch Panel Display
- Entering the Department ID and Password
- Using a Login Service
- Placing Originals
- Making Prints Using the Stack Bypass
- Multifunctional Operations
- Available Paper Stock
- Optional Equipment
- Customizing Settings
- What Are Additional Functions?
- Additional Functions Settings Table
- Specifying Common Settings
- Initial Function at Power ON
- Default Display after Auto Clear
- Tone Settings
- Display the Remaining Paper Message
- Inch Entry
- Auto Paper Selection/Auto Drawer Switching
- Identifying the Type of Paper in a Paper Source
- Paper Select Screen Priority
- Energy Saver Mode
- Energy Consumption in the Sleep Mode
- Distinguishing LTRR and STMT Originals
- Output Tray Designation
- Setting the Printing Priority
- Image Form
- User-Defined Text for Page Numbers and Watermarks
- Standard Paper for the Stack Bypass
- Standard Local Print Settings
- Changing the Language Shown on the Touch Panel Display
- Reversing the Contrast of the Touch Panel Display
- Alternating the Print Output (Offset Jobs)
- Inserting a Job Separation Sheet between Print Jobs
- Inserting a Job Separation Sheet between Copy Sets
- Job Duration Display
- Storing Paper Sizes for the Paper Deck
- Setting an Output Tray to Hold Different Paper Sizes
- Clean the Original Scanning Area Prompt
- Limiting Functions
- Forcing to Output Excess Tab Paper
- Returning the Common Settings to Their Defaults
- Timer Settings
- Adjusting the Machine
- Zoom Fine Adjustment
- Saddle Stitch Staple Repositioning
- Saddle Stitch Position Adjustment
- Adjusting Creep (Displacement) Correction
- Fold Placement Adjustment
- Exposure Recalibration
- Character/Background Contrast Adjustment
- Automatic Feeder Cleaning
- Wire Cleaning
- Drum Cleaning
- Displaying the Procedure for Cleaning the Original Scanning Area
- Checking Job and Device Status
- System Manager Settings
- Specifying the System Manager Settings
- Department ID Management
- Remote UI
- Device Information Settings
- Clearing the Message Board
- Auto Online/Offline
- Current Date and Time
- License Registration
- Copy Set Numbering Options
- Setting System Monitor Screen Restrictions
- MEAP Settings
- Specifying Device Information Delivery Settings
- Initializing All Data/Settings
- Displaying the Current Department ID/User Name
- Specifying Encrypted Secured Printing Settings
- USB Settings
- Setting the Display Method When Entering a Password
- Setting the Secure Watermark Mode
- Storing/Editing Irregular Paper Types
- PDL Selection (PnP)
- Specifying Settings for All User Inboxes
- Restricting Printer Jobs
- Routine Maintenance
- Troubleshooting
- Reducing the Frequency of Paper Jams
- Clearing Paper Jams
- Screens Indicating the Locations of Paper Jams
- Feeder
- Main Unit (Fixing Unit and Duplexing Unit)
- Stack Bypass
- Inside the Upper and Lower Right Covers
- Paper Drawer 1
- Paper Drawer 2
- Paper Drawers 3 and 4
- Paper Deck-AD1/Paper Deck-AE1 (Optional)
- Inside the Top Cover of the Finisher-AD1/Saddle Finisher-AD2 (Optional)
- Output Delivery Unit of the Finisher-AD1/Saddle Finisher-AD2 (Optional)
- Inside the Front Cover of the Saddle Finisher-AD2 (Optional)
- Saddle Stitcher Unit (Optional)
- Insertion Unit (Optional)
- Inside the Insertion Unit (Optional)
- Document Insertion/Folding Unit-F1 (Optional)
- Puncher Unit-AT1 (Optional)
- Copy Tray-L1 (Optional)
- Clearing Staple Jams
- List of Error Messages
- If Memory Becomes Full during Scanning
- Service Call Message
- When the Power Does Not Turn ON
- Appendix
Copy Tray-L1
3-29
3
Optional Equipment
Copy Tray-L1
If the Copy Tray-L1 is attached to the machine, the following modes are available:
IMPORTANT
The Copy Tray-L1 can be attached to the machine only if no optional finisher is attached.
■ Collate Mode
The prints are automatically collated into sets arranged in page order before they are
delivered to the output tray.
■ Group Mode
All prints of the same original page are grouped together into sets before they are
delivered to the output tray.
■ Rotate Mode
If originals of the same size are printed, the prints are automatically collated into sets
arranged in page order, and are output in alternating directions to the output tray.
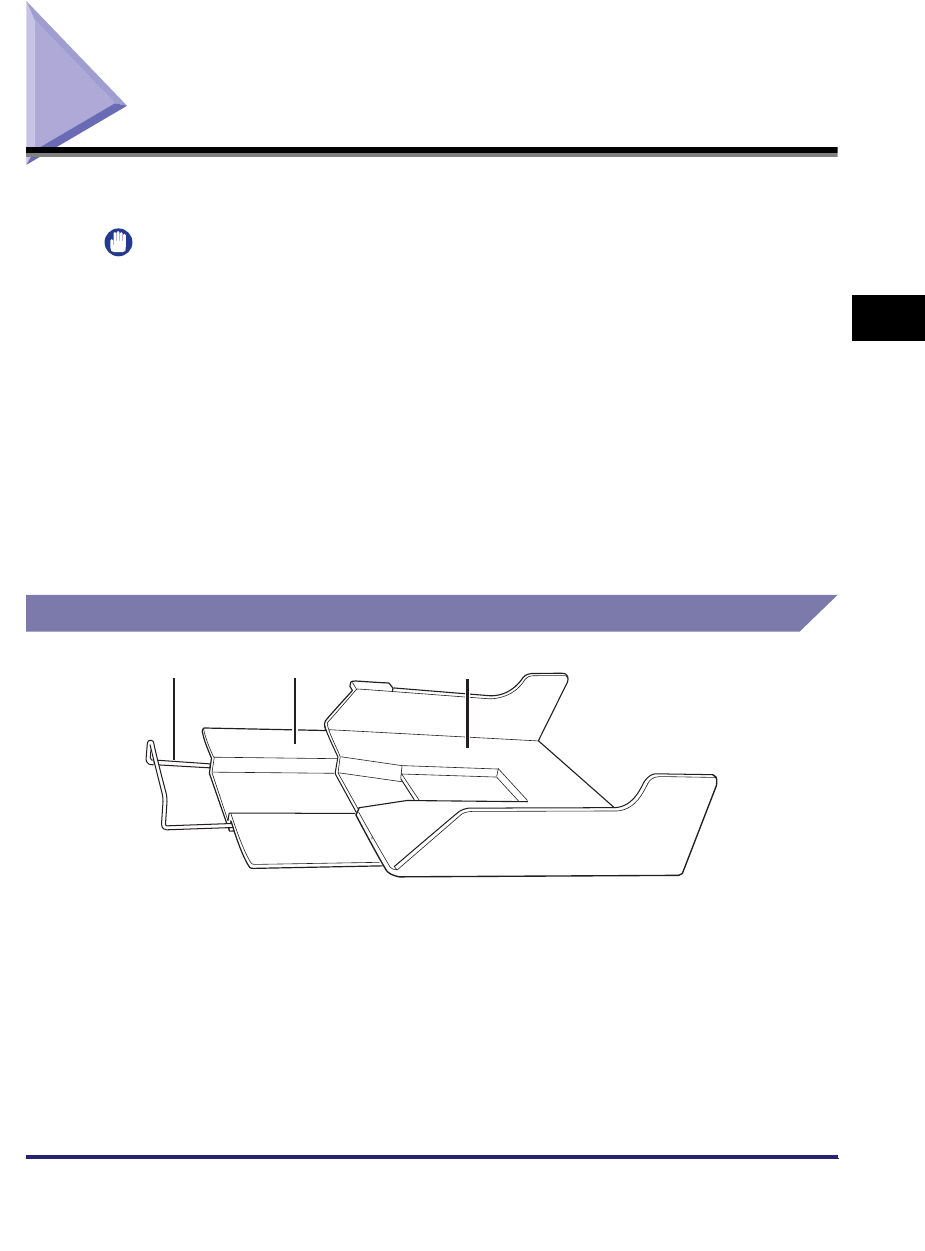
Parts and Their Functions
a Auxiliary Wire
Pull out the auxiliary wire if you are printing on
paper larger than 11" x 17".
b Auxiliary Tray
Pull out the auxiliary tray if you are printing on
large size paper (11" x 17", LGL, or LTRR).
c Output Tray
Prints are output to this tray.
a
b
c