
Owner's Manual
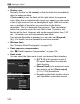
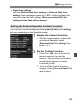
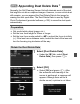

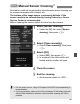
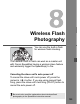
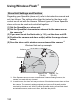
Table Of Contents
- Quick Reference Guide
- Instruction Manual
- Conventions Used in This Manual
- Table of Contents
- Quick Start Guide
- Supplied Accessories
- Parts & Controls
- Getting Started
- Attaching the Strap
- Charging the Battery
- Installing / Removing the Battery
- Installing / Removing a Memory Card
- Using the LCD Monitor
- Power On
- Date & Time Set
- Setting the Language
- Attaching & Detaching a Lens
- Lens Image Stabilizer
- Basic Operation
- Using the Quick Control Shooting Functions
- Menu Operations
- Formatting a Memory Card
- Switching the LCD Monitor Display
- Feature Guide
- Basic Shooting & Image Playback
- Advanced Shooting Operations
- Program AE
- Setting the Image-Recording Quality
- Changing the ISO Speed
- Changing the AF Mode
- Selecting the AF Point
- Subjects Difficult to Focus
- Continuous Shooting
- Self-Timer
- Using the Built-in Flash
- Action Shots
- Changing Depth of Field
- Manual Exposure
- Automatic Depth of Field
- Changing the Metering Mode
- Setting Exposure Compensation
- Auto Exposure Bracketing
- Locking the Exposure
- Locking the Flash Exposure
- Correcting the Image’s Dark Corners
- Customizing Image Characteristics
- Registering Preferred Image Characteristics
- Matching the Light Source
- Adjusting the Color Tone for the Light Source
- Setting the Color Reproduction Range
- Mirror Lock-up to Reduce Camera Shake
- Live View Shooting
- Shooting Movies
- Handy Features
- Silencing the Beeper
- Card Reminder
- Setting Image Review Time
- Setting Auto Power-Off Time
- Adjusting LCD Monitor Brightness
- Creating and Selecting a Folder
- File Numbering Methods
- Setting Copyright Information
- Auto Rotate of Vertical Images
- Checking Camera Settings
- Restore Default Settings
- Turning the LCD Monitor Off / On
- Changing the Shooting Settings Screen Color
- Setting the Flash
- Automatic Sensor Cleaning
- Appending Dust Delete Data
- Manual Sensor Cleaning
- Wireless Flash Photography
- Image Playback
- Post-Processing Images
- Printing Images
- Customizing the Camera
- Reference
- Troubleshooting
- Error Codes
- Specs
- Software Start Guide
- Quick Reference Guide
- Index
- Do More with Macro
- Great Photography IS Easy
- Flash Classroom
- Scans of CD-ROMs
- Lens Warranty
- Camera Warranty

187
Dust which could not be removed by the automatic sensor cleaning can
be removed manually with a blower, etc.
The surface of the image sensor is extremely delicate. If the
sensor needs to be cleaned directly, having it done by a Canon
Service Center is recommended.
Before cleaning the sensor, detach the lens from the camera.
1
Select [Sensor cleaning].
Under the [6] tab, select [Sensor
cleaning], then press <0>.
2
Select [Clean manually].
Select [Clean manually], then press
<0>.
3
Select [OK].
Select [OK], then press <0>.
In a moment, the reflex mirror will
lockup and the shutter will open.
4
Clean the sensor.
5
End the cleaning.
Set the power switch to <2>.
3 Manual Sensor CleaningN
For the power source, using AC Adapter Kit ACK-E8 (sold separately) is
recommended.
If you use a battery, make sure it is fully recharged. If the battery grip with
size-AA/LR6 batteries is attached, manual sensor cleaning will not be
possible.