
Owner's Manual

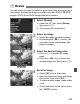
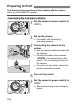
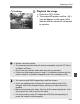
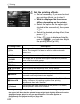
Table Of Contents
- Quick Reference Guide
- Instruction Manual
- Conventions Used in This Manual
- Table of Contents
- Quick Start Guide
- Supplied Accessories
- Parts & Controls
- Getting Started
- Attaching the Strap
- Charging the Battery
- Installing / Removing the Battery
- Installing / Removing a Memory Card
- Using the LCD Monitor
- Power On
- Date & Time Set
- Setting the Language
- Attaching & Detaching a Lens
- Lens Image Stabilizer
- Basic Operation
- Using the Quick Control Shooting Functions
- Menu Operations
- Formatting a Memory Card
- Switching the LCD Monitor Display
- Feature Guide
- Basic Shooting & Image Playback
- Advanced Shooting Operations
- Program AE
- Setting the Image-Recording Quality
- Changing the ISO Speed
- Changing the AF Mode
- Selecting the AF Point
- Subjects Difficult to Focus
- Continuous Shooting
- Self-Timer
- Using the Built-in Flash
- Action Shots
- Changing Depth of Field
- Manual Exposure
- Automatic Depth of Field
- Changing the Metering Mode
- Setting Exposure Compensation
- Auto Exposure Bracketing
- Locking the Exposure
- Locking the Flash Exposure
- Correcting the Image’s Dark Corners
- Customizing Image Characteristics
- Registering Preferred Image Characteristics
- Matching the Light Source
- Adjusting the Color Tone for the Light Source
- Setting the Color Reproduction Range
- Mirror Lock-up to Reduce Camera Shake
- Live View Shooting
- Shooting Movies
- Handy Features
- Silencing the Beeper
- Card Reminder
- Setting Image Review Time
- Setting Auto Power-Off Time
- Adjusting LCD Monitor Brightness
- Creating and Selecting a Folder
- File Numbering Methods
- Setting Copyright Information
- Auto Rotate of Vertical Images
- Checking Camera Settings
- Restore Default Settings
- Turning the LCD Monitor Off / On
- Changing the Shooting Settings Screen Color
- Setting the Flash
- Automatic Sensor Cleaning
- Appending Dust Delete Data
- Manual Sensor Cleaning
- Wireless Flash Photography
- Image Playback
- Post-Processing Images
- Printing Images
- Customizing the Camera
- Reference
- Troubleshooting
- Error Codes
- Specs
- Software Start Guide
- Quick Reference Guide
- Index
- Do More with Macro
- Great Photography IS Easy
- Flash Classroom
- Scans of CD-ROMs
- Lens Warranty
- Camera Warranty

237
Preparing to Print
6
Playback the image.
Press the <x> button.
The image will appear, and the <w>
icon will appear on the upper left to
indicate that the camera is connected
to a printer.
w
PictBridge
Movies cannot be printed.
The camera cannot be used with printers compatible only with CP Direct
or Bubble Jet Direct.
Do not use any interface cable other than the one provided.
If there is a long beeping sound in step 5, it indicates a problem with the
printer. Resolve he problem displayed by the error message (p.244).
You can also print RAW images taken with this camera.
If you use a battery pack to power the camera, make sure it is fully
charged. With a fully-charged battery, printing up to about 4 hours is
possible.
Before disconnecting the cable, first turn off the camera and printer. Hold
the plug (not the cord) to pull out the cable.
For direct printing, using AC Adapter Kit ACK-E8 (sold separately) to
power the camera is recommended.