
Owner's Manual
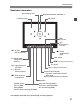
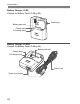

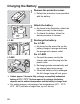
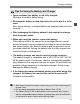

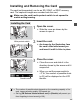
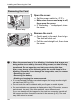
Table Of Contents
- Quick Reference Guide
- Instruction Manual
- Conventions Used in This Manual
- Table of Contents
- Quick Start Guide
- Supplied Accessories
- Parts & Controls
- Getting Started
- Attaching the Strap
- Charging the Battery
- Installing / Removing the Battery
- Installing / Removing a Memory Card
- Using the LCD Monitor
- Power On
- Date & Time Set
- Setting the Language
- Attaching & Detaching a Lens
- Lens Image Stabilizer
- Basic Operation
- Using the Quick Control Shooting Functions
- Menu Operations
- Formatting a Memory Card
- Switching the LCD Monitor Display
- Feature Guide
- Basic Shooting & Image Playback
- Advanced Shooting Operations
- Program AE
- Setting the Image-Recording Quality
- Changing the ISO Speed
- Changing the AF Mode
- Selecting the AF Point
- Subjects Difficult to Focus
- Continuous Shooting
- Self-Timer
- Using the Built-in Flash
- Action Shots
- Changing Depth of Field
- Manual Exposure
- Automatic Depth of Field
- Changing the Metering Mode
- Setting Exposure Compensation
- Auto Exposure Bracketing
- Locking the Exposure
- Locking the Flash Exposure
- Correcting the Image’s Dark Corners
- Customizing Image Characteristics
- Registering Preferred Image Characteristics
- Matching the Light Source
- Adjusting the Color Tone for the Light Source
- Setting the Color Reproduction Range
- Mirror Lock-up to Reduce Camera Shake
- Live View Shooting
- Shooting Movies
- Handy Features
- Silencing the Beeper
- Card Reminder
- Setting Image Review Time
- Setting Auto Power-Off Time
- Adjusting LCD Monitor Brightness
- Creating and Selecting a Folder
- File Numbering Methods
- Setting Copyright Information
- Auto Rotate of Vertical Images
- Checking Camera Settings
- Restore Default Settings
- Turning the LCD Monitor Off / On
- Changing the Shooting Settings Screen Color
- Setting the Flash
- Automatic Sensor Cleaning
- Appending Dust Delete Data
- Manual Sensor Cleaning
- Wireless Flash Photography
- Image Playback
- Post-Processing Images
- Printing Images
- Customizing the Camera
- Reference
- Troubleshooting
- Error Codes
- Specs
- Software Start Guide
- Quick Reference Guide
- Index
- Do More with Macro
- Great Photography IS Easy
- Flash Classroom
- Scans of CD-ROMs
- Lens Warranty
- Camera Warranty

Installing and Removing the Card
30
1
Open the cover.
Set the power switch to <2>.
Make sure the access lamp is off,
then open the cover.
If “Recording ...” is displayed, close
the cover.
2
Remove the card.
Gently push in the card, then let go.
The card will stick out.
Pull the card straight out, then close
the cover.
Removing the Card
Access lamp
When the access lamp is lit or blinking, it indicates that images are
being written to or read by the card, being erased, or data is being
transferred. Do not open the card slot cover during this time.
Also, never do any of the following while the access lamp is lit or
blinking. Otherwise, it can damage the image data, card, or camera.
• Removing the card.
• Removing the battery.
• Shaking or banging the camera around.
If he card already contains recorded images, the image number might
not start from 0001 (p.170).
Do not touch the card’s contacts with your fingers or metal objects.
If a card-related error message is displayed on the LCD monitor, remove
and reinsert he card. If the error persists, use a different card.
If you can transfer all the images on the card to a computer, transfer all
the images and then format the card wi h the camera (p.45). The card
may then return to normal.