
Owner's Manual

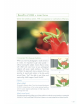


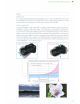
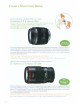
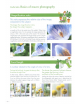
Table Of Contents
- Quick Reference Guide
- Instruction Manual
- Conventions Used in This Manual
- Table of Contents
- Quick Start Guide
- Supplied Accessories
- Parts & Controls
- Getting Started
- Attaching the Strap
- Charging the Battery
- Installing / Removing the Battery
- Installing / Removing a Memory Card
- Using the LCD Monitor
- Power On
- Date & Time Set
- Setting the Language
- Attaching & Detaching a Lens
- Lens Image Stabilizer
- Basic Operation
- Using the Quick Control Shooting Functions
- Menu Operations
- Formatting a Memory Card
- Switching the LCD Monitor Display
- Feature Guide
- Basic Shooting & Image Playback
- Advanced Shooting Operations
- Program AE
- Setting the Image-Recording Quality
- Changing the ISO Speed
- Changing the AF Mode
- Selecting the AF Point
- Subjects Difficult to Focus
- Continuous Shooting
- Self-Timer
- Using the Built-in Flash
- Action Shots
- Changing Depth of Field
- Manual Exposure
- Automatic Depth of Field
- Changing the Metering Mode
- Setting Exposure Compensation
- Auto Exposure Bracketing
- Locking the Exposure
- Locking the Flash Exposure
- Correcting the Image’s Dark Corners
- Customizing Image Characteristics
- Registering Preferred Image Characteristics
- Matching the Light Source
- Adjusting the Color Tone for the Light Source
- Setting the Color Reproduction Range
- Mirror Lock-up to Reduce Camera Shake
- Live View Shooting
- Shooting Movies
- Handy Features
- Silencing the Beeper
- Card Reminder
- Setting Image Review Time
- Setting Auto Power-Off Time
- Adjusting LCD Monitor Brightness
- Creating and Selecting a Folder
- File Numbering Methods
- Setting Copyright Information
- Auto Rotate of Vertical Images
- Checking Camera Settings
- Restore Default Settings
- Turning the LCD Monitor Off / On
- Changing the Shooting Settings Screen Color
- Setting the Flash
- Automatic Sensor Cleaning
- Appending Dust Delete Data
- Manual Sensor Cleaning
- Wireless Flash Photography
- Image Playback
- Post-Processing Images
- Printing Images
- Customizing the Camera
- Reference
- Troubleshooting
- Error Codes
- Specs
- Software Start Guide
- Quick Reference Guide
- Index
- Do More with Macro
- Great Photography IS Easy
- Flash Classroom
- Scans of CD-ROMs
- Lens Warranty
- Camera Warranty

Learn
,..ore about macro le'lses •
Tripod mount ring ]
L..--....:....-_---=----
_
00
se
the
veco
{nonzonto
~o,"ng
'5100 w
e
ewfi
de·
Usef
Ii
at imes
,.
e these
Perhaps
you
shoot
a
horizontal
composition,
then
feel
like
taking
a
similar
photo
in
a
verticol
framing.
With a
regular
tripod,
the
subject
position
through
the
viewfinder
inevitably
shifts
and
the
photographer
has
to
refocus
from
the
start.
With a
tripod
mount
ring,
however,
you
can
maintain
the
position
of
the
subject
in
the
viewfinder
-
for
on
easy,
instant
frame
change
to
a
vertical,
horizontal,
or
even
on
angled
composition.
Terms
Who
is
a tripod
mount
ring?
Tr,pods
are
nonno
y
o'ioched
d;rect!y
10
the
camero
body
lemes
equipped
WIth
0
noed
mount
"119
howeYer
ol\ow
the
tnpod
to
be
ot:oched
10
the
lens
rotl-er
thon
the
camero
body,
kco<dlngly,
the
camero
rololE!$
With
the
lens
ot
the
cOOs,
ond
olter
the
meao
ens
IS
ottached,
the
front/boc
weight
dis
burion
IS
imOfoved,
The
'esu~
is
steedy,
blur·free
photography
Tnpod
JTlOlJnt
flngs
ore
01/0
Ioble
for
\l1e
EF1
OOmm
f/28
/kao
USM,
ond
suppl
ed
WIth
the
Ef
180mm
1/3,5l
Macro
USM
ond
the
MP-E
65mm
1/2,8
1,5.
Mocropholo
lenses
28 I