
Owner's Manual
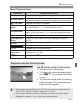

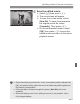

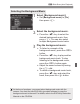

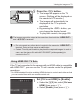
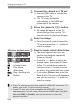
Table Of Contents
- Quick Reference Guide
- Instruction Manual
- Conventions Used in This Manual
- Table of Contents
- Quick Start Guide
- Supplied Accessories
- Parts & Controls
- Getting Started
- Attaching the Strap
- Charging the Battery
- Installing / Removing the Battery
- Installing / Removing a Memory Card
- Using the LCD Monitor
- Power On
- Date & Time Set
- Setting the Language
- Attaching & Detaching a Lens
- Lens Image Stabilizer
- Basic Operation
- Using the Quick Control Shooting Functions
- Menu Operations
- Formatting a Memory Card
- Switching the LCD Monitor Display
- Feature Guide
- Touch Screen Operations
- Basic Shooting & Image Playback
- Fully Automatic Shooting
- Full Auto Techniques
- Disabling Flash
- Creative Auto Shooting
- Shooting Portraits
- Shooting Landscapes
- Shooting Close-Ups
- Shooting Moving Subjects
- Shooting Night Portraits (with a Tripod)
- Shooting Night Scenes (Handheld)
- Shooting Backlit Scenes
- Quick Control
- Shoot by Ambience Selection
- Shoot by Lighting or Scene Type
- Image Playback
- Advanced Shooting Operations
- Program AE
- Setting the Image-Recording Quality
- Changing the ISO Speed
- Optimal Image Characteristics for the Subject
- Changing the AF Operation
- Selecting the AF Point
- Subjects Difficult to Focus
- Continuous Shooting
- Self-Timer
- Using the Built-in Flash
- Convey the Subject’s Movement
- Changing Depth of Field
- Manual Exposure
- Changing the Metering Mode
- Setting Exposure Compensation
- Auto Exposure Bracketing
- Locking the Exposure
- Locking the Flash Exposure
- Auto Correction of Brightness and Contrast
- Noise Reduction Settings
- Lens Peripheral Illumination / Chromatic Aberration Correction
- Customizing Image Characteristics
- Registering Preferred Image Characteristics
- Matching the Light Source
- Adjusting the Color Tone for the Light Source
- Setting the Color Reproduction Range
- Mirror Lockup to Reduce Camera Shake
- Live View Shooting
- Shooting Movies
- Handy Features
- Silencing the Beeper
- Card Reminder
- Setting Image Review Time
- Setting Auto Power-Off Time
- Adjusting LCD Monitor Brightness
- Creating and Selecting a Folder
- File Numbering Methods
- Setting Copyright Information
- Auto Rotate of Vertical Images
- Checking Camera Settings
- Restore Default Settings
- Preventing the LCD Monitor from Turning Off Automatically
- Changing the Shooting Settings Screen Color
- Setting the Flash
- Automatic Sensor Cleaning
- Appending Dust Delete Data
- Manual Sensor Cleaning
- Wireless Flash Photography
- Image Playback
- Searching for Images Quickly
- Magnified View
- Playing Back with the Touch Screen
- Rotating the Image
- Setting Ratings
- Quick Control During Playback
- Playing Movies
- Editing the Movie’s First and Last Scenes
- Slide Show (Auto Playback)
- Viewing the Images on a TV
- Protecting Images
- Erasing Images
- Shooting Information Display
- Post-Processing Images
- Printing Images
- Customizing the Camera
- Reference
- Troubleshooting
- Error Codes
- Specs
- Downloading Images to a Personal Computer
- Quick Reference Guide
- Index
- Do More with Macro
- Great Photography IS Easy
- Flash Classroom
- Scans of CD-ROMs
- Lens Warranty
- Camera Warranty

251
k Playing Movies
Movie Playback Panel
* When background music is set, the movie’s sound will not be played.
Tap [
7
] at the center of the screen.
X The movie will start playing.
To display the movie playback panel,
tap <s1> on the upper left of the
screen.
To pause the movie while it is playing,
tap the screen. The movie playback
panel will also appear.
Operation Playback Description
7 Play Pressing <0> toggles between play and stop.
8 Slow motion
Adjust the slow motion speed by pressing the <
U
> key. The
slow-motion speed is indicated at the upper right of the screen.
5 First frame Displays the movie’s first frame.
3 Previous
frame
Each time you press <0>, the previous frame is displayed.
If you hold down <0>, it will rewind the movie.
6 Next frame
Each time you press <0>, the movie will play frame-by-
frame. If you hold down <0>, it will fast forward the movie.
4 Last frame Displays the movie’s last frame.
Background
music*
Play back a movie with the selected background music
(p.257).
X Edit
Displays the editing screen (p.252).
Play back position
mm’ ss” Playback time (minutes:seconds)
9 Volume
You can adjust the built-in speaker’s (p.250) volume by
turning the <6> dial.
32
Pressing the <
M
> button returns to the single-image display.
Playback with the Touch Screen
With a fully-charged Battery Pack LP-E8, the continuous playback time
at 23°C/73°F will be as follows: approx. 2 hr. 30 min.
If you took a still photo while you shot the movie, the still photo will be
displayed for approx. 1 sec. during the movie playback.